Updated: 2026.5.1
| Contents |
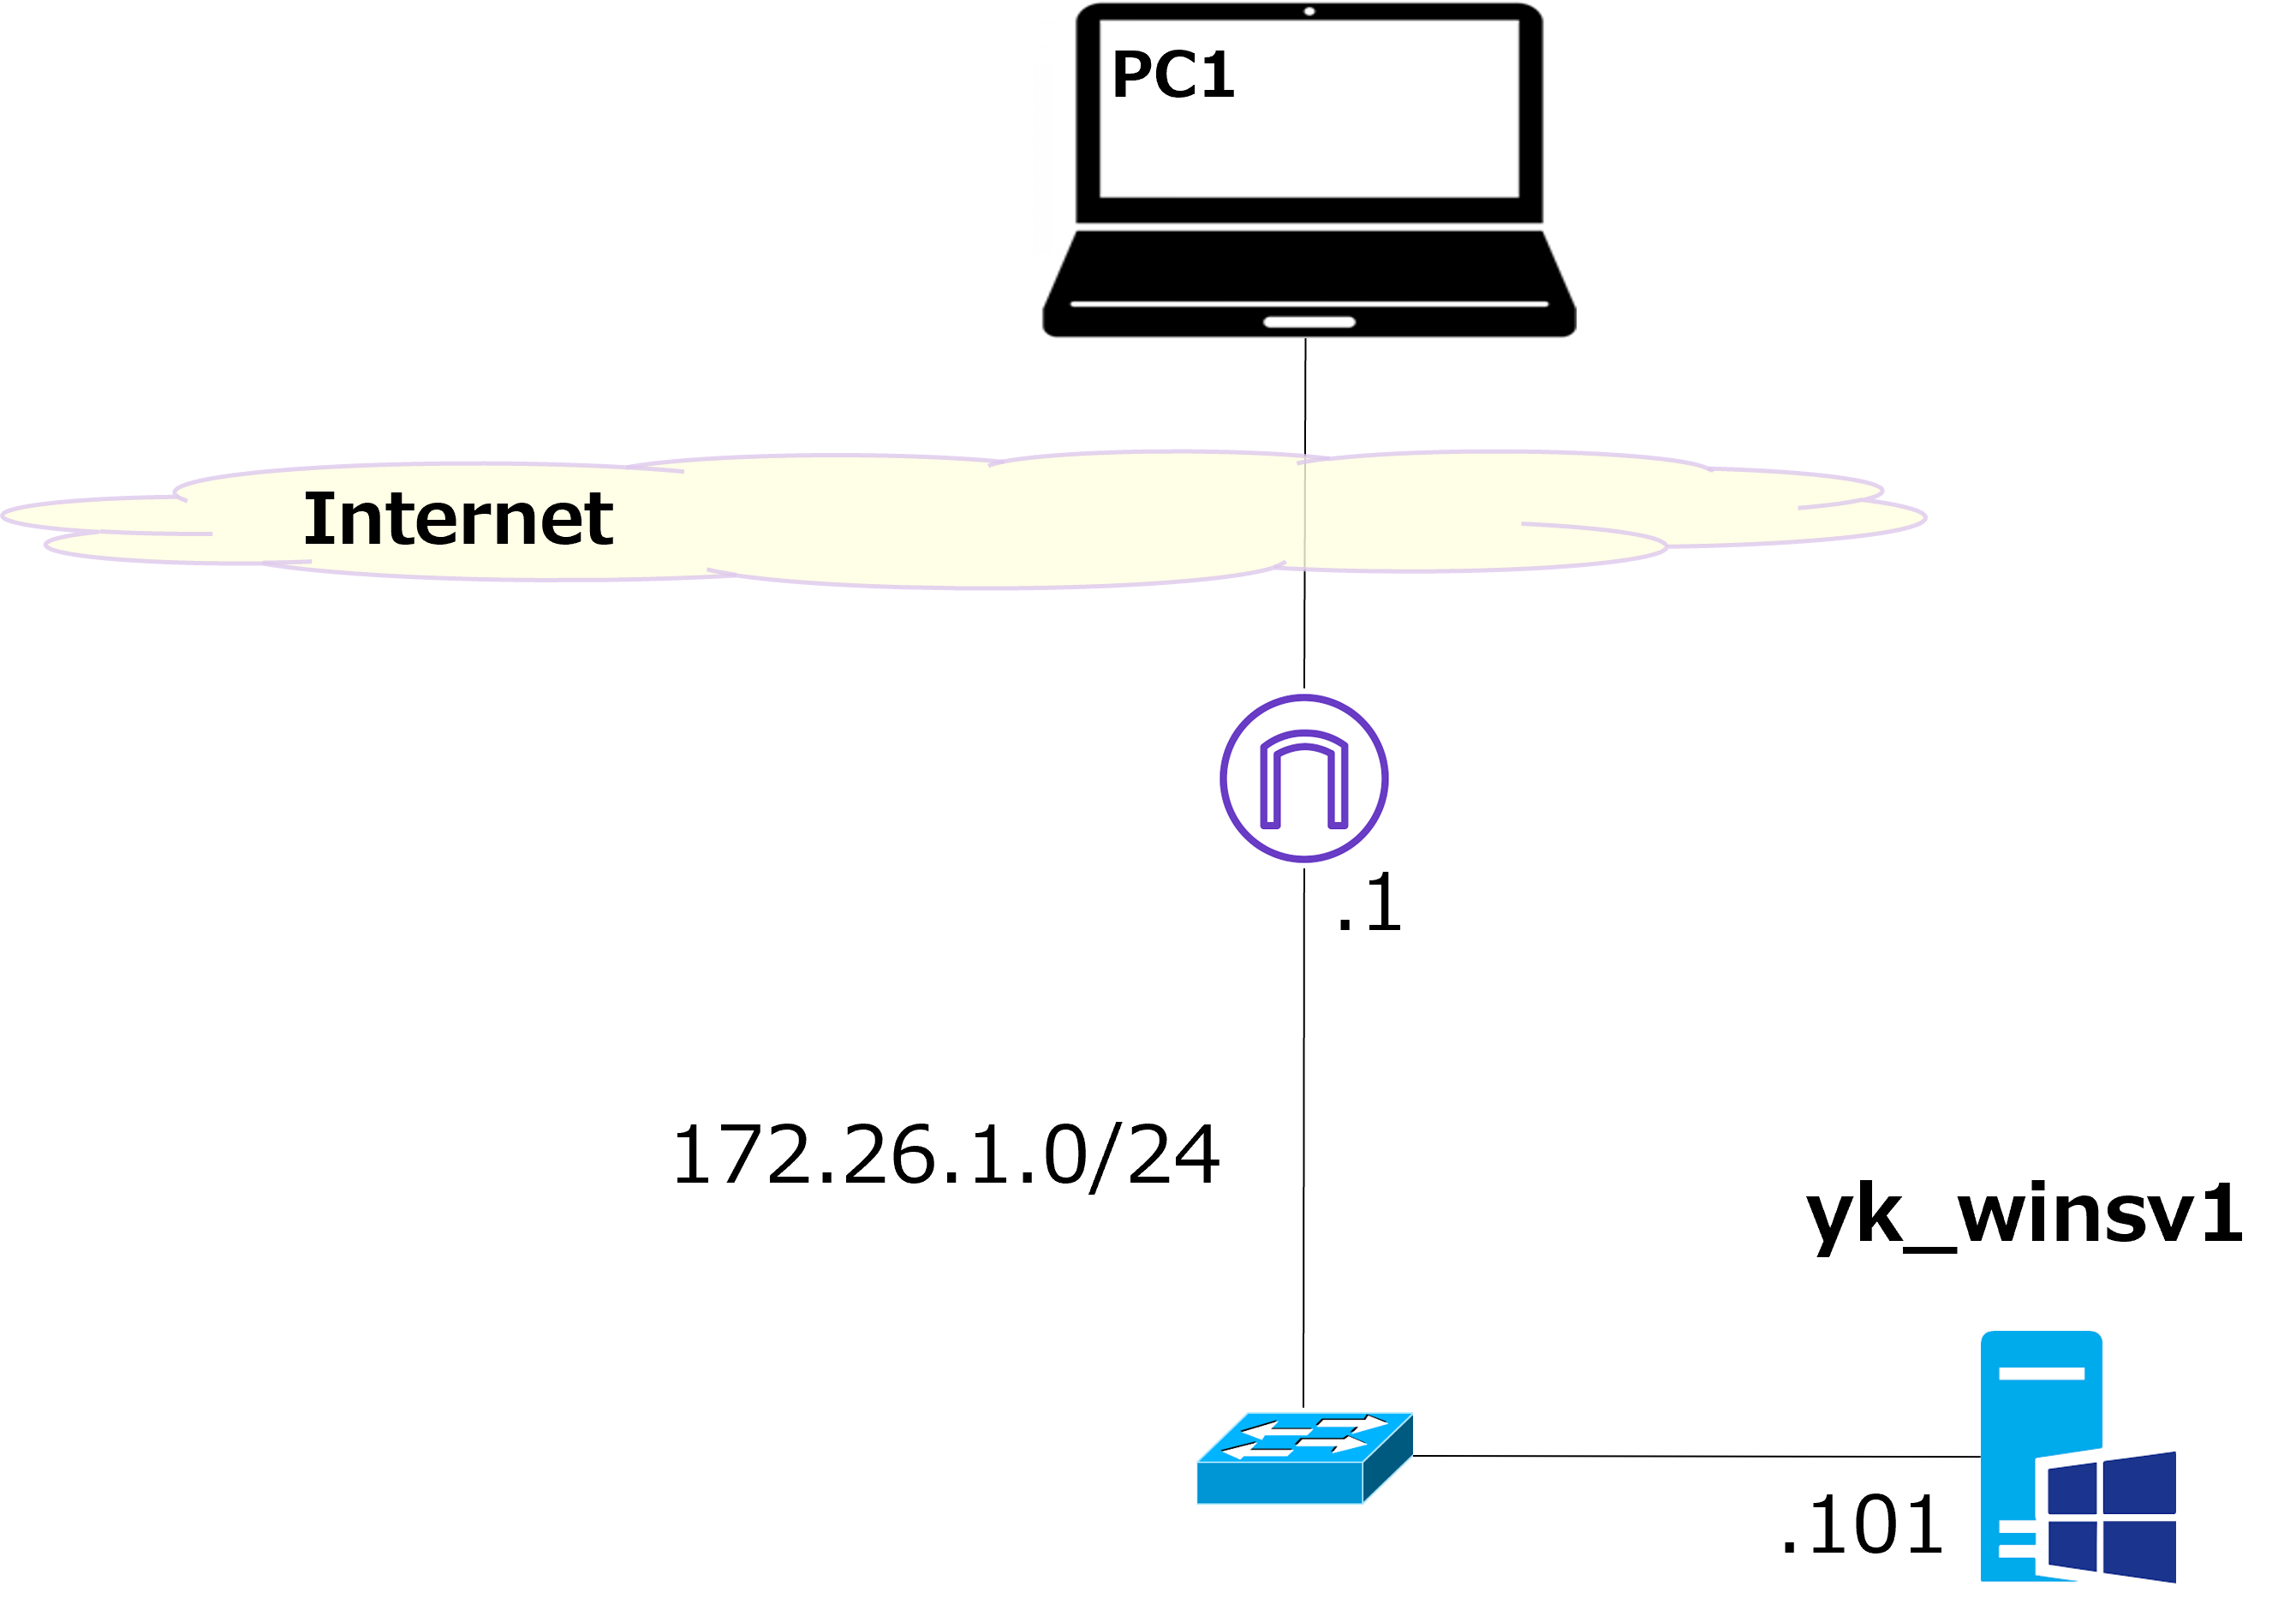
Network configuration overview
 |
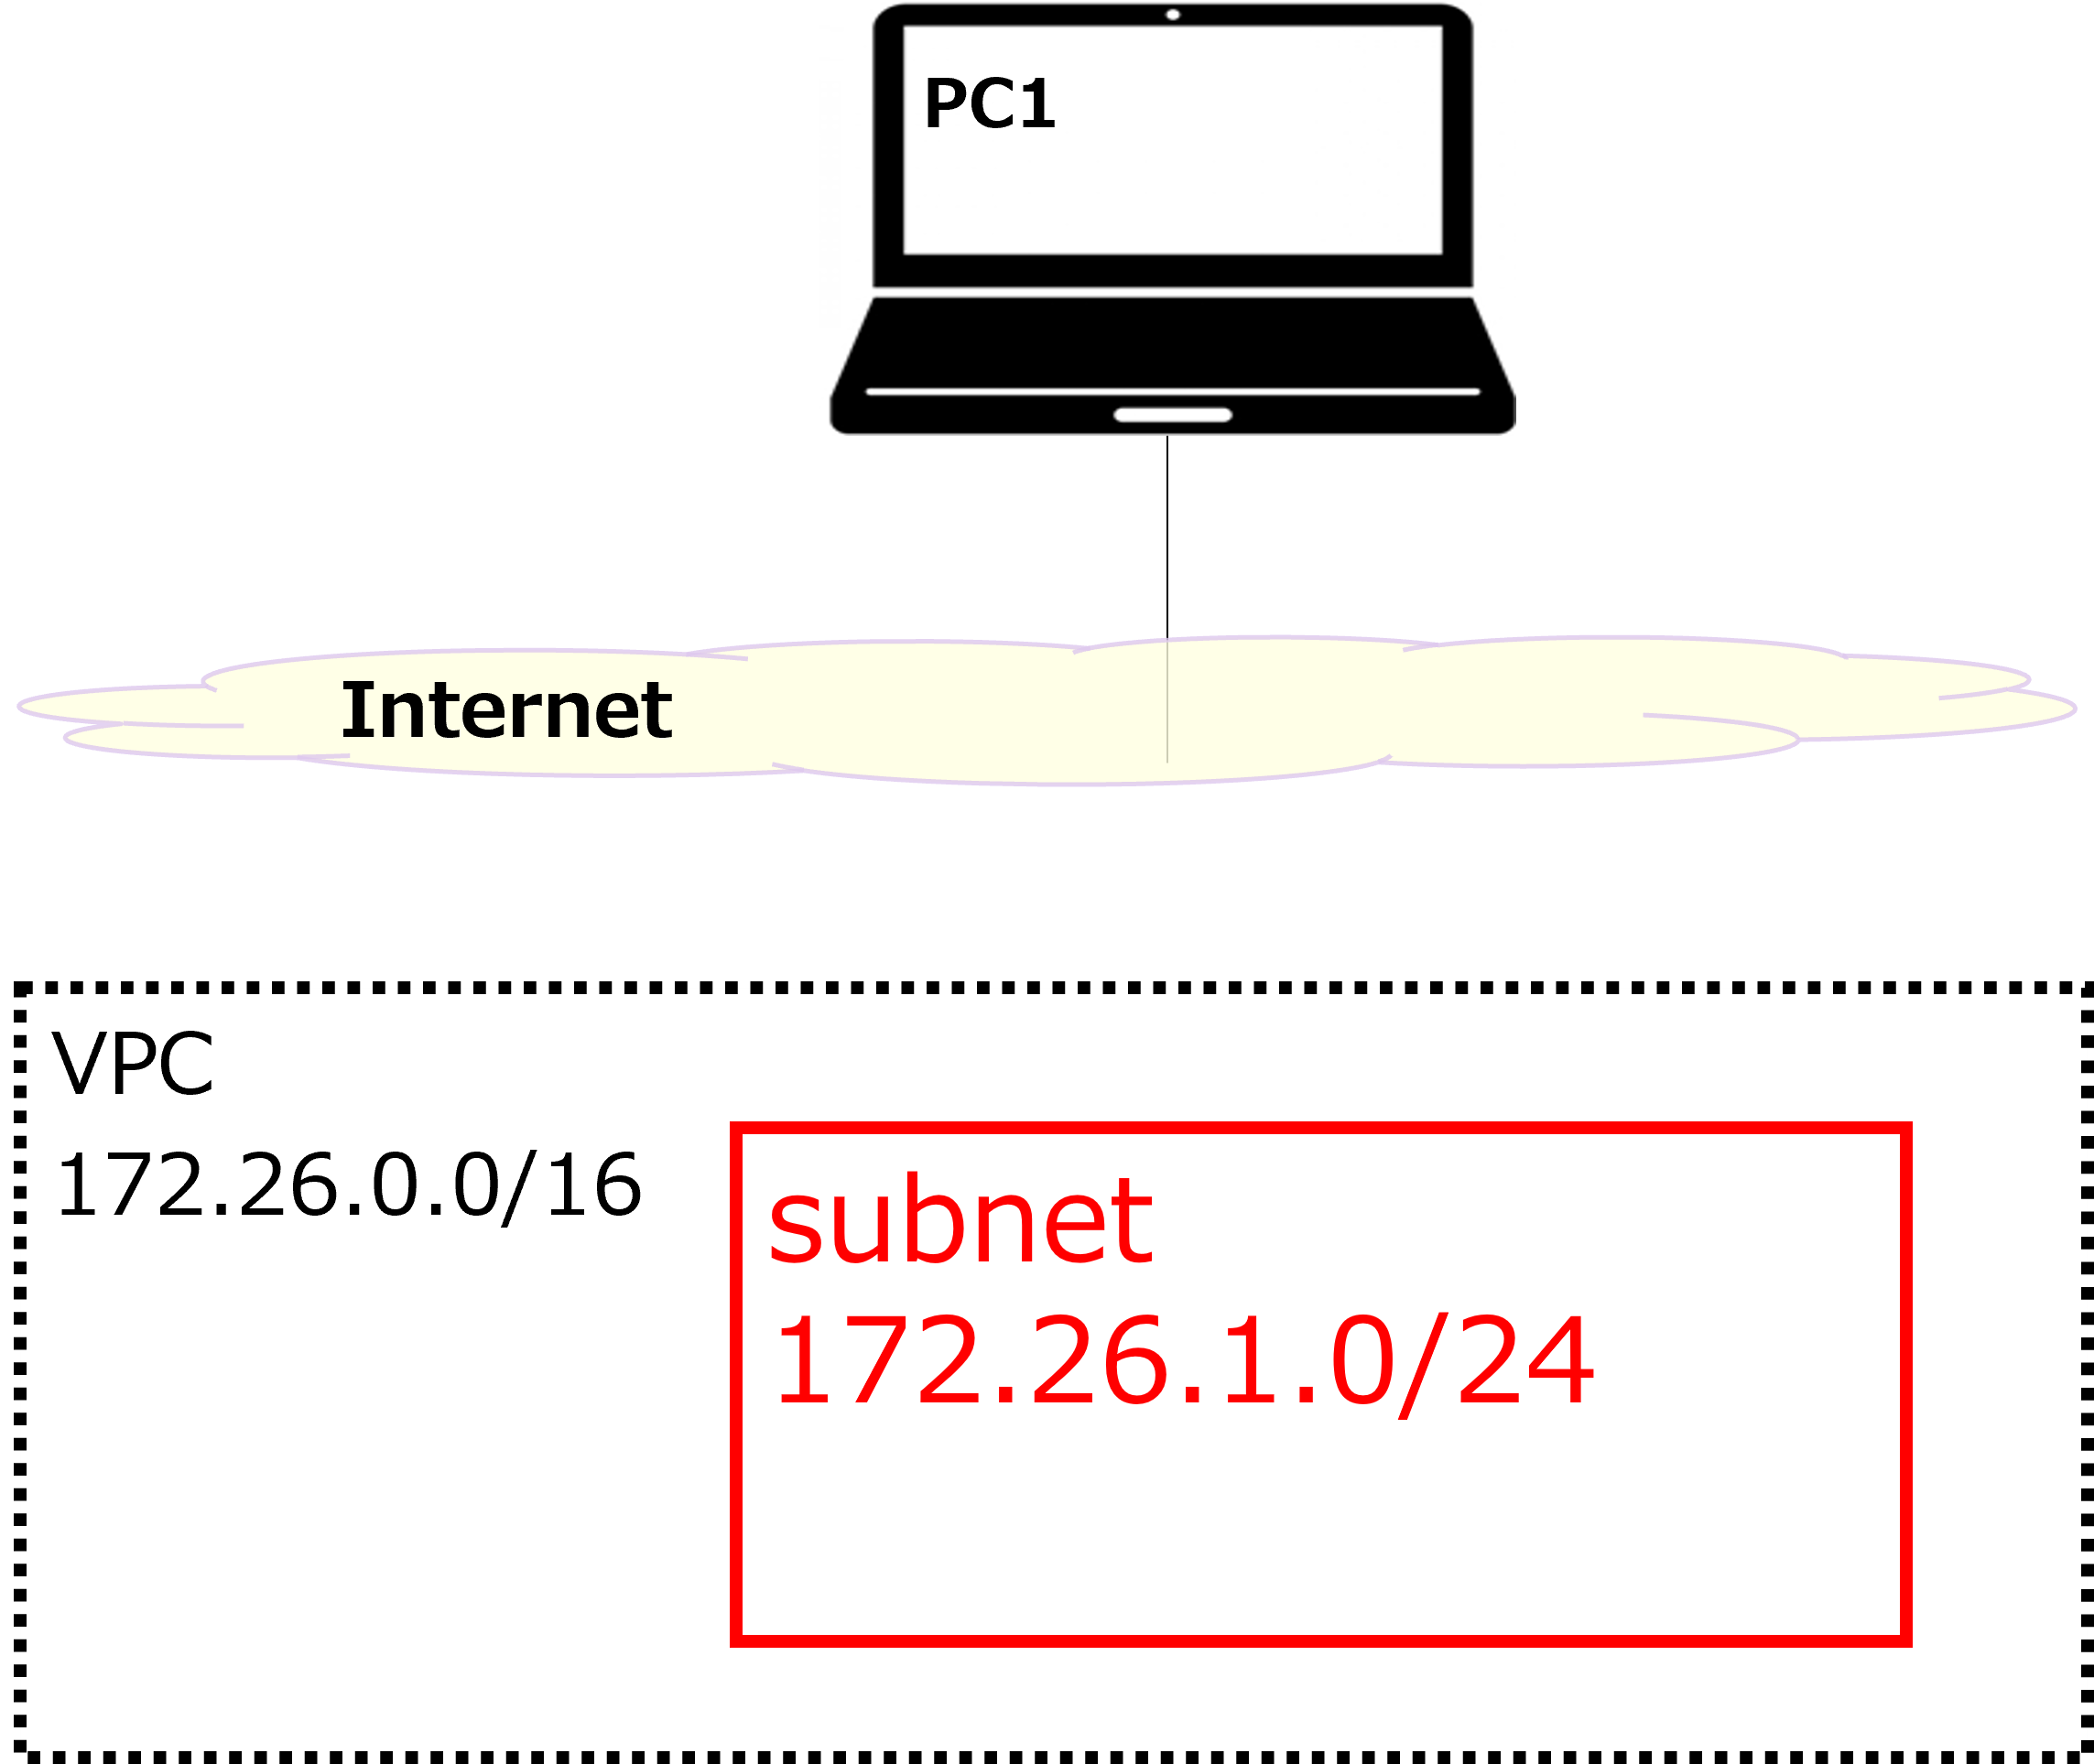
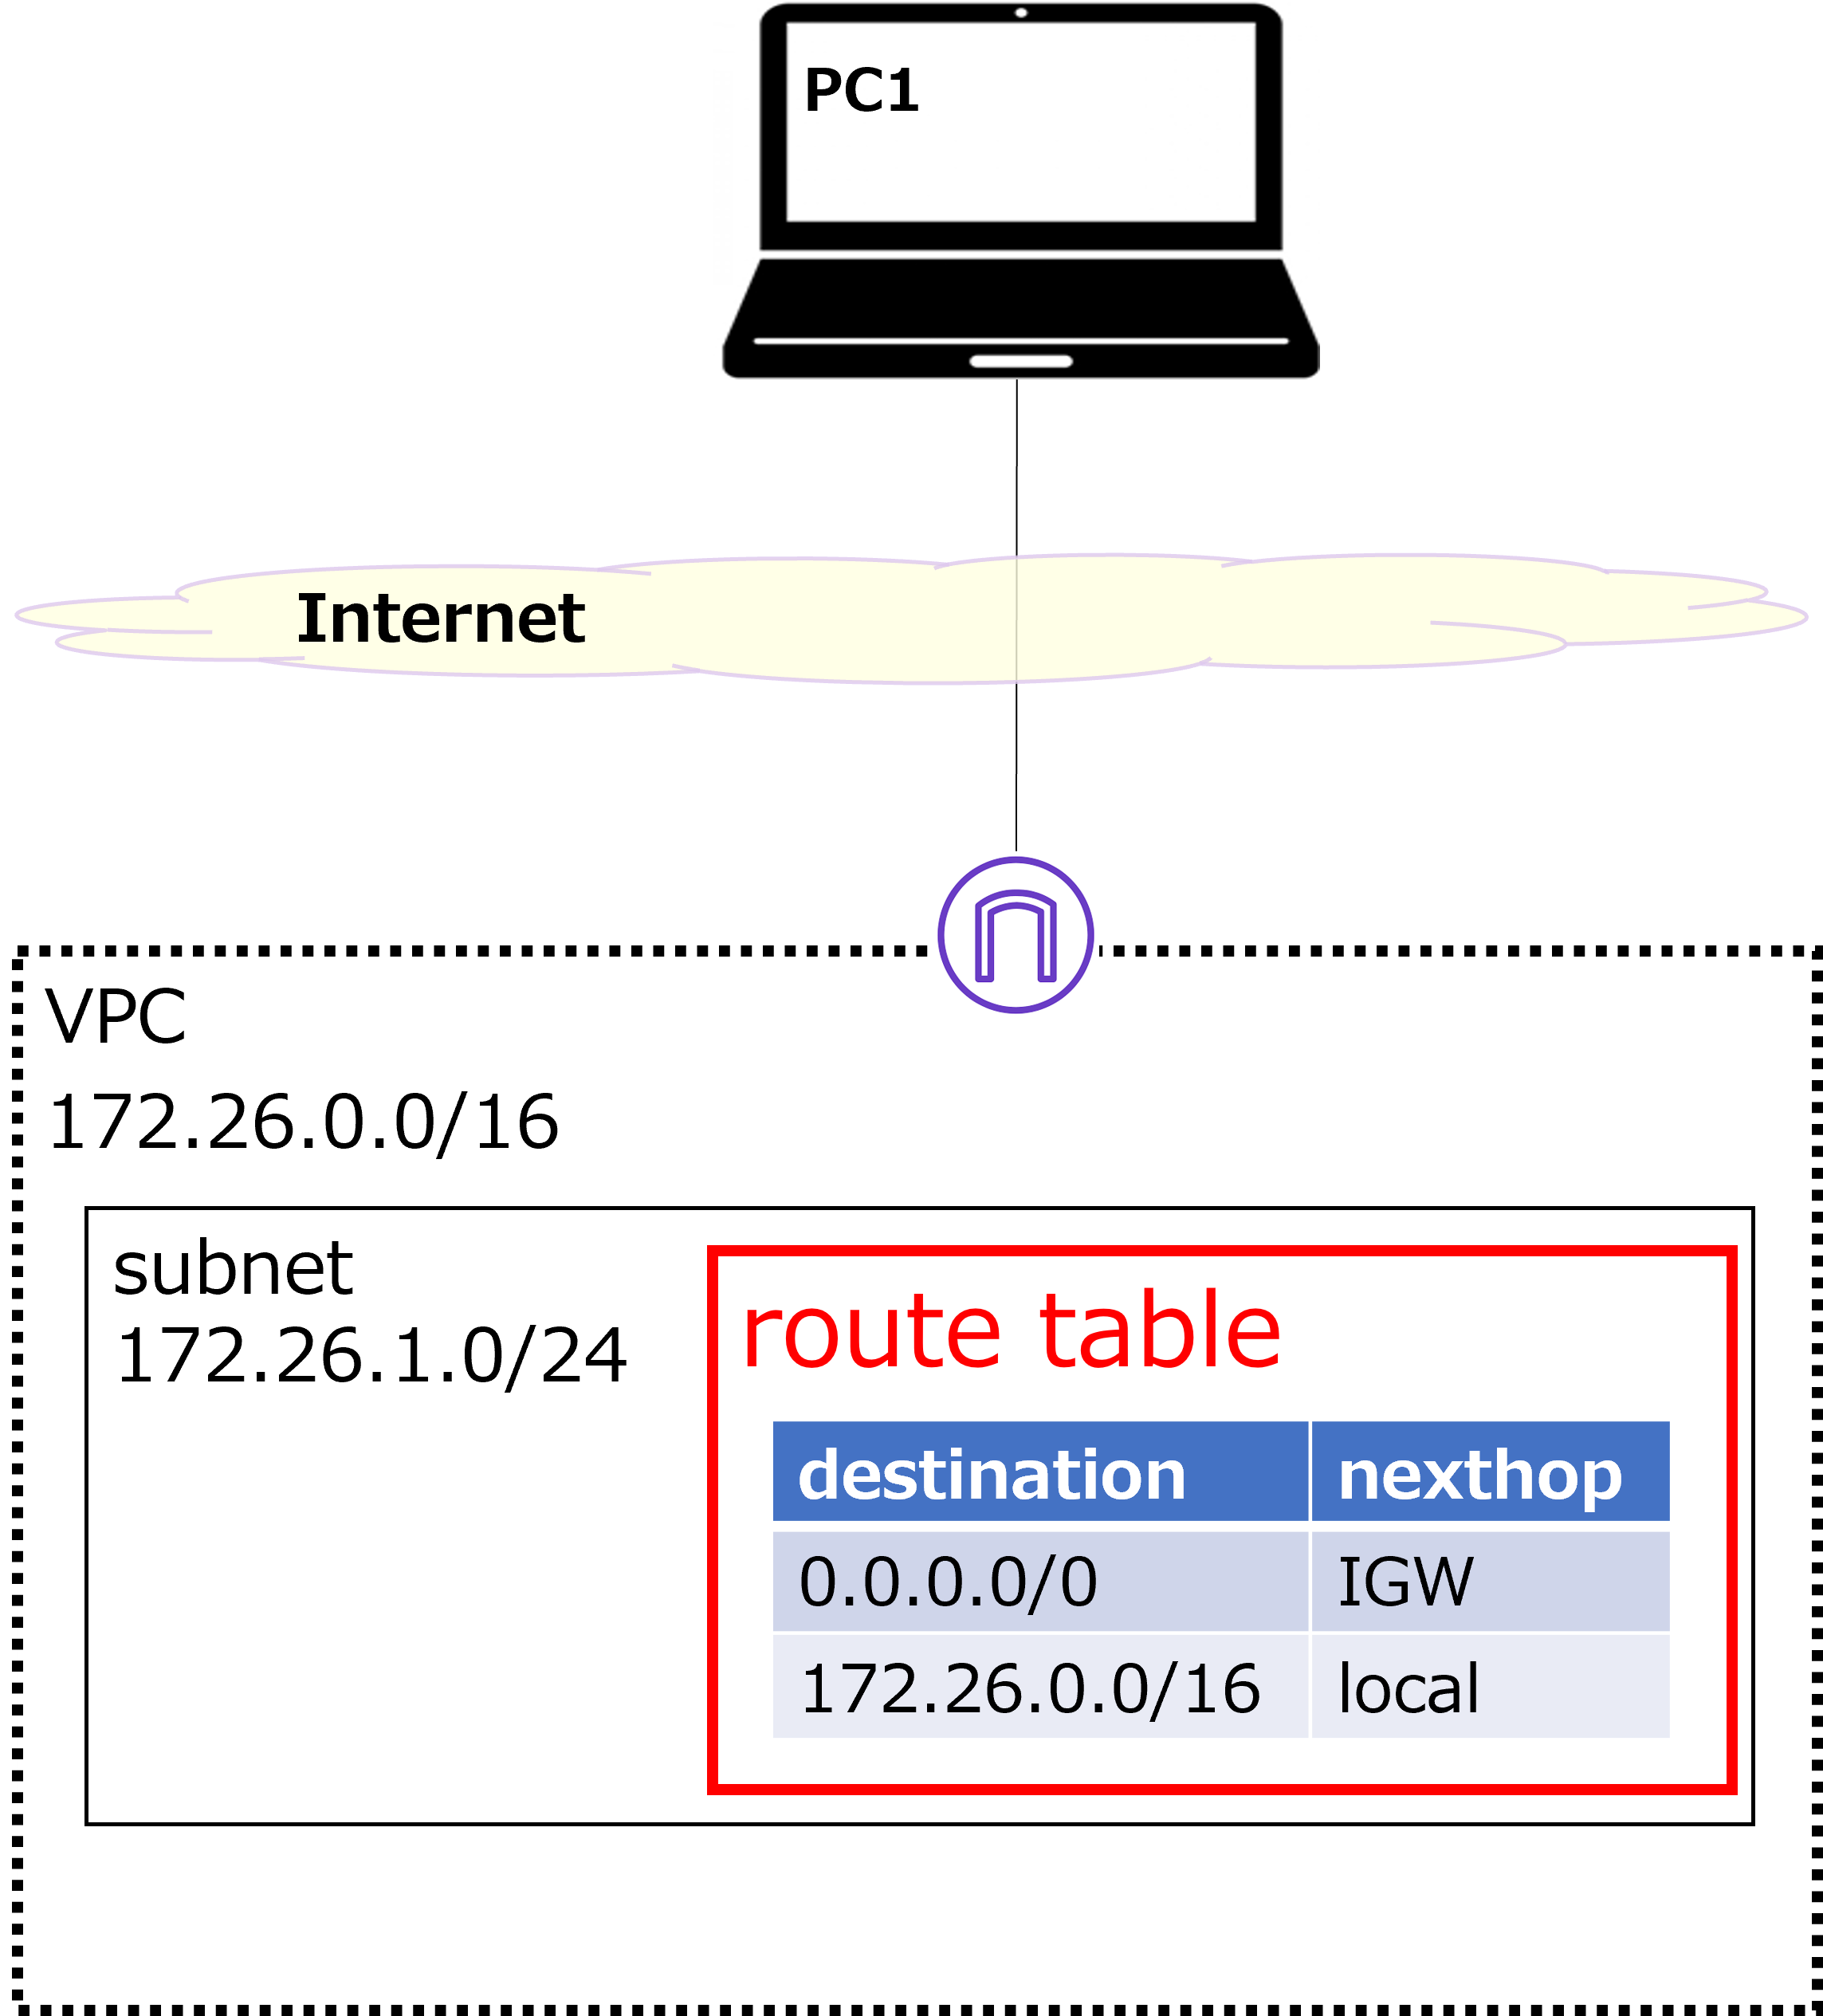
This time, we'll build a simple network like the one shown above. Everything above "Internet" uses your home PC and internet connection, so what we actually build on AWS is the part below "Internet". The goal is to connect from PC1 to a Windows VM (VM = Virtual Machine, hostname: YK-SV1) via RDP (Remote Desktop). |
 |
Hmm? ← What is this? ← What is this? |
|
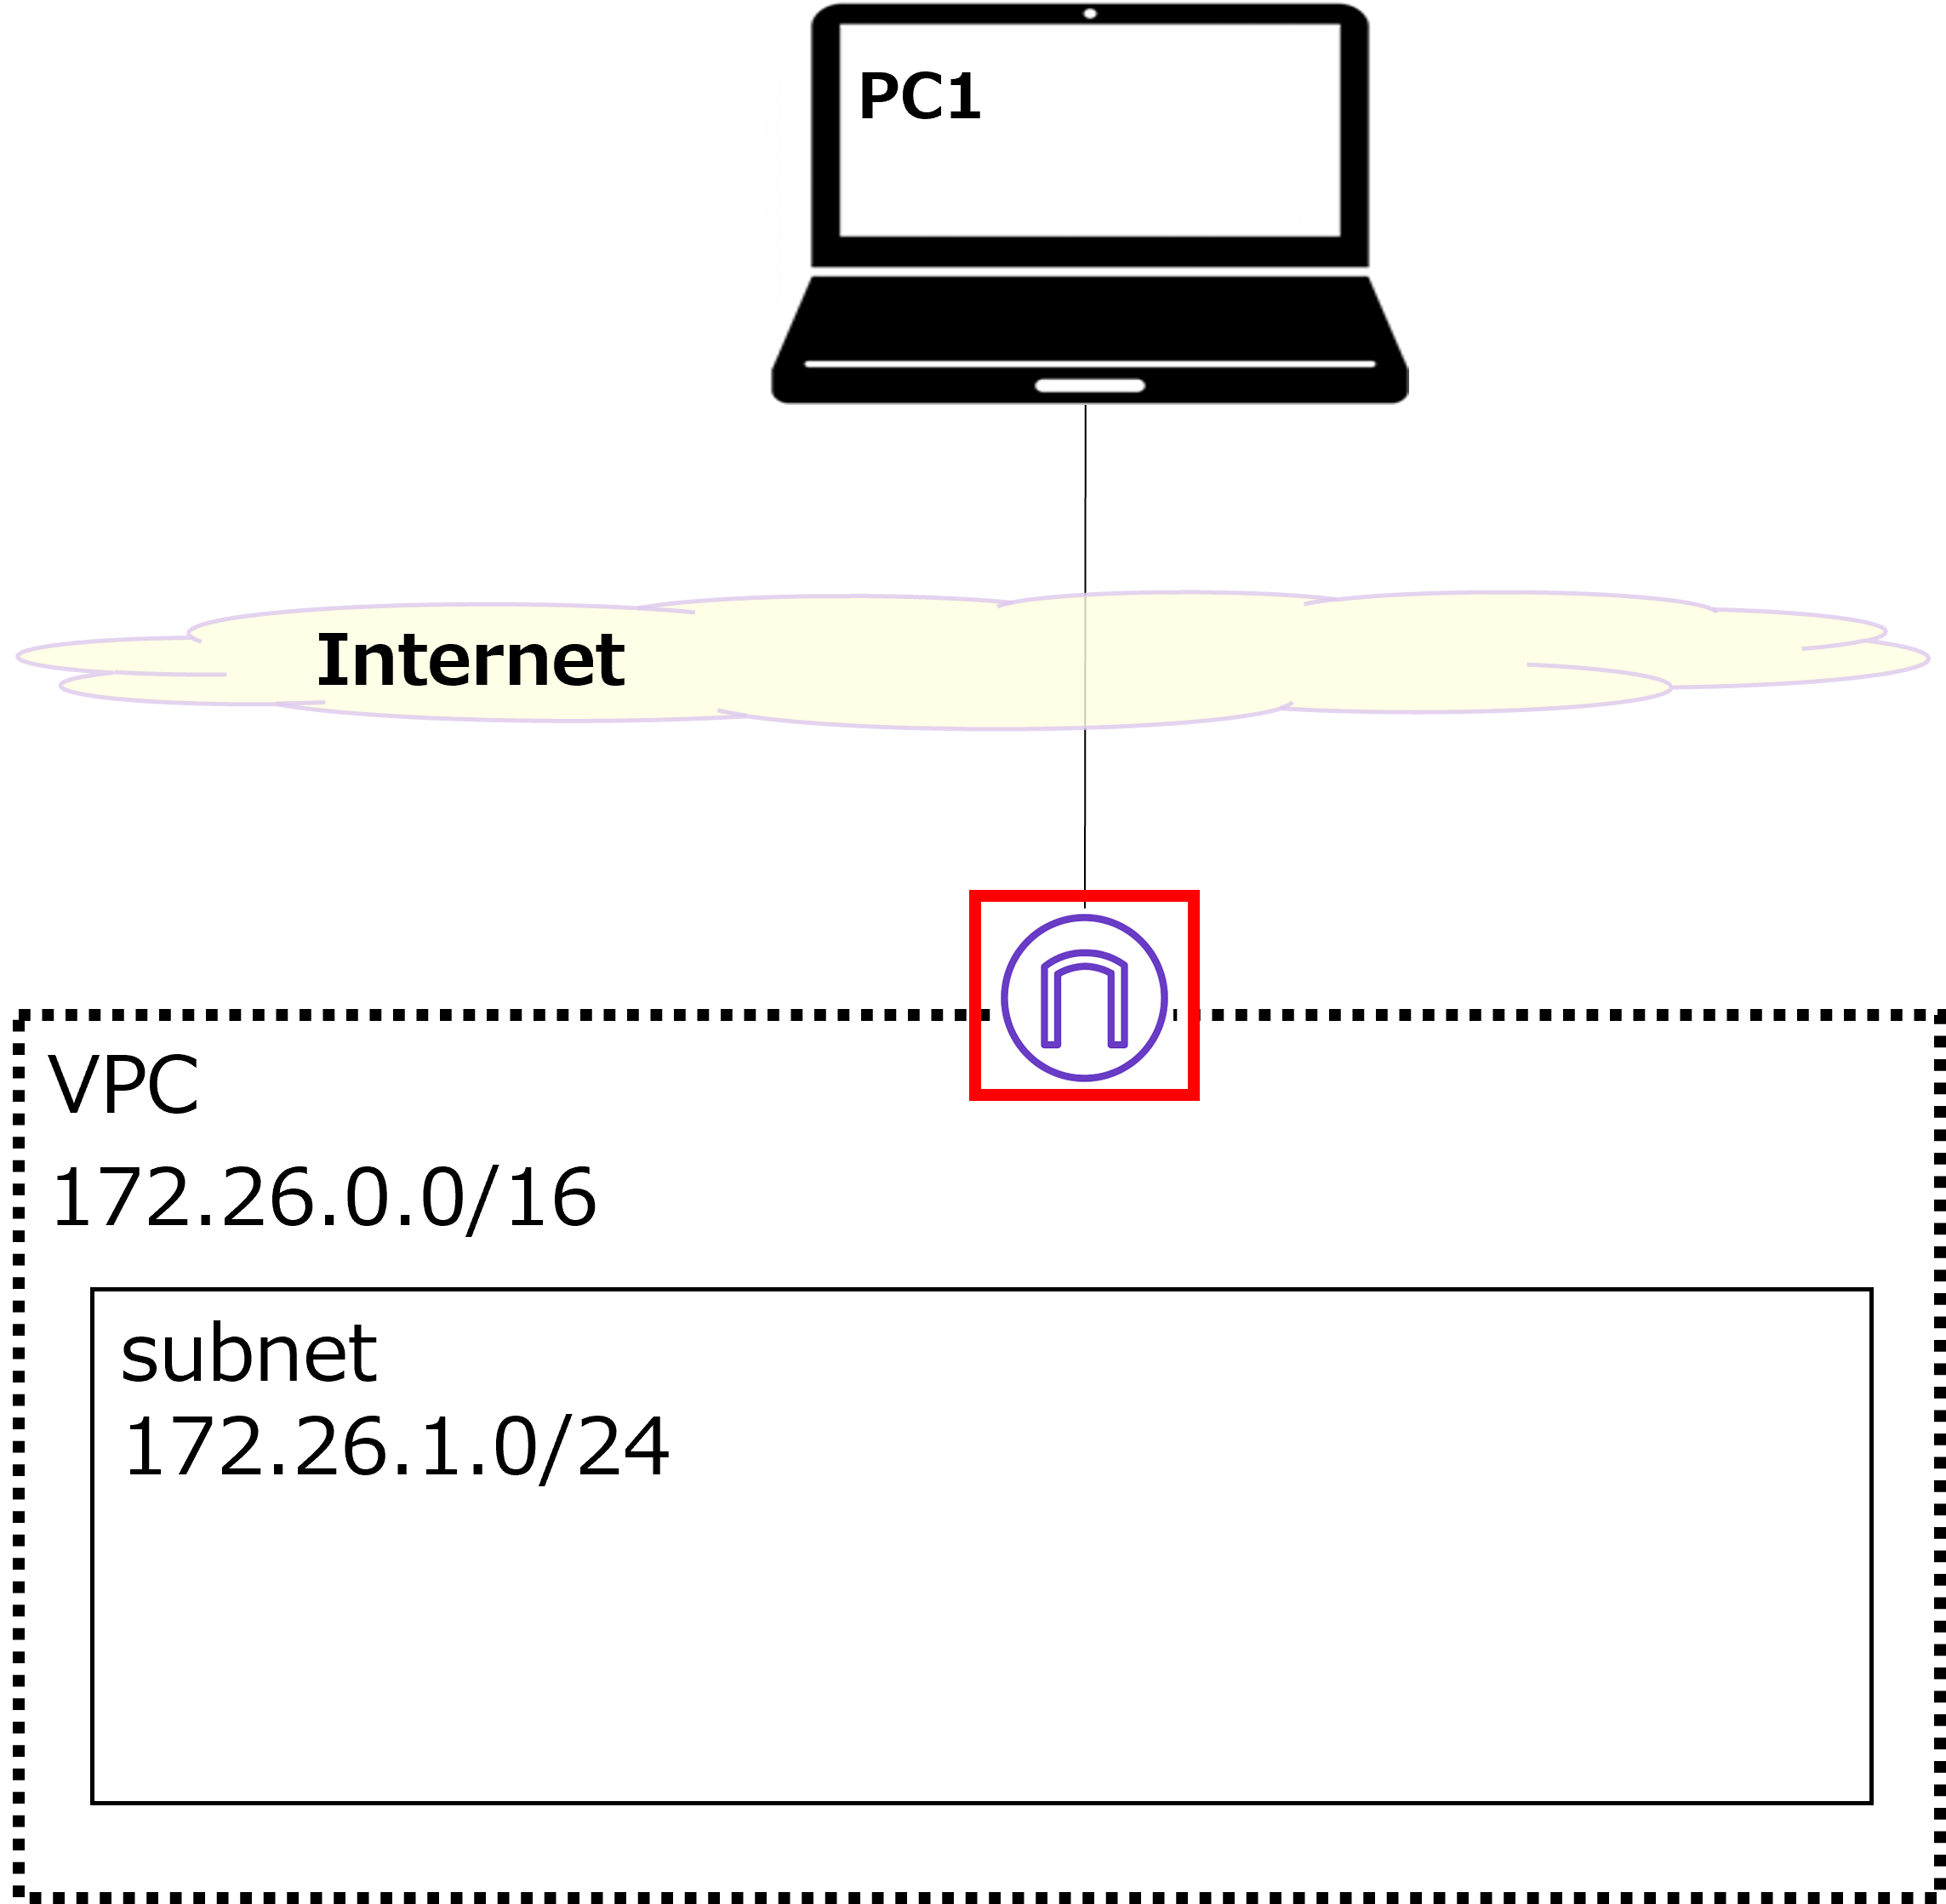
That's an AWS original icon representing an IGW (Internet Gateway) — the entry/exit point to the internet. AWS has a lot of icons. Check out the official site for more details. |
|
I see. Also, it's amazing that you can build a network like this just using AWS. |
|
Exactly. AWS has a huge number of services, and it's incredibly useful for network testing too. Without cloud services like AWS, you'd have to buy physical hardware like Windows PCs and L2 switches, and even get a new internet line installed. But with AWS, you can get all of this up and running just by clicking around on your screen — probably in under an hour. |
|
That is convenient. But it costs money, right? |
|
Yes. AWS basically uses pay-as-you-go pricing. Depending on the type and specs of the VM, Windows or Fortigate VMs often run about $1–$3 per hour per instance. So cloud services are great for temporary testing, but if you're using something for a long time in production, physical hardware often ends up cheaper. |
|
I see — it's kind of like the difference between owning a car and renting one. If you only use it occasionally, a rental is fine, but if you're using it long-term, owning is cheaper. |
|
Exactly right. But even for infrastructure used long-term, many companies still choose cloud services over physical hardware. |
|
Why is that? |
|
There are several reasons, but I think the biggest one is maintenance. With a rental car, the rental company handles maintenance for you, but with your own car, you have to do it yourself. It's the same with physical hardware — you have to handle all the maintenance on your own. That's just a lot of work, which is why many companies prefer the cloud. |
|
That makes sense. Car maintenance does sound like a hassle. |
|
It really is. I honestly can't remember the last time I changed the oil in my car... |
Create VPC
|
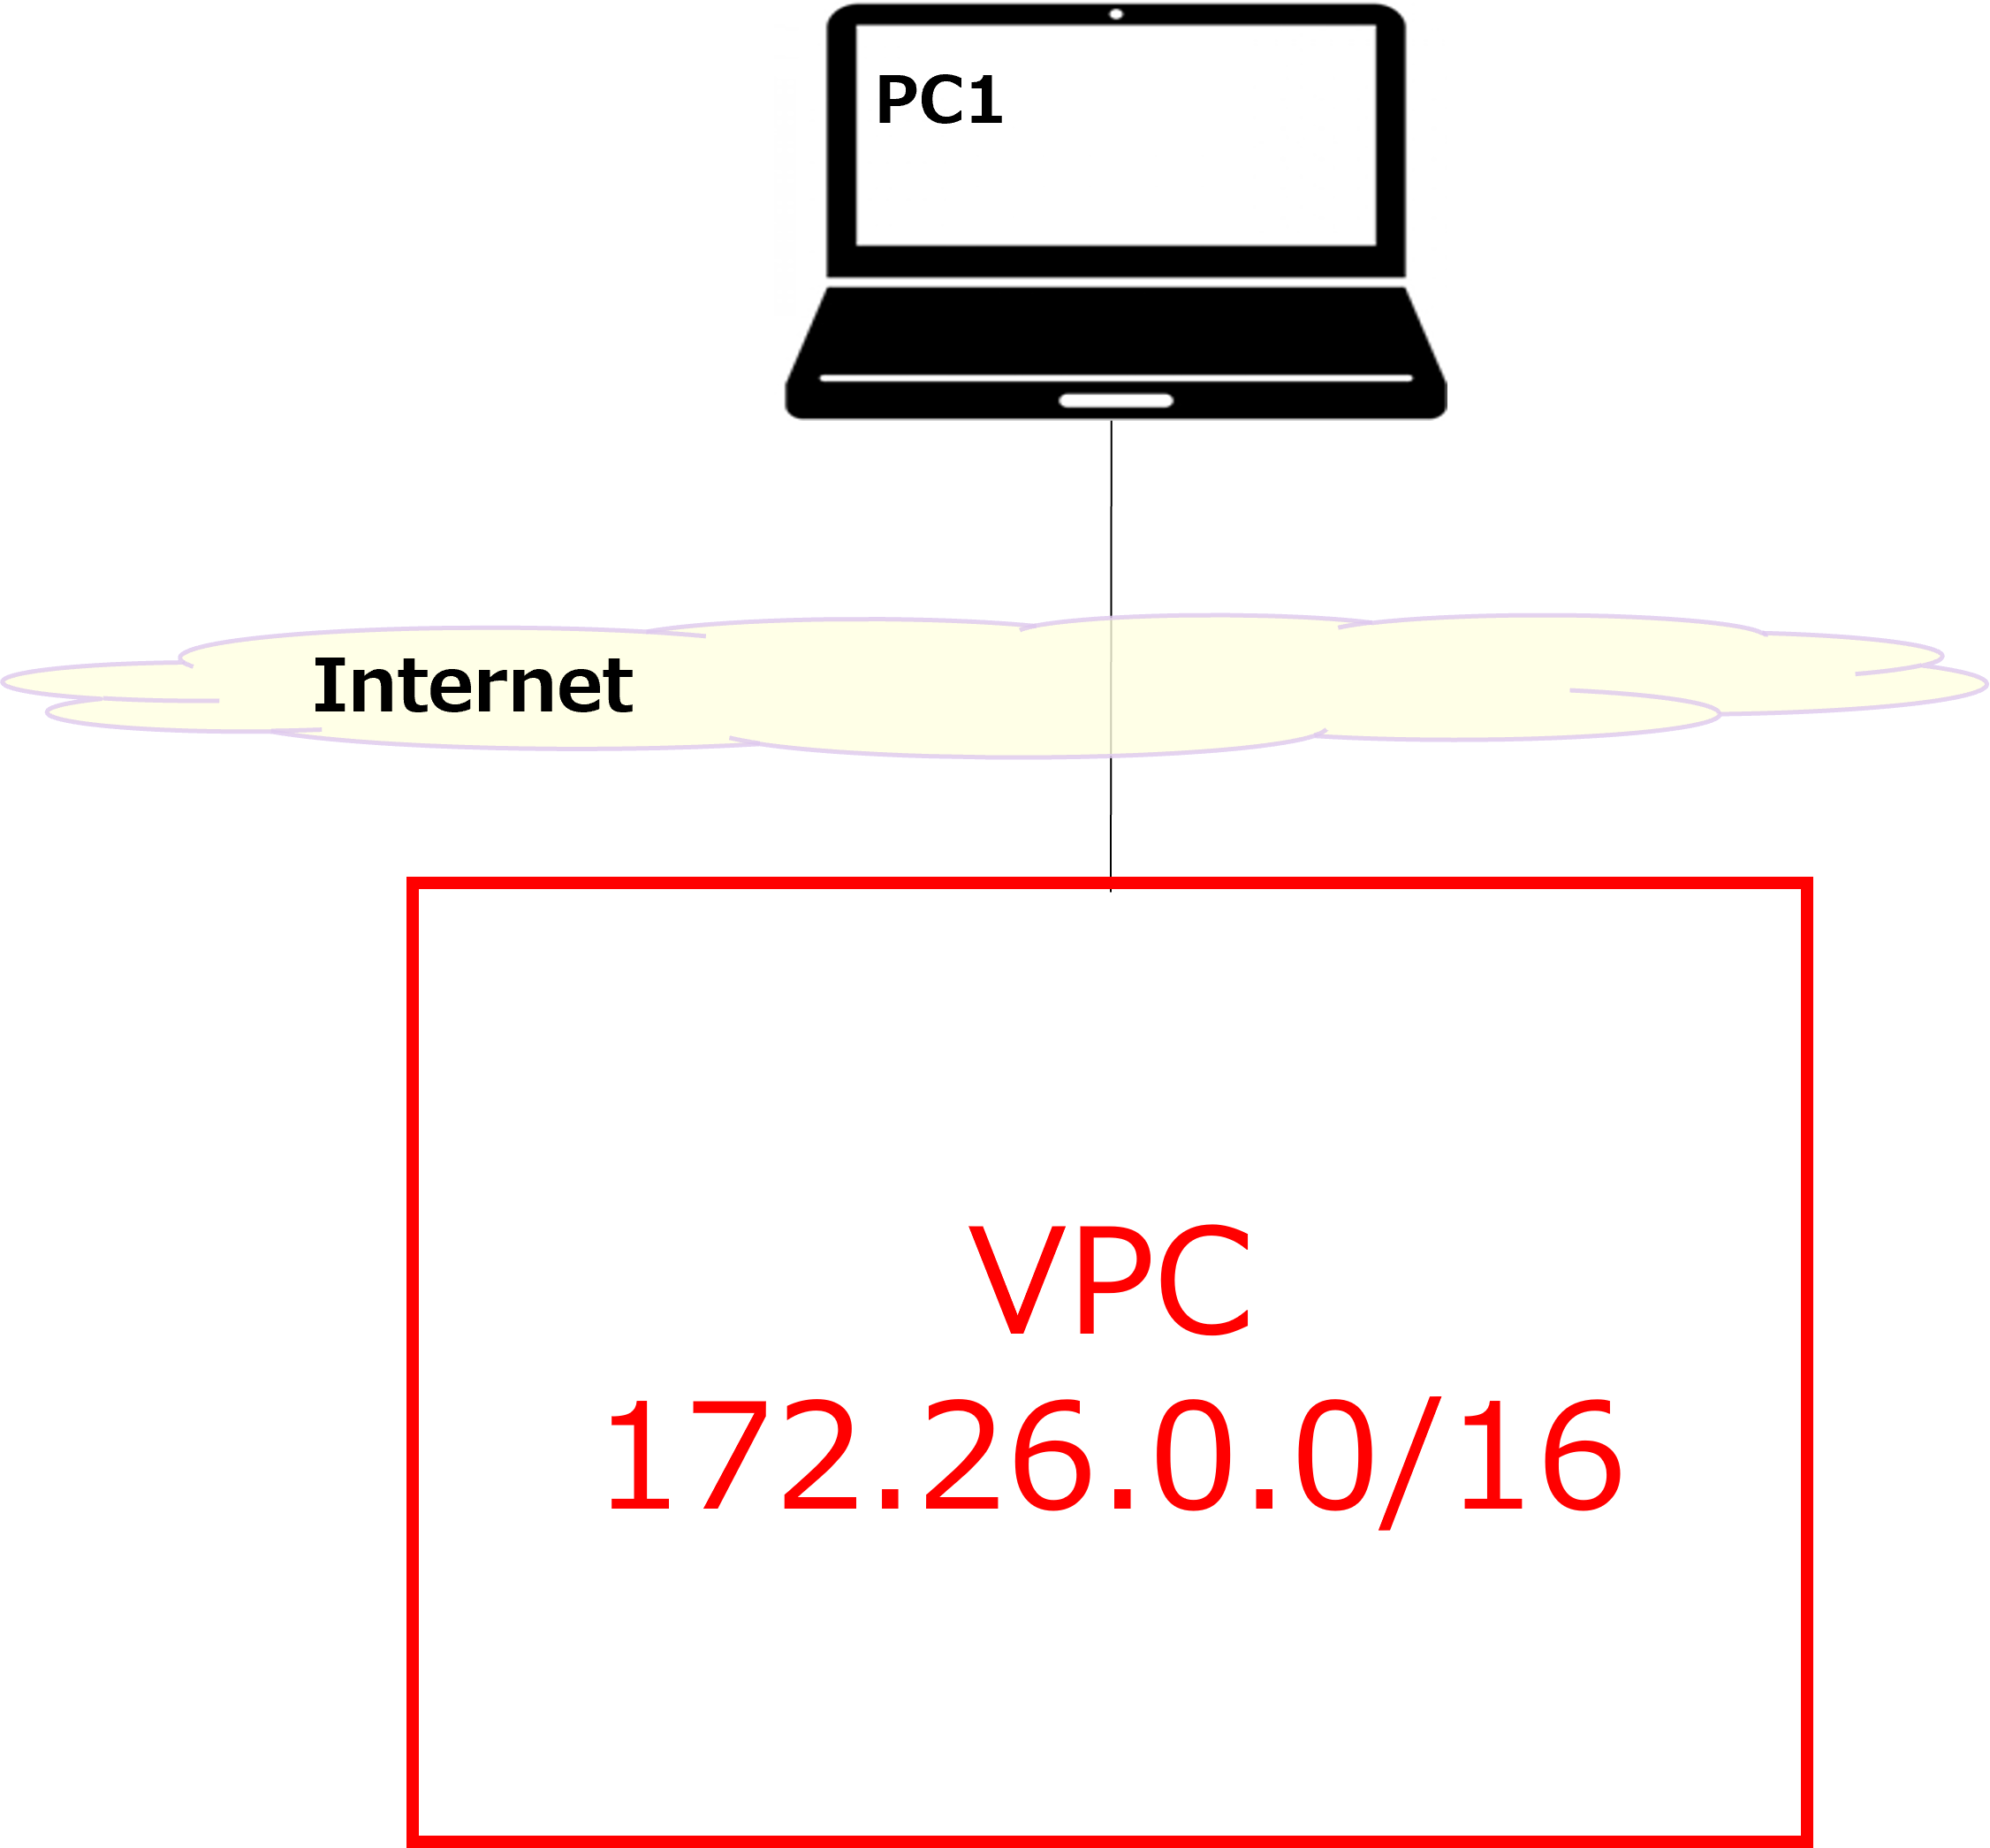
Alright, here's a rough outline of the steps for this guide: Create VPC So let's start with the VPC. VPC stands for Virtual Private Cloud. Think of it as creating a large, private box for yourself in a blank environment, as shown in the diagram above. |
|
Got it — it's like buying land before building a house. |
|
Exactly. Here are the actual steps in the console: |
① Select your region from the top-right of the AWS console. This time, we'll select the Osaka region.

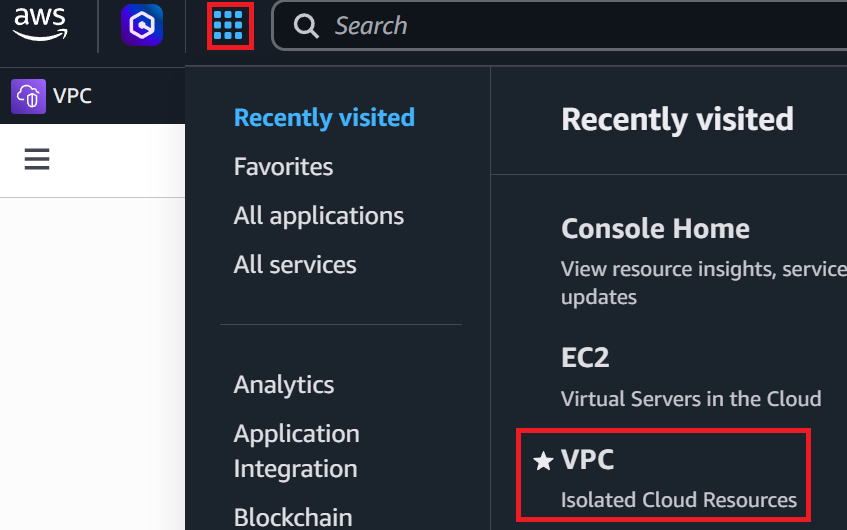
② Click the grid icon (dots) in the top-left corner → then click VPC.
③ In the left menu, click "Your VPCs" → then click "Create VPC" in the top-right.

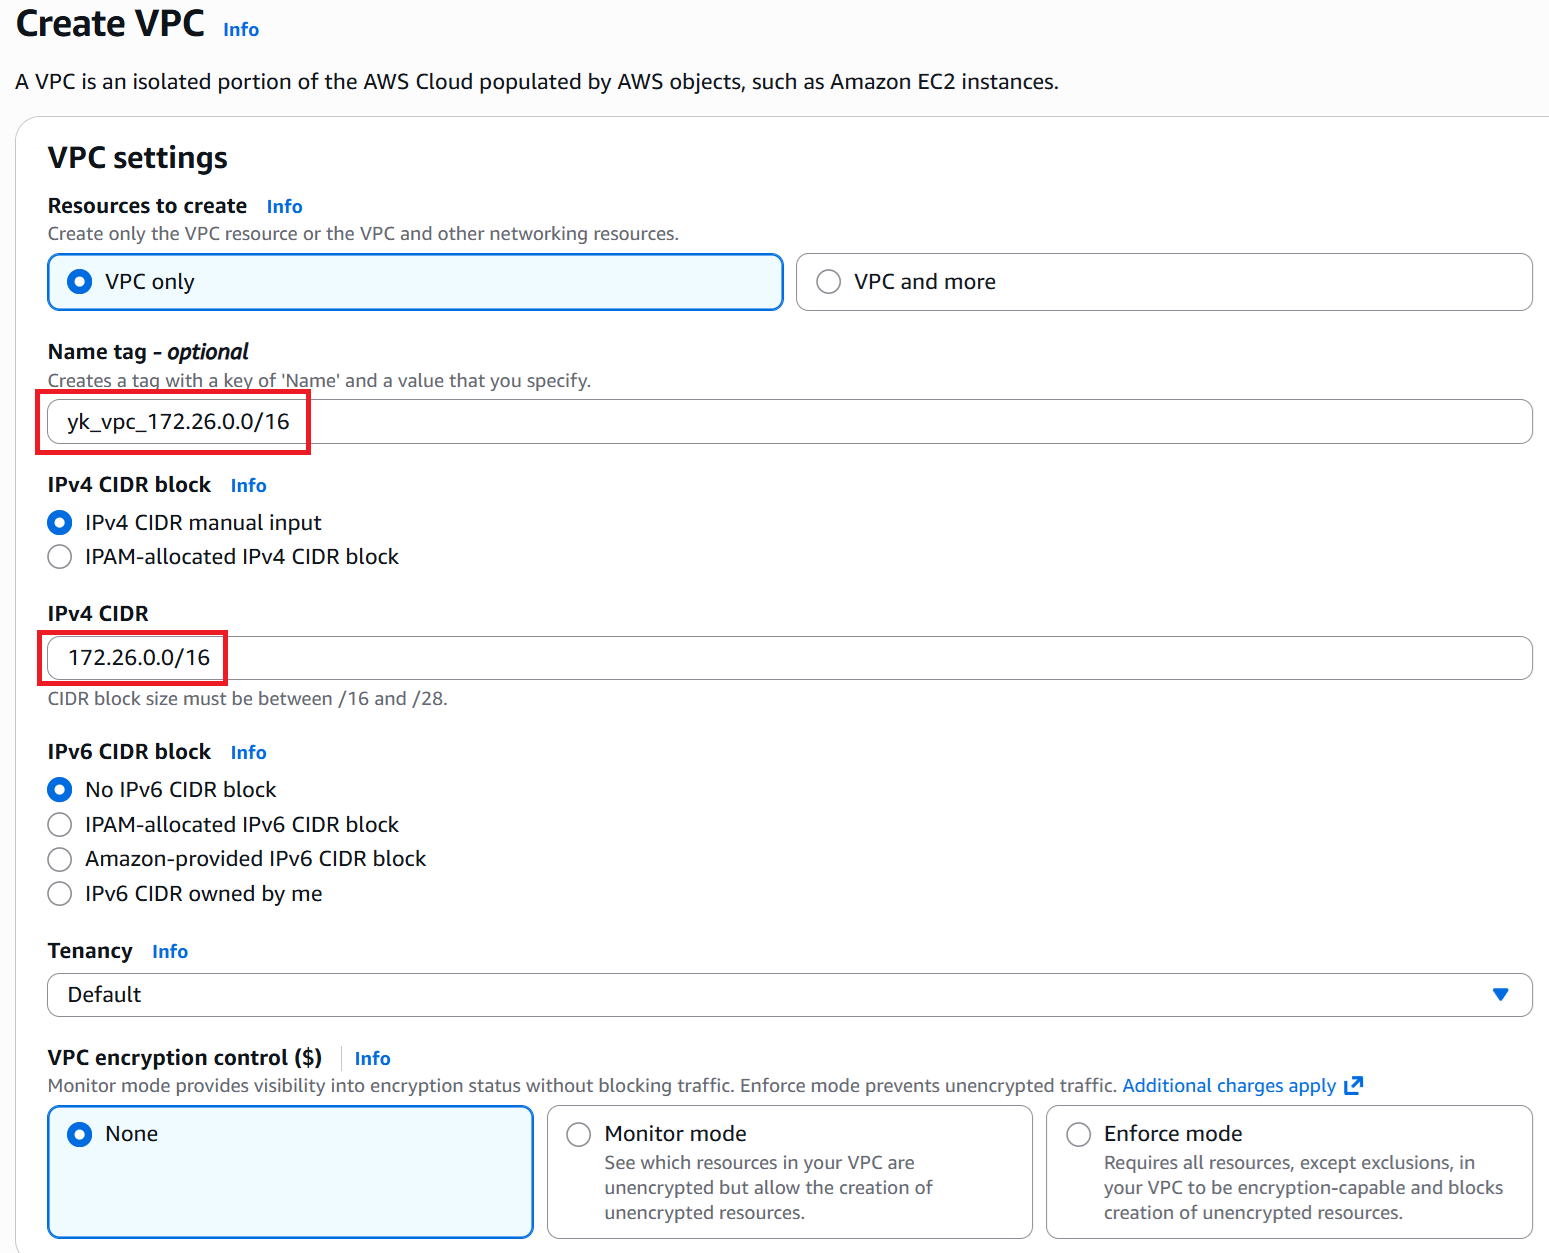
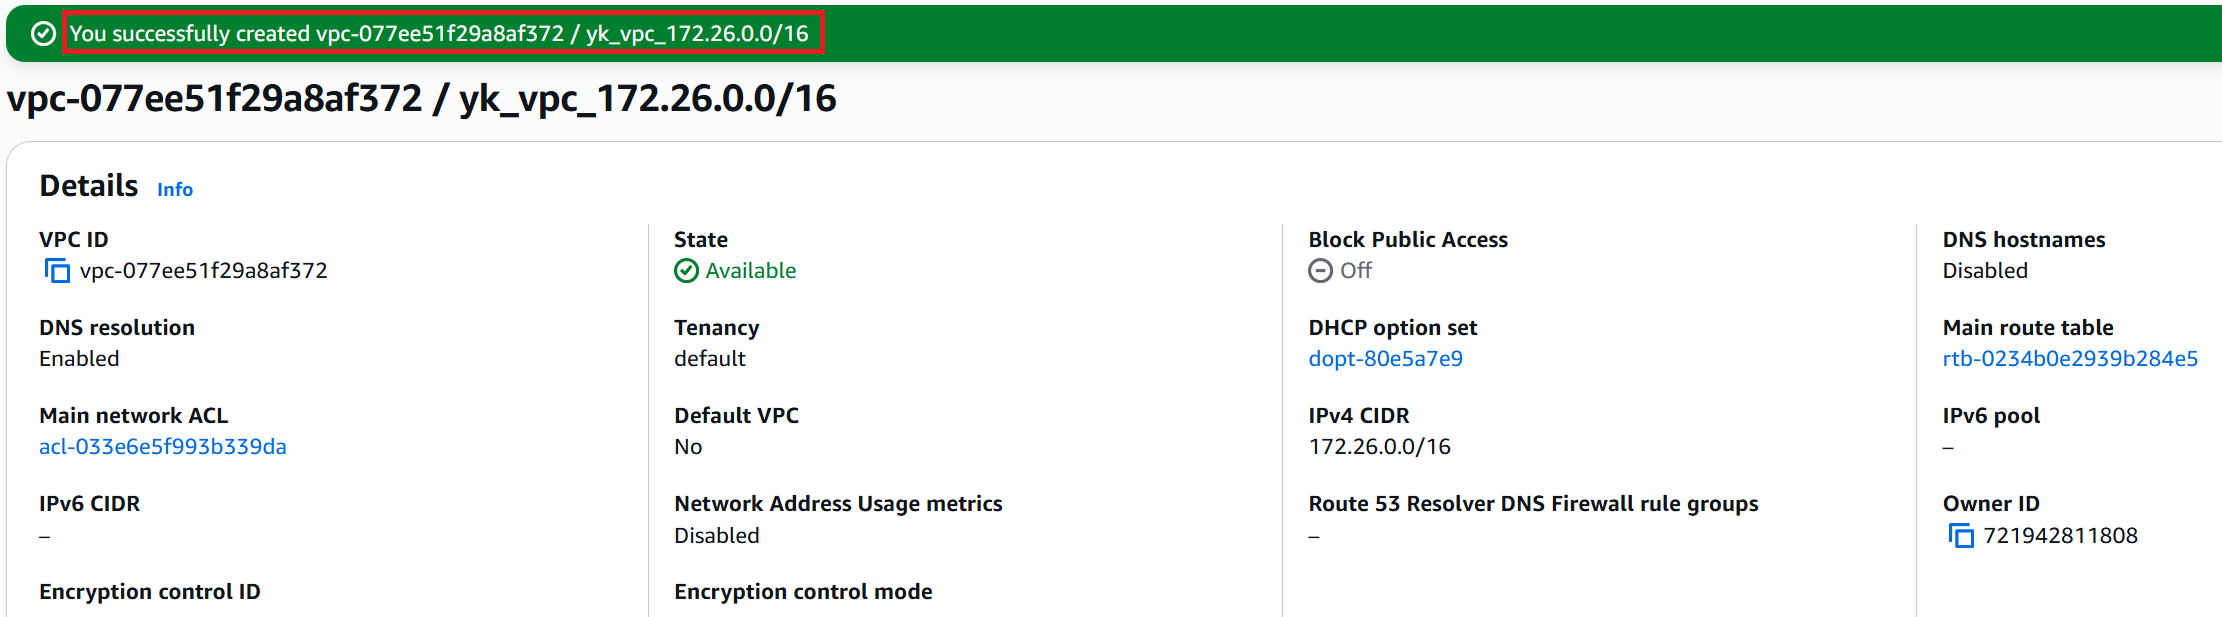
④ Enter any name in the Name tag field. This time we used "yk_vpc_172.26.0.0/16". Enter "172.26.0.0/16" for the IPv4 CIDR.
Leave everything else as default and click "Create VPC" in the bottom-right.
⑤ A success message is displayed. It's a good idea to note down the VPC ID.
Create subnet
|
Next, we'll create a subnet as shown by the red box in the diagram above. The network address will be 172.26.1.0/24. |
|
I see — so we're creating a smaller box (subnet) inside the larger VPC box. |
① In the left menu, click "Subnets" → then click "Create subnet" in the top-right.

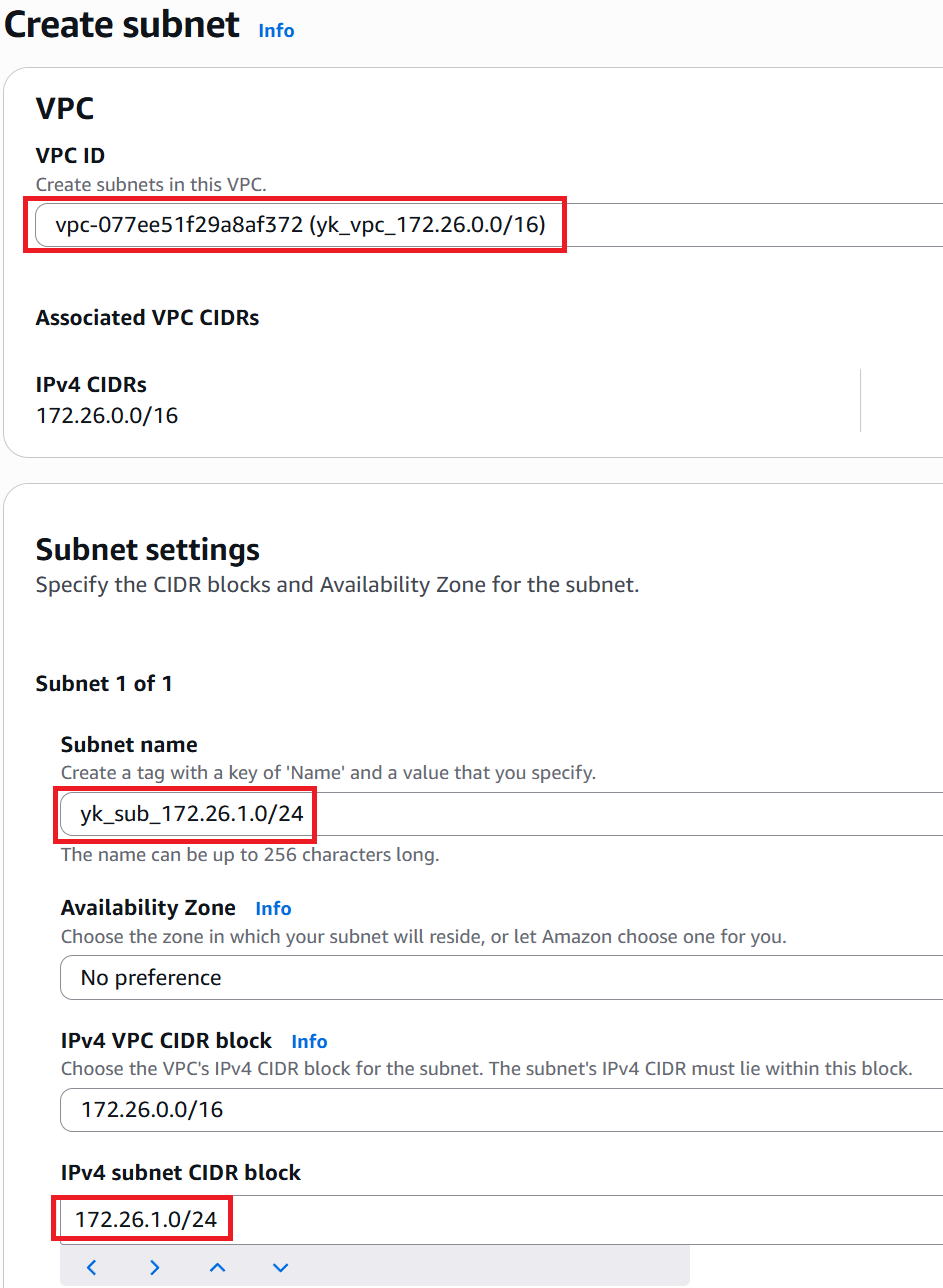
② Select which VPC to create the subnet in. This time, select yk_vpc_172.26.0.0/16.
Enter any name for the subnet name. This time we used yk_sub_172.26.1.0/24.
Enter the network address of the subnet in the IPv4 subnet CIDR block field. This time, enter 172.26.1.0/24.
Leave everything else as default and click "Create subnet" in the bottom-right.
③ Creation successful. Note down the Subnet ID.

Create IGW
|
Next, we'll create an IGW as shown in the diagram above and attach it to the VPC we just created. This allows the VPC to connect to the internet. |
|
Wait — the VPC uses private IP addresses, right? Doesn't connecting to the internet require NAT? So does the IGW perform NAT? |
|
Yes, exactly. The IGW performs NAT in both directions — from internet → VPC and from VPC → internet. By the way, we won't use it this time, but there's also something called a NAT Gateway that only handles outbound NAT (VPC → internet). |
|
Got it. |
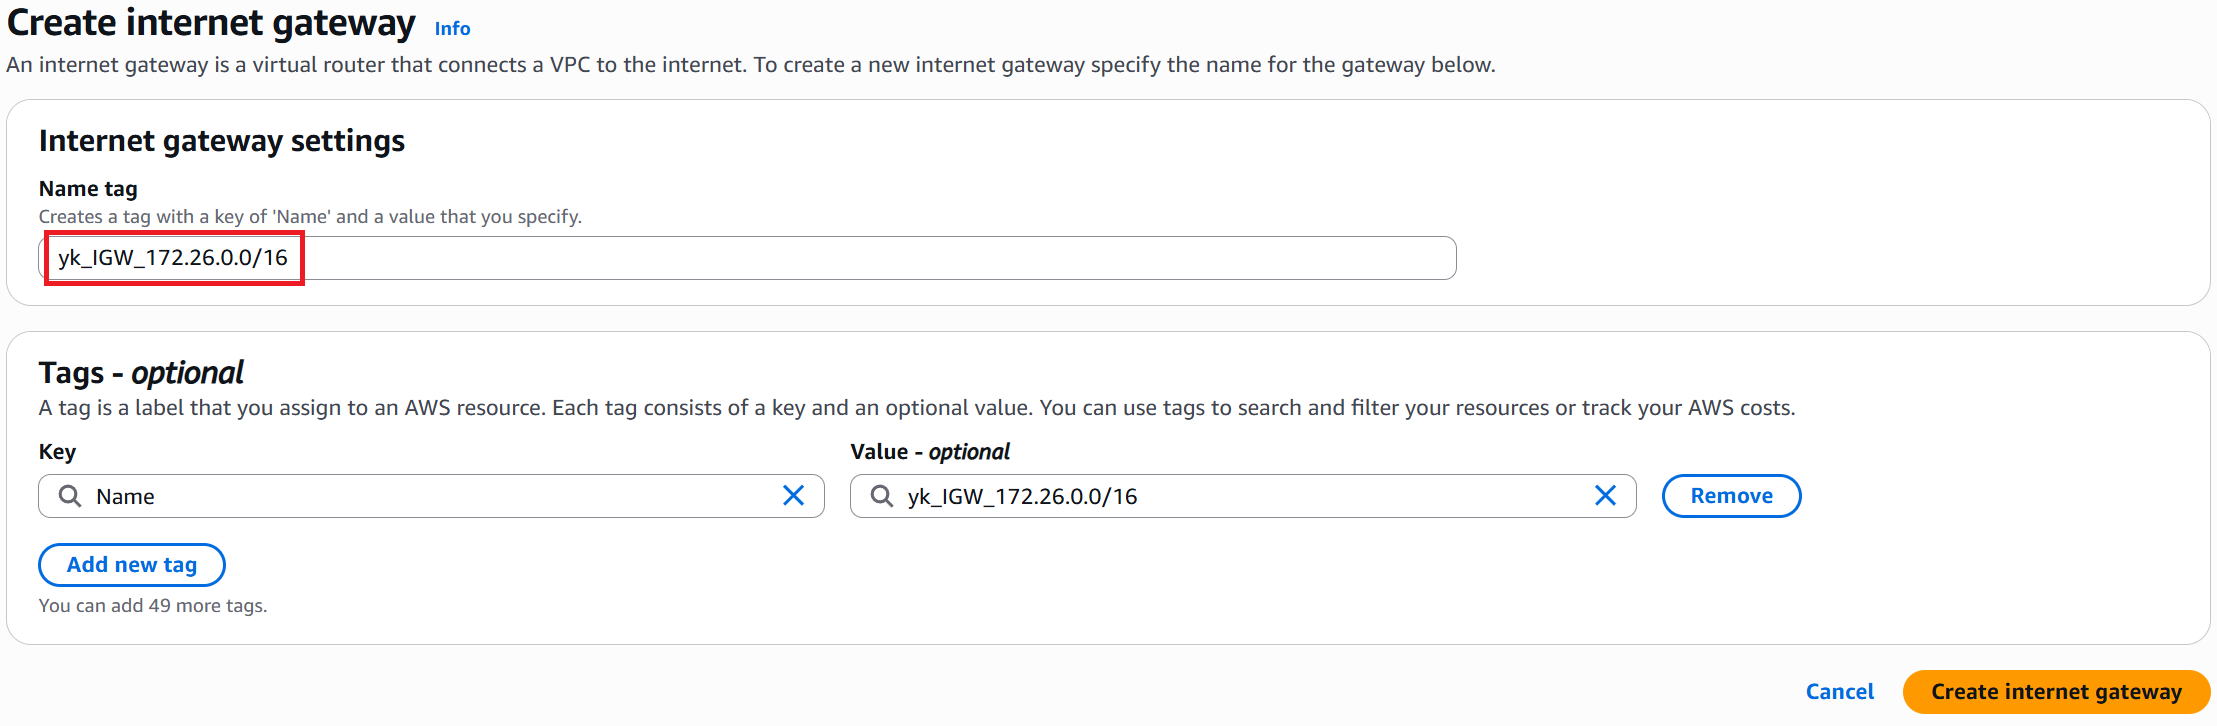
① In the left menu, click "Internet gateways" → then click "Create internet gateway" in the top-right.

② Enter any name in the Name tag field (this time: yk_IGW_172.26.0.0/16) and click "Create internet gateway" in the bottom-right.
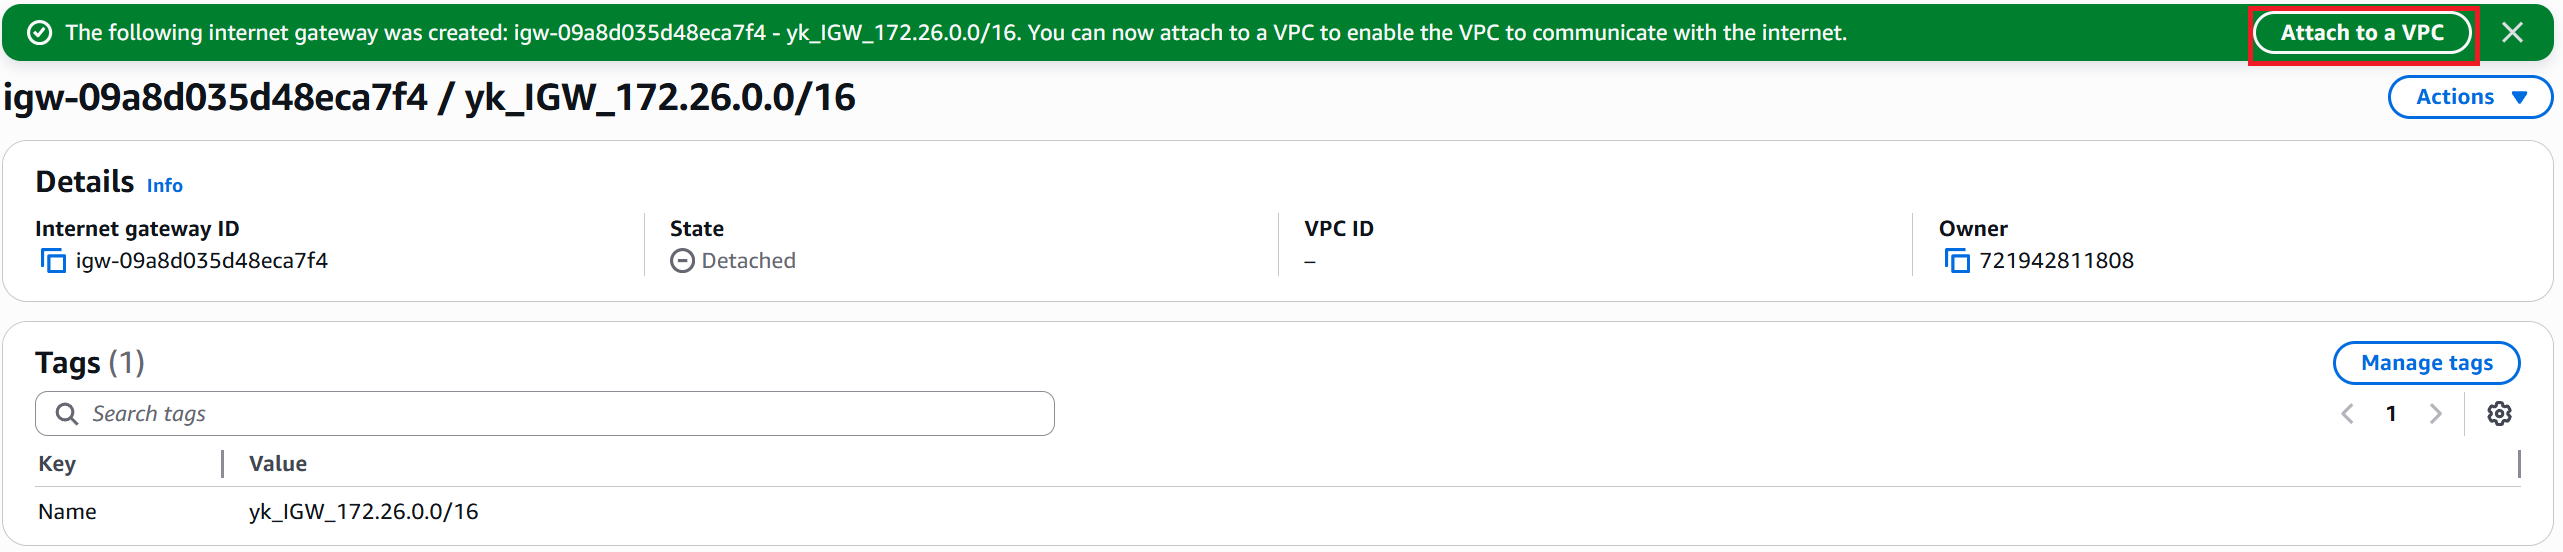
③ The creation success screen is displayed. Note down the Internet gateway ID. Then click "Attach to a VPC" in the top-right.
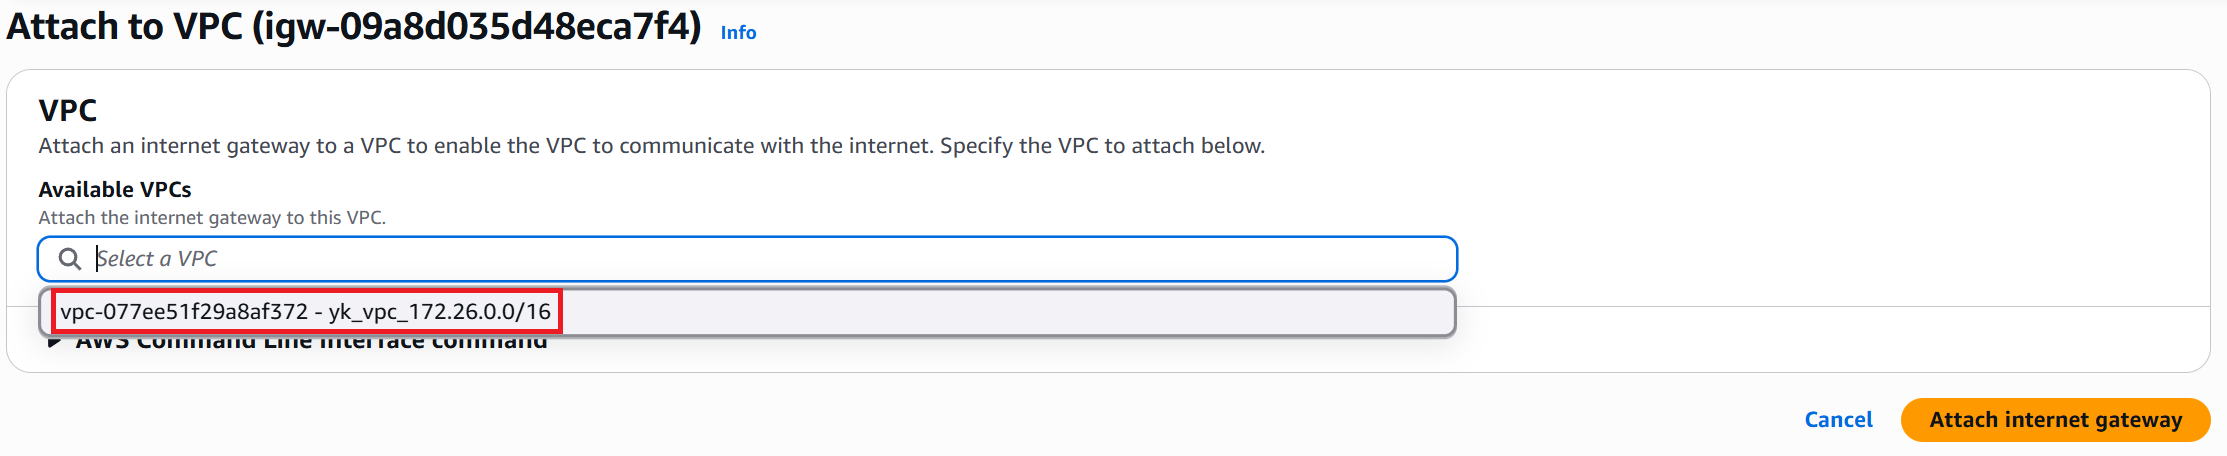
④ From the Available VPCs list, select yk_vpc_172.26.0.0/16 and click "Attach Internet gateway" in the bottom-right.
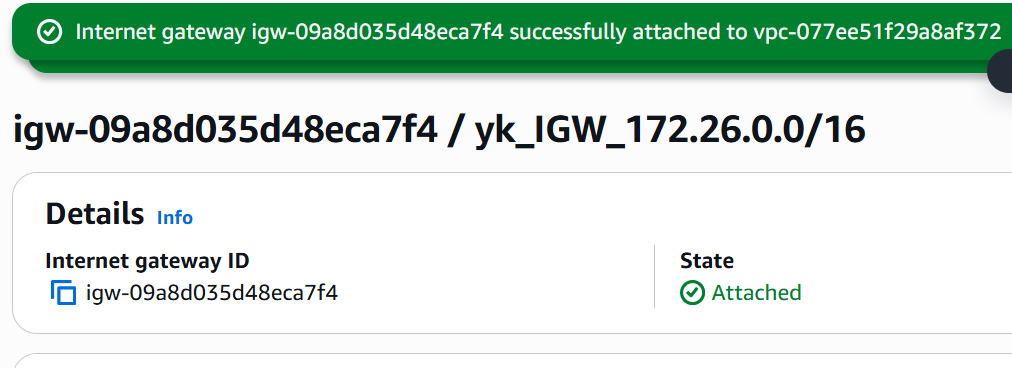
⑤ The completion screen is displayed.
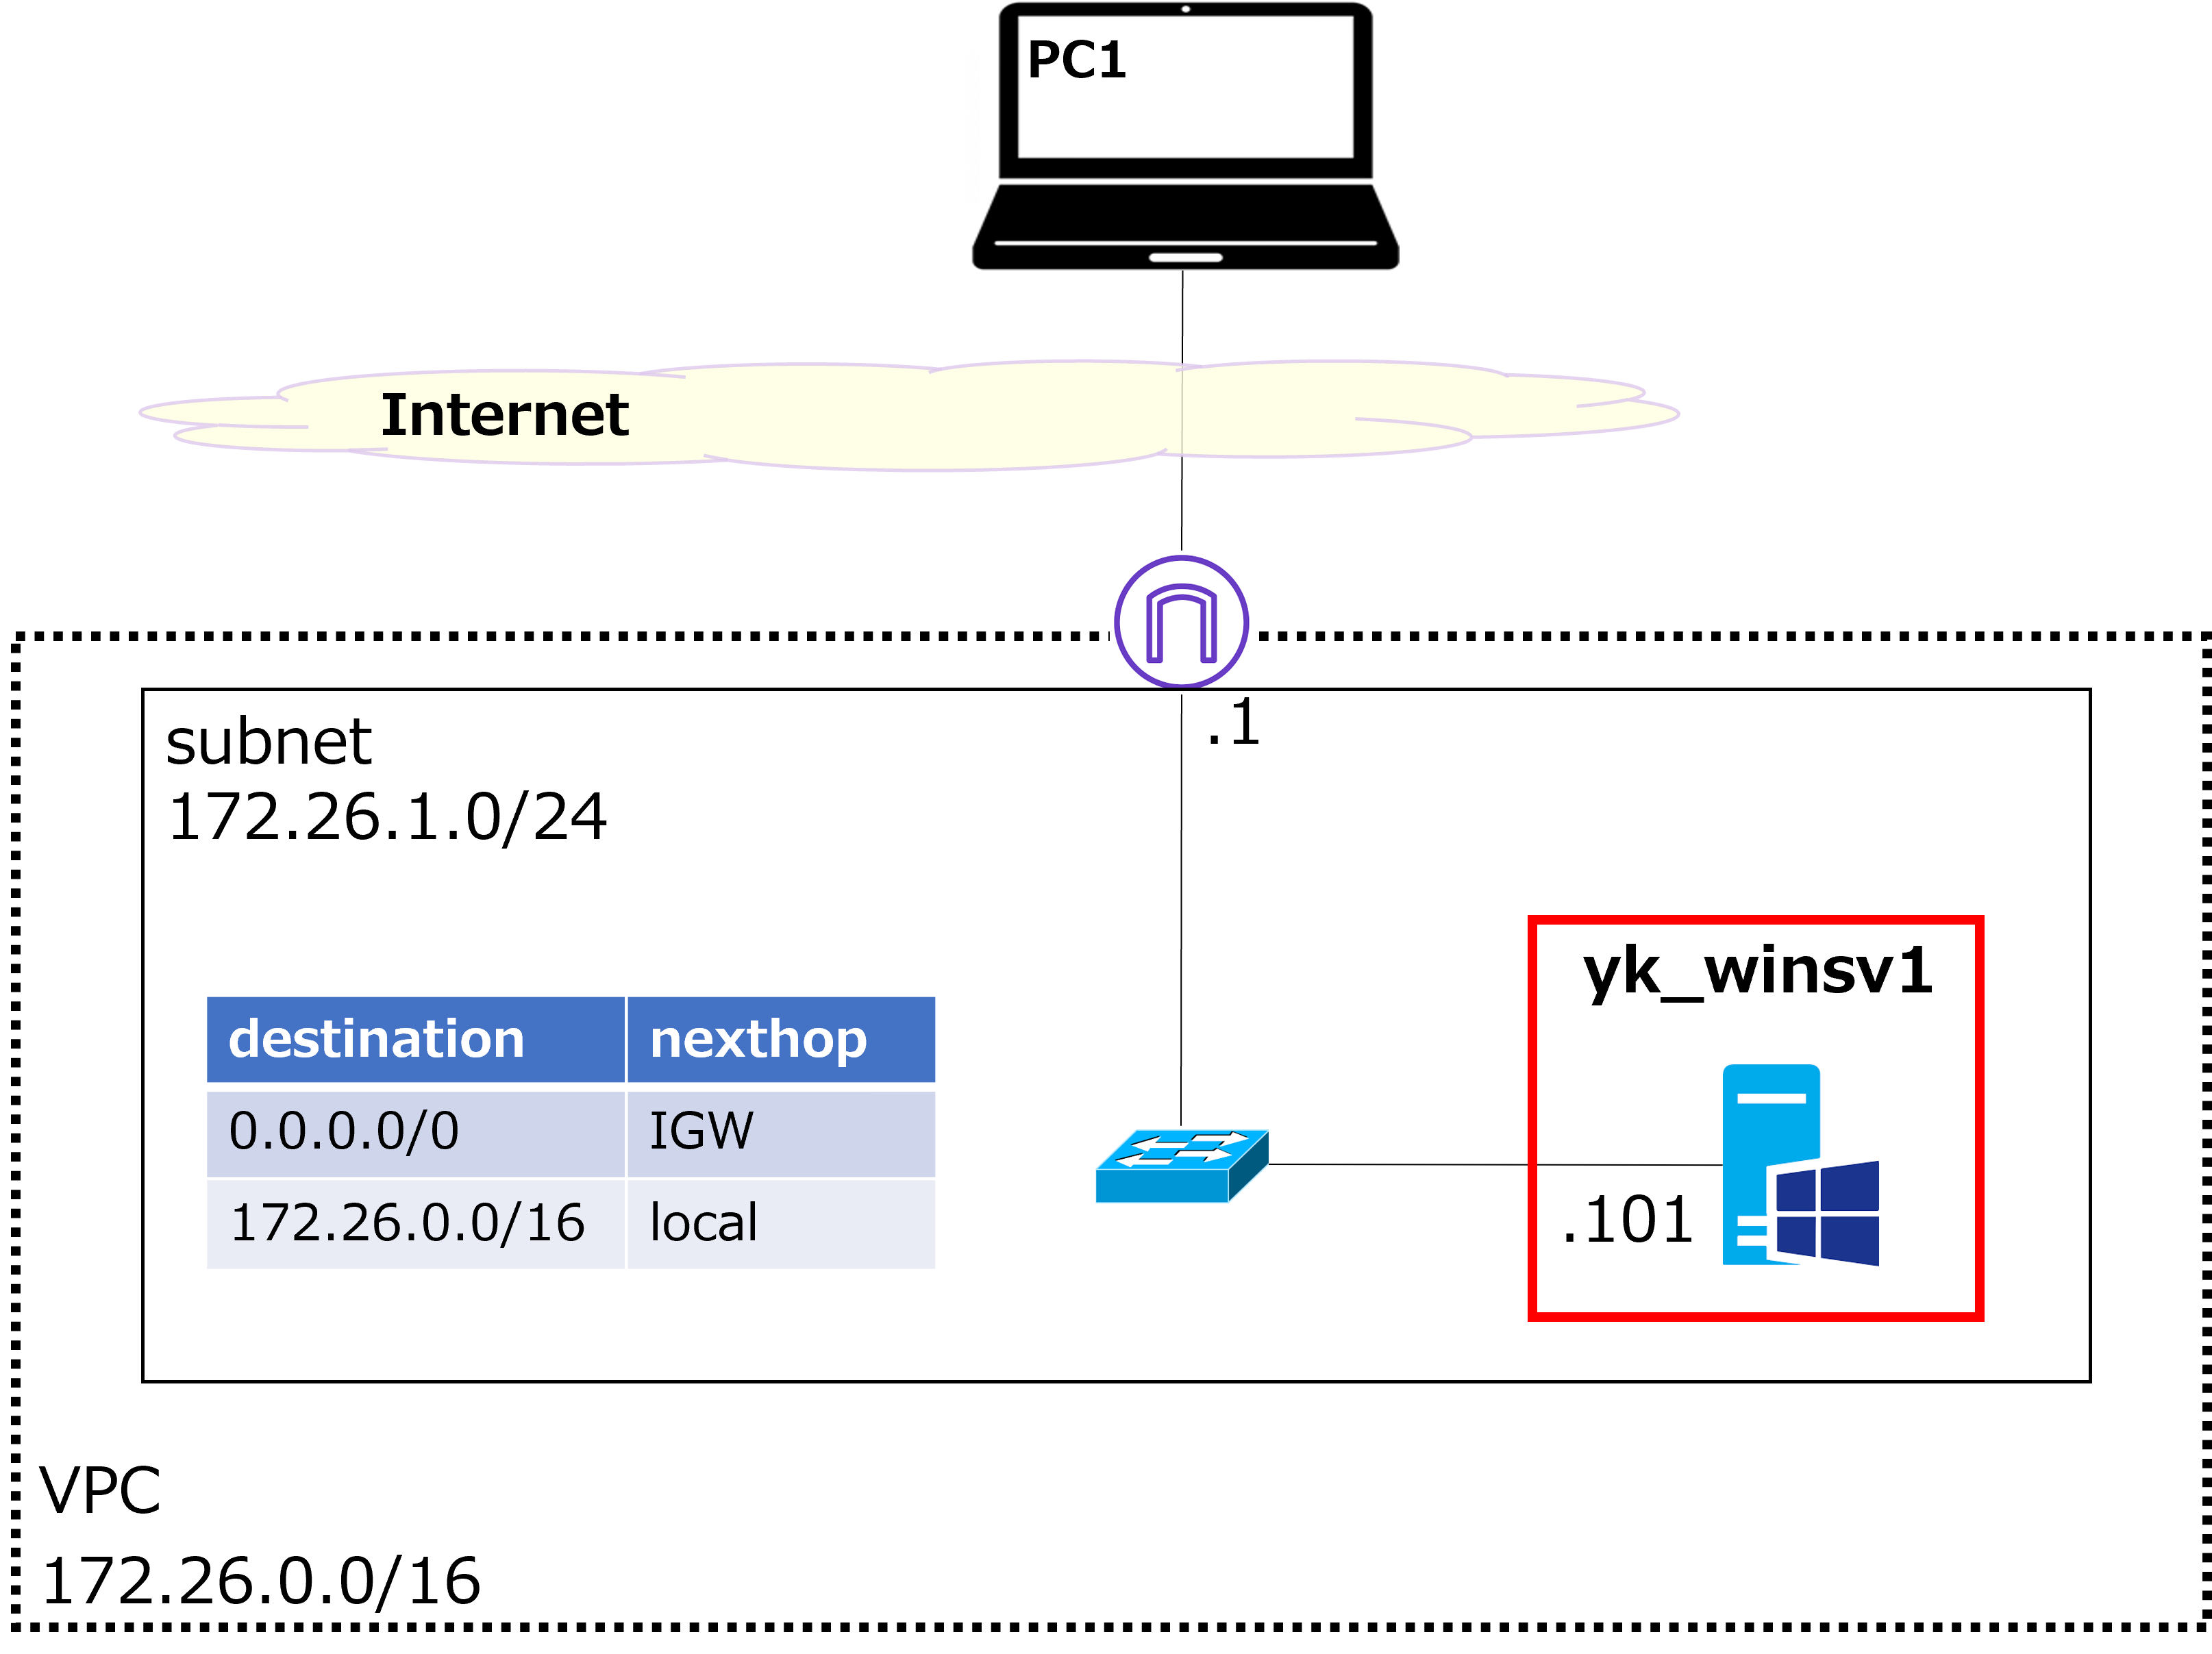
Create route table
|
Next, we'll create a route table as shown in the diagram above and associate it with the 172.26.1.0/24 subnet. |
|
Is this similar to a routing table on a network device? |
|
Yes, although it can be a bit confusing at first. Think of the route table as a routing table that all devices within a subnet will reference. For example, once we build Windows or Linux VMs inside the subnet, those machines will look up this route table when they communicate. For instance, for packets destined to 8.8.8.8, the next hop would be the IGW, so the packet gets sent to the IGW. |
|
I see — so you don't have to configure each device individually, which is convenient. |
|
Exactly. |
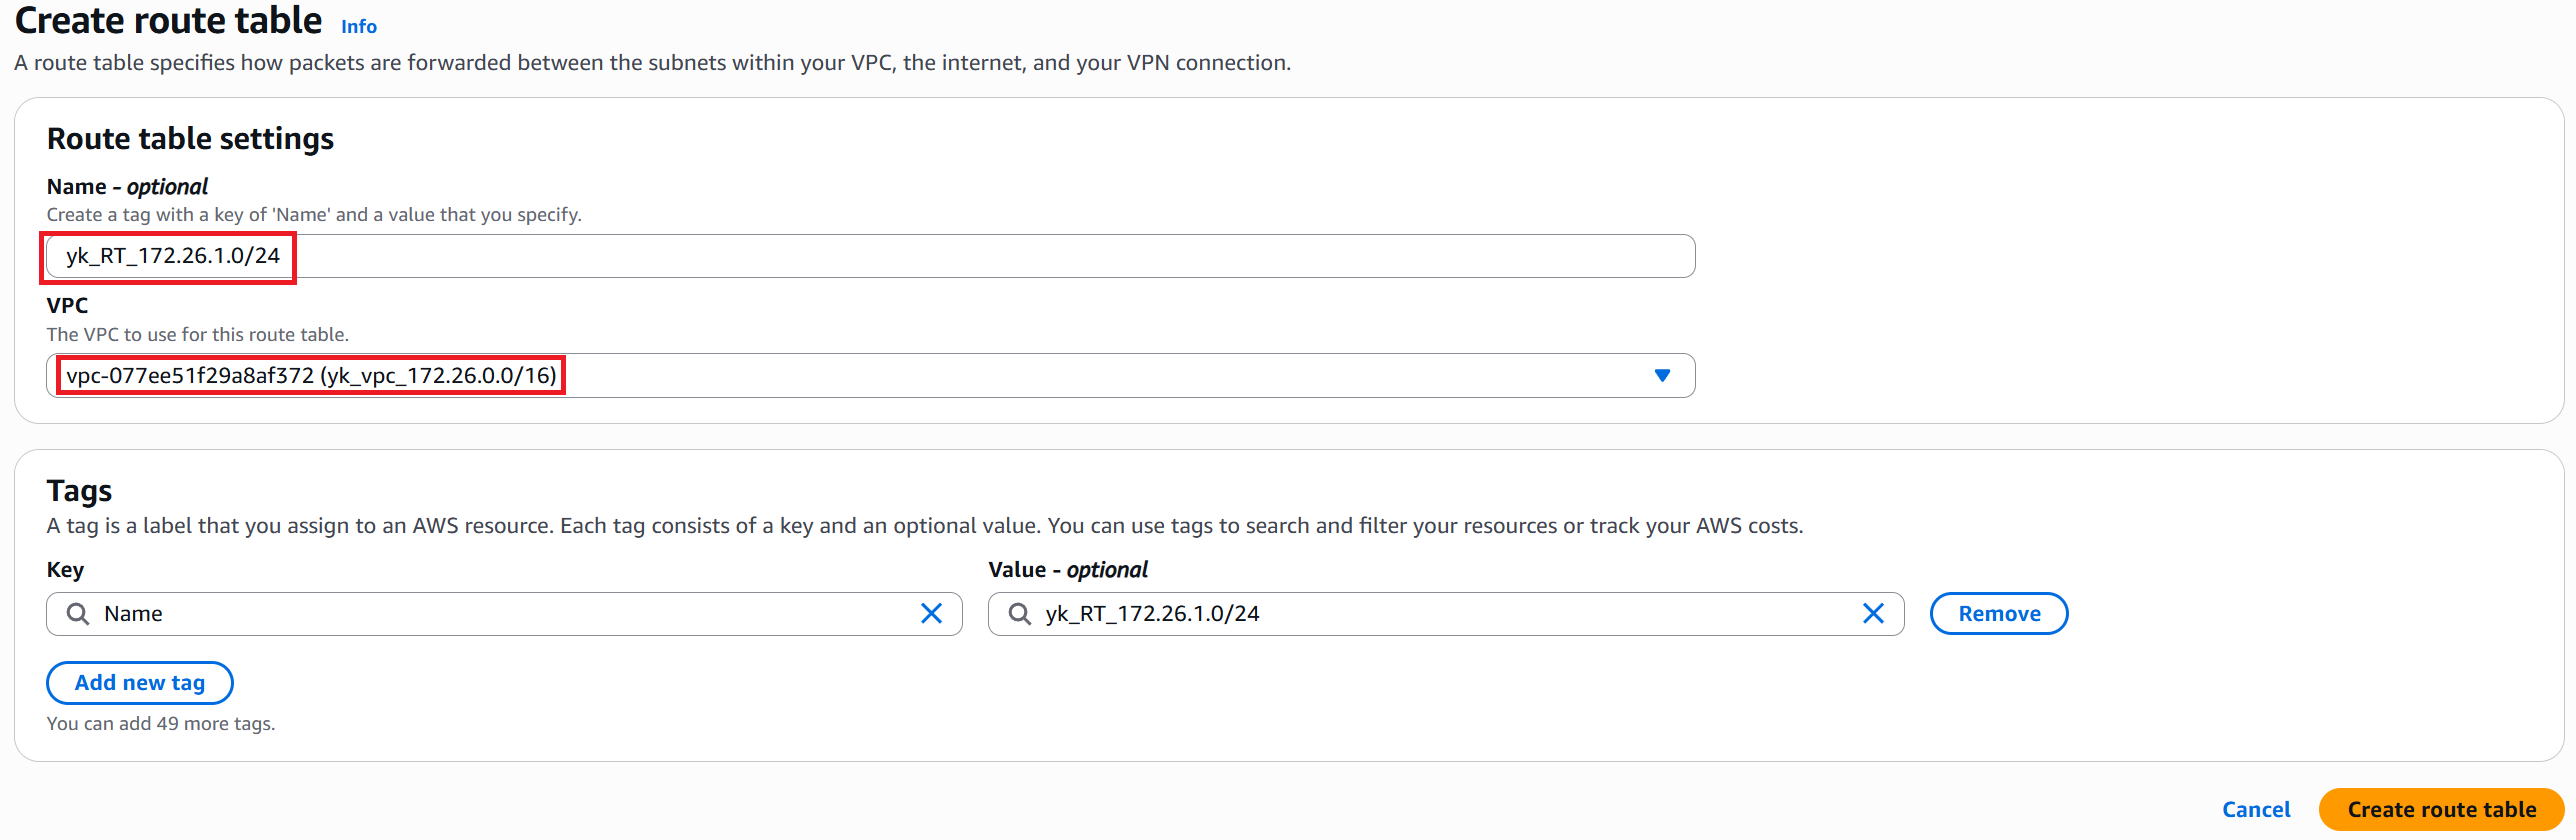
① In the left menu, click "Route tables" → then click "Create route table" in the top-right.

② Enter any name in the Name field (this time: yk_RT_172.26.1.0/24). Select yk_vpc_172.26.0.0/16 for the VPC. Click "Create route table" in the bottom-right.
③ The creation success screen is displayed. Note down the Route table ID. Then click "Edit routes" in the bottom-right.
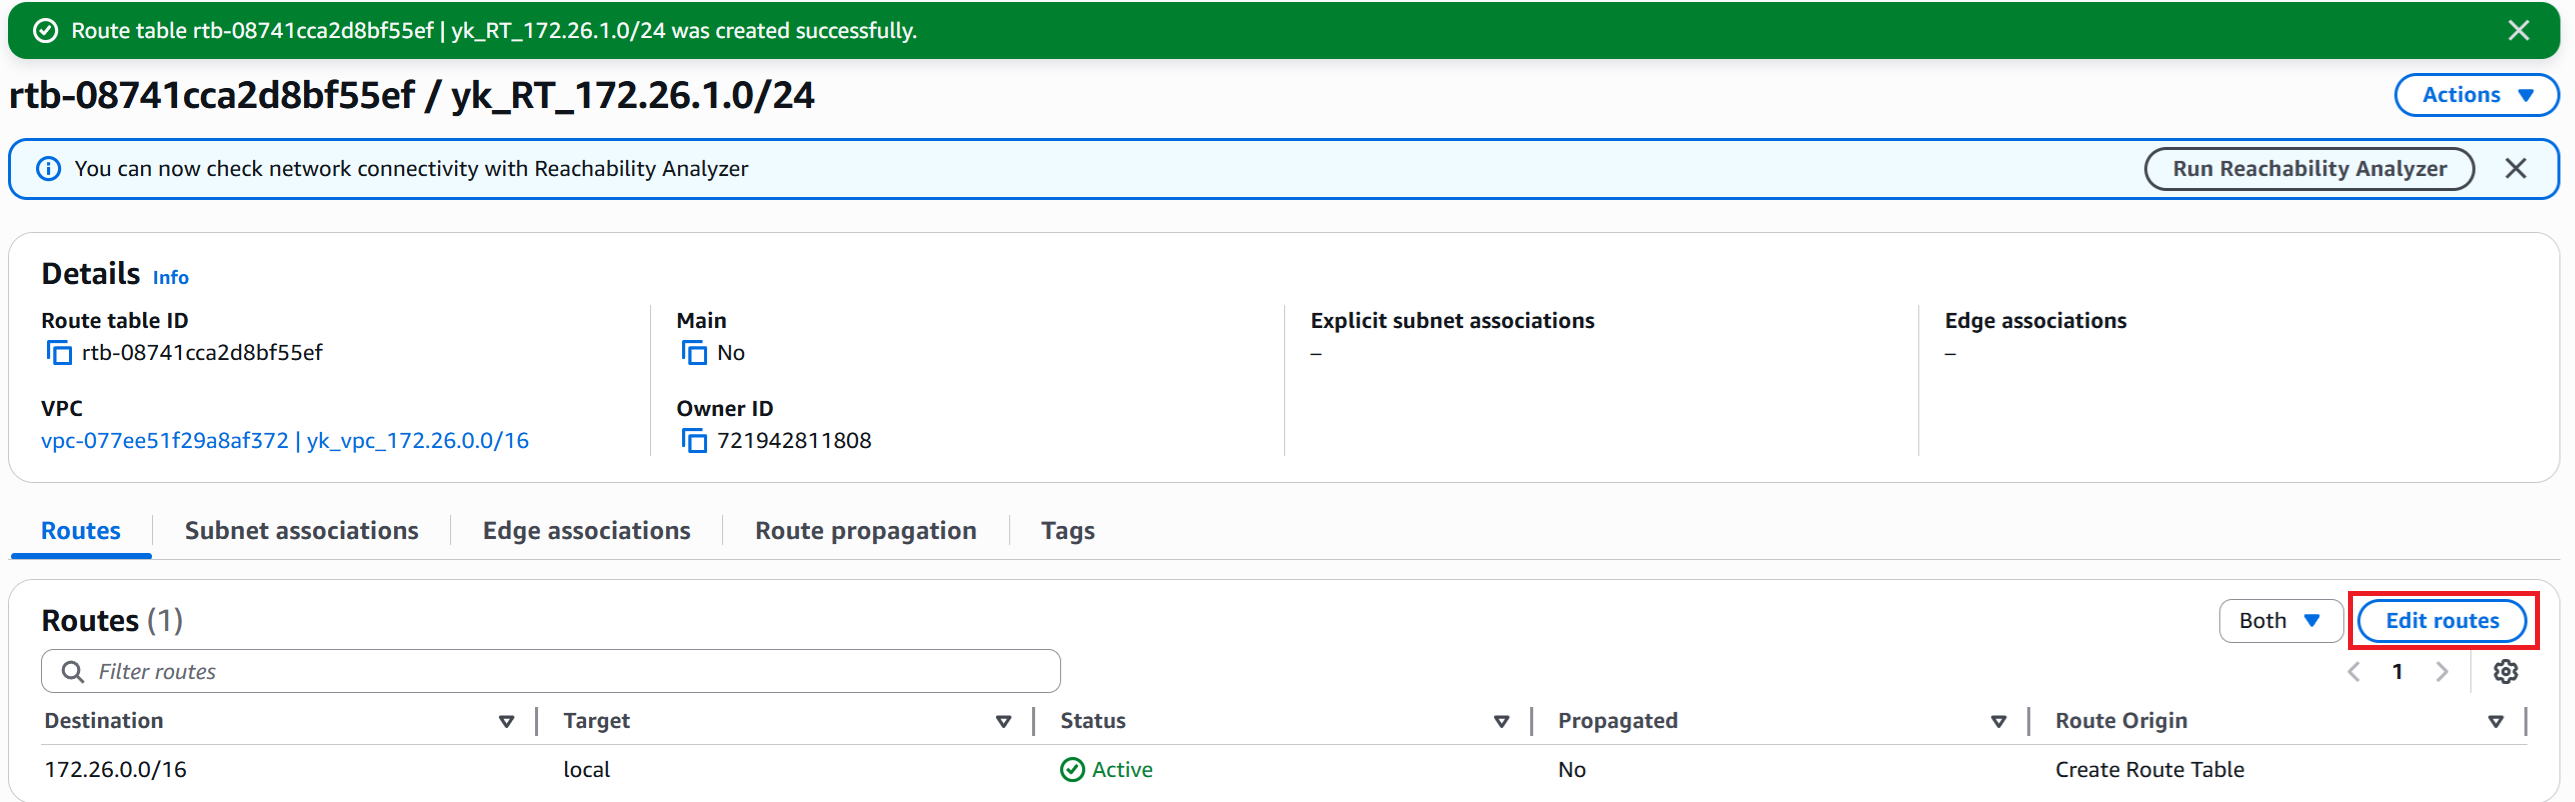
④ Right after creation, only the VPC network address (in this case 172.26.0.0/16) is listed as an entry.
The Target (next hop) is set to local (directly connected).
We want to add a default route, so click "Add route" in the bottom-left.

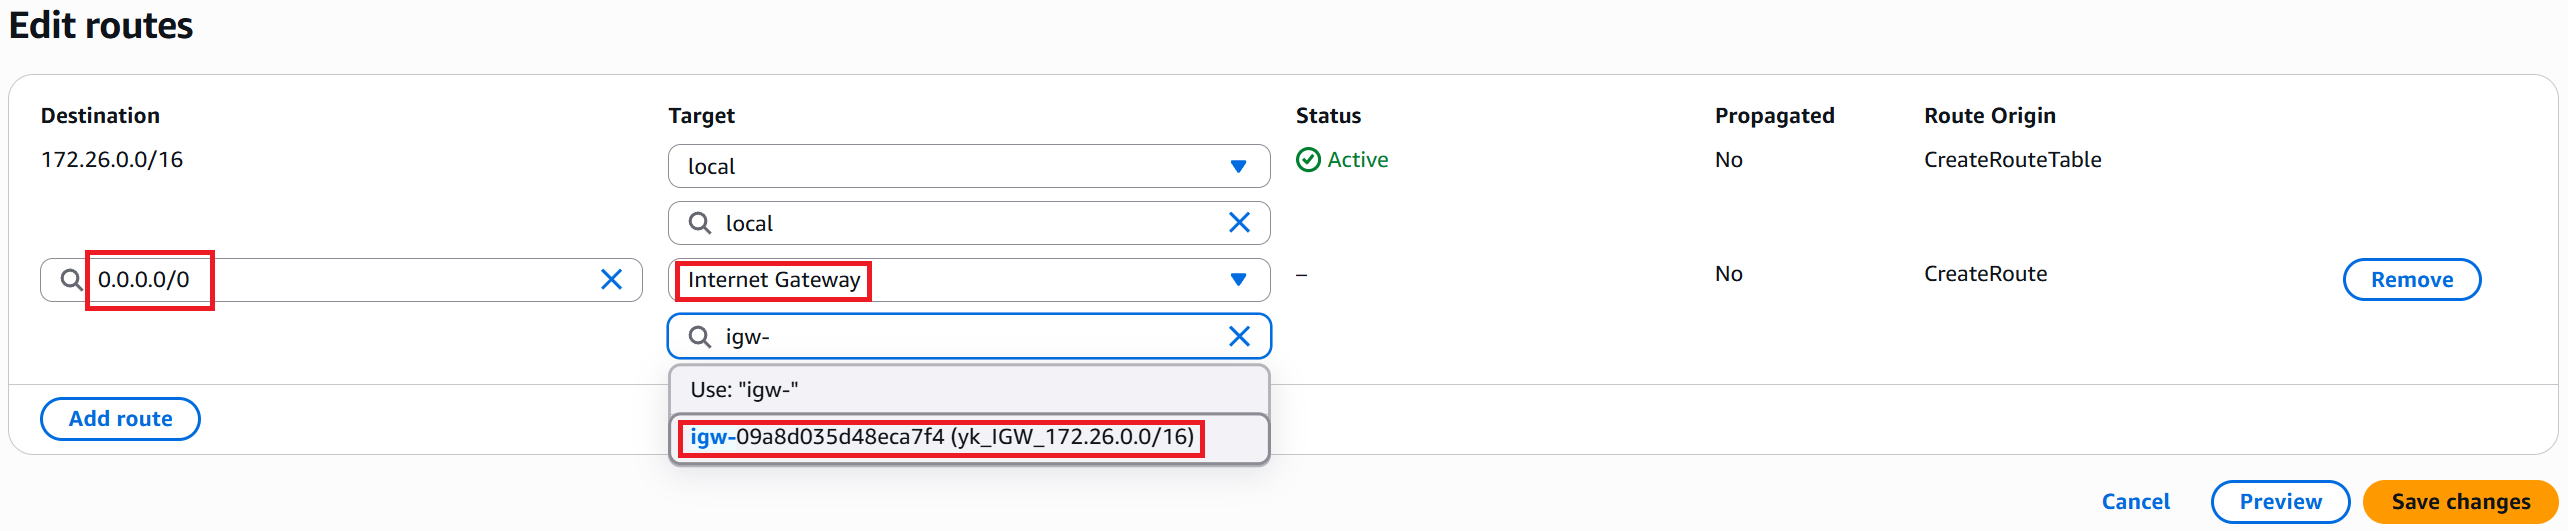
⑤ Select "0.0.0.0/0" for Destination.
Select "Internet Gateway" for the Target type, then select "yk_IGW_172.26.0.0/16" and click "Save changes" in the bottom-right.
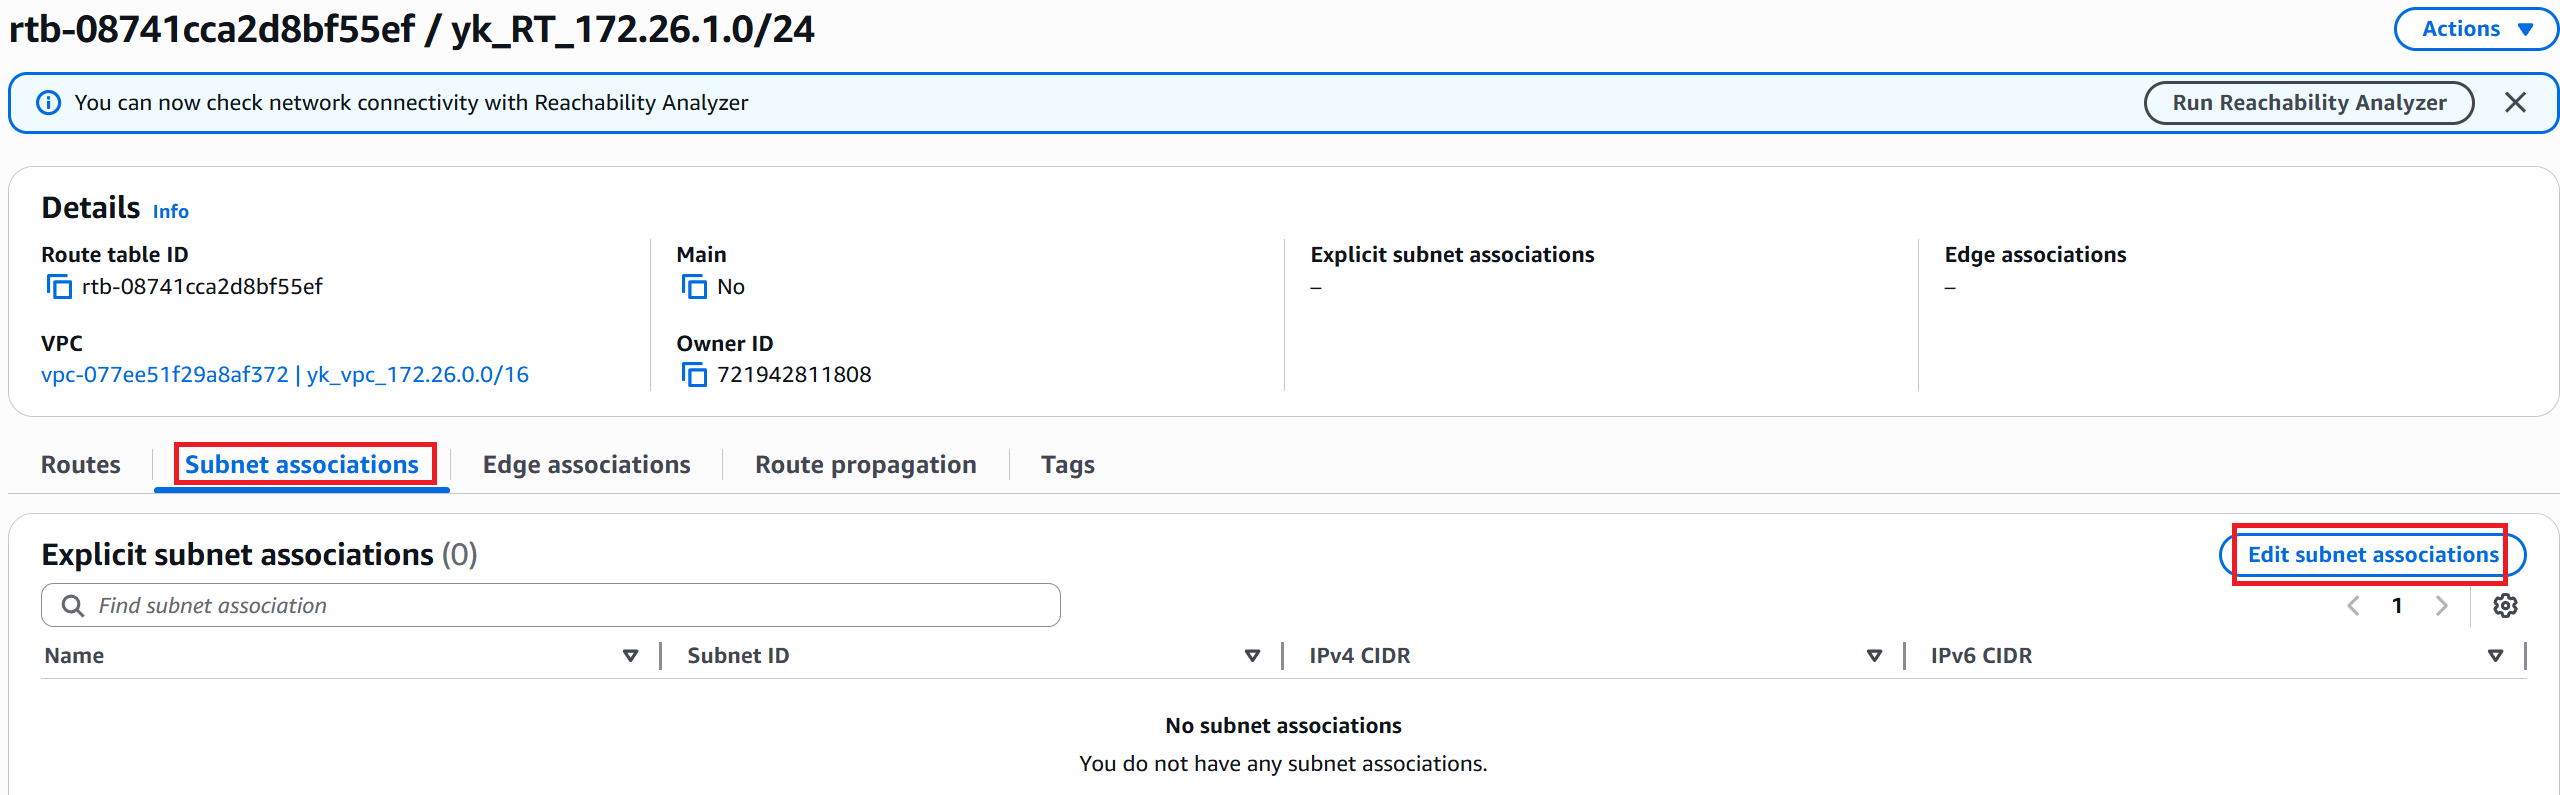
⑥ To associate this route table with the subnet, go to "Subnet associations" → then click "Edit subnet associations".
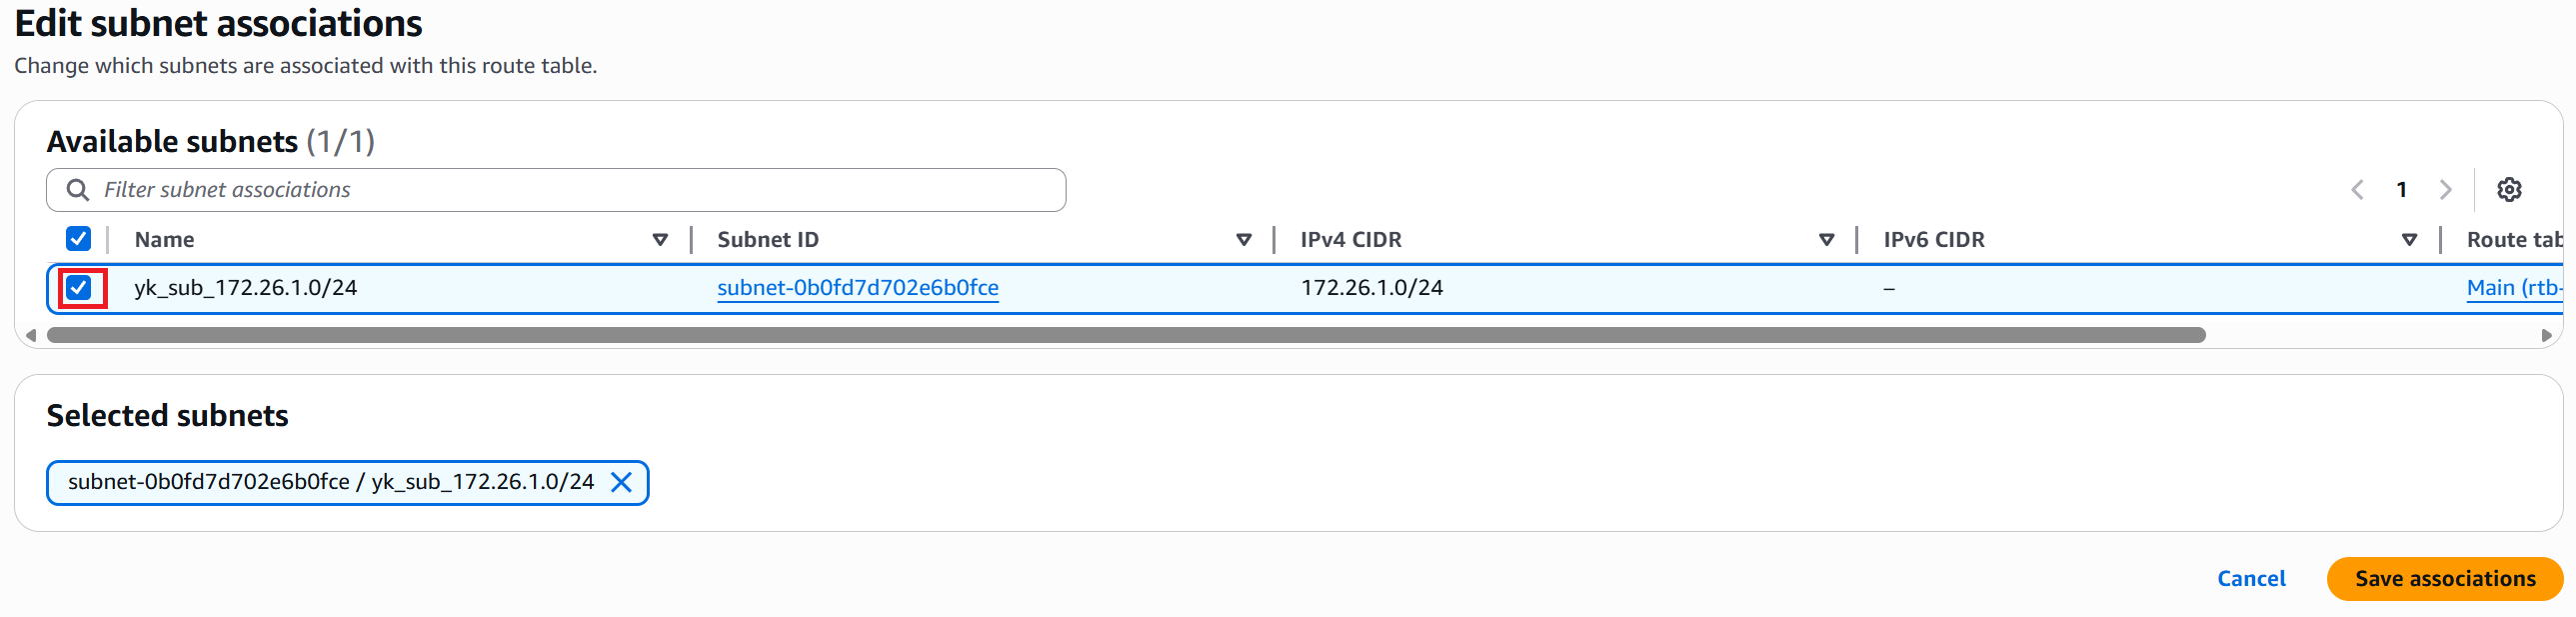
⑦ Check the subnet you want to associate (this time: yk_sub_172.26.1.0/24) and click "Save associations" in the bottom-right.
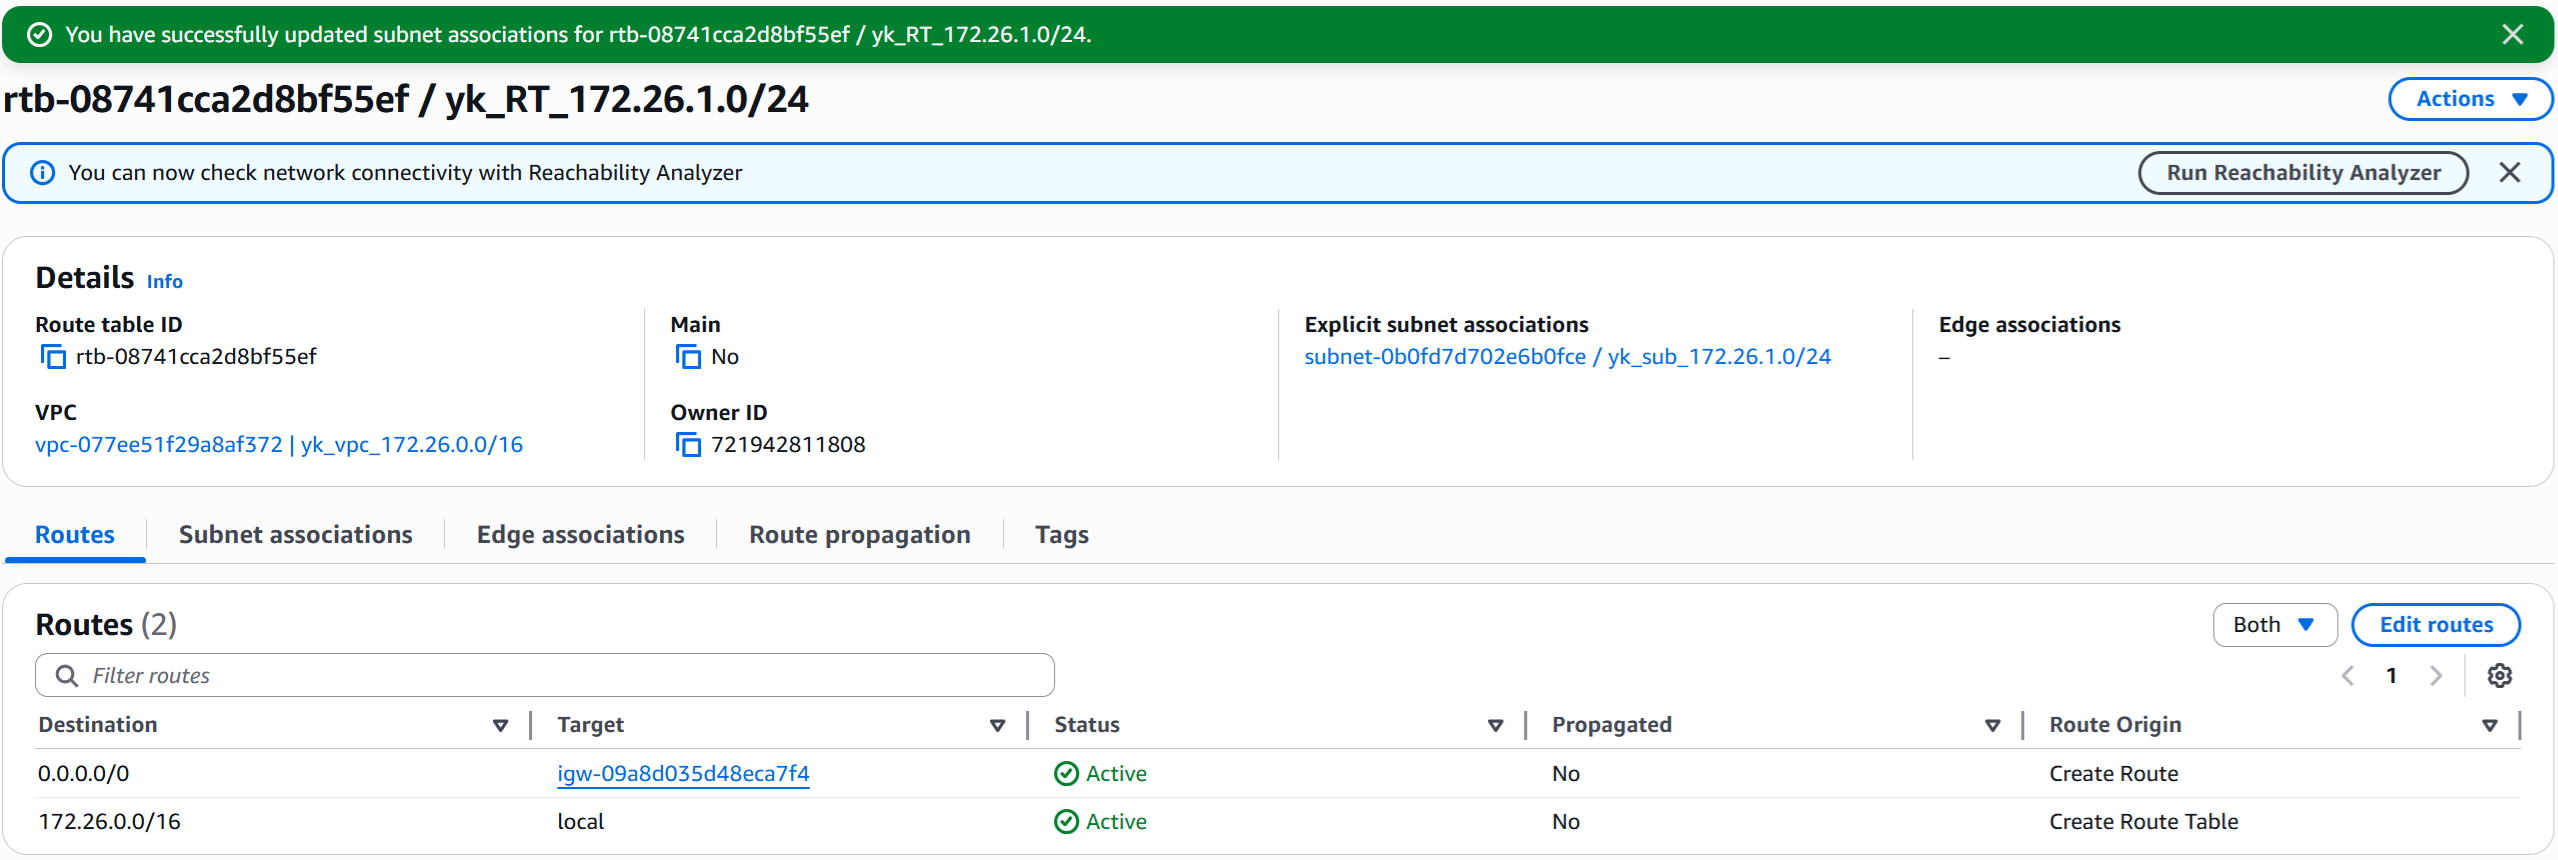
⑧ The completion screen is displayed.
Build a Windows VM
|
Now, let's finally build a Windows VM in the red-boxed area. The IP address will be 172.26.1.101/24. |
|
This feels like the main dish! |
|
Right. Note that AWS doesn't support PC-only operating systems like Windows 11, so we'll use Windows Server instead. Windows Server can be used as a server but also works just fine as a regular PC. |
|
Got it. |
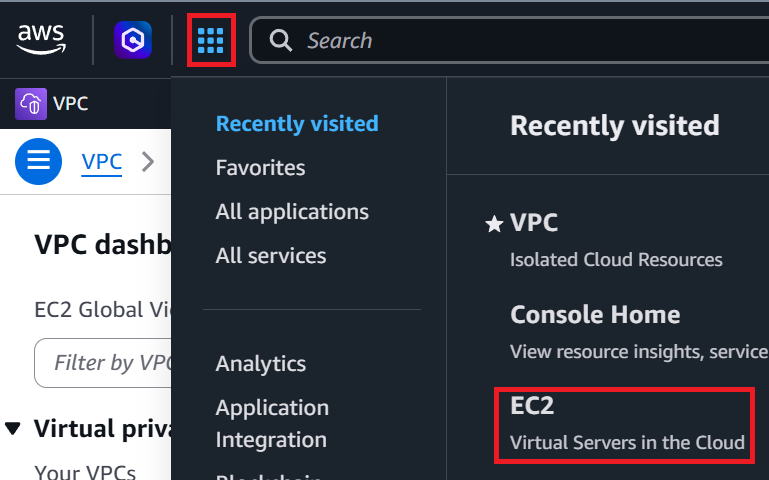
① Click the grid icon (dots) in the top-left corner → then click EC2.
② In the left menu, click "Instances" → then click "Launch instance" in the top-right.

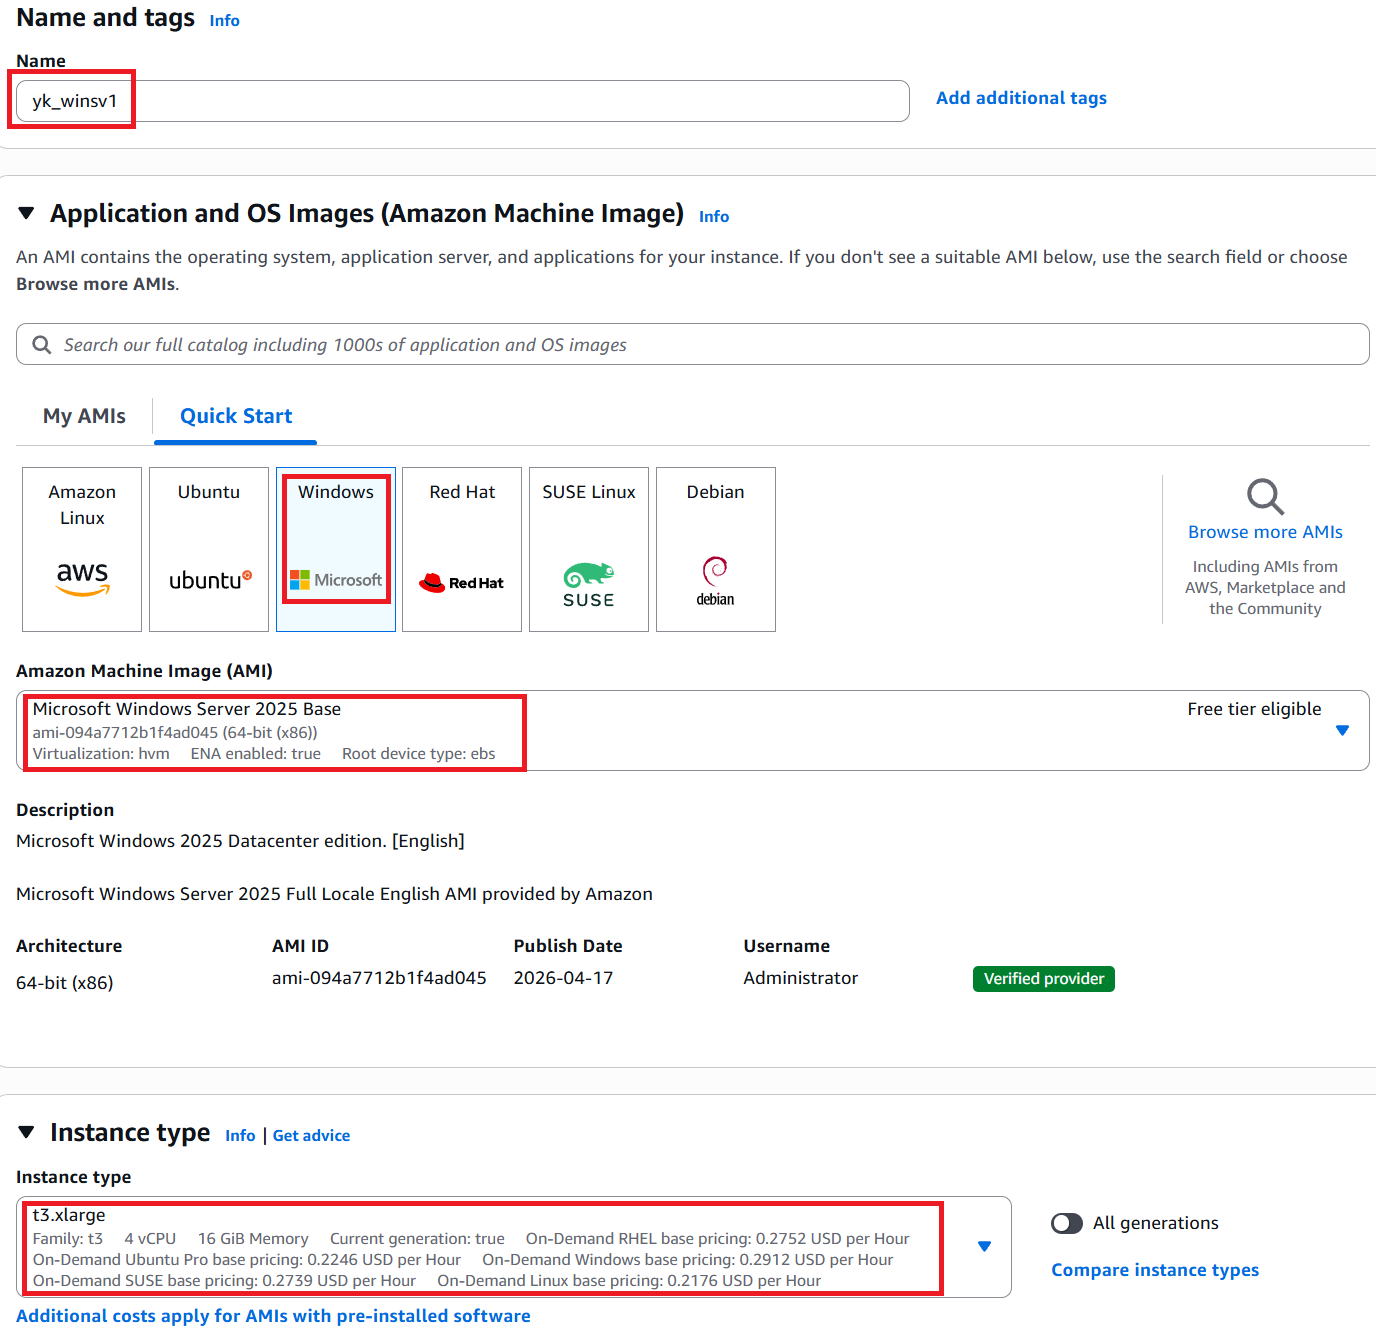
③ Enter any name in the Name field (this time: yk_winsv1).
For Application and OS Images, select "Windows".
For Amazon Machine Image, select "Windows Server 2025 Base".
For Instance type, select "t3.xlarge" with 16 GB of memory.
※ Windows VMs tend to run slowly with less memory, so 16 GB or more is recommended.
※ For production use, something more stable like "m5.xlarge" would be better, but since this is for testing, we'll go with the t-series.
④ Select a Key pair. Since we haven't created one yet, click "Create new key pair". This key will be used later when logging into the VM.

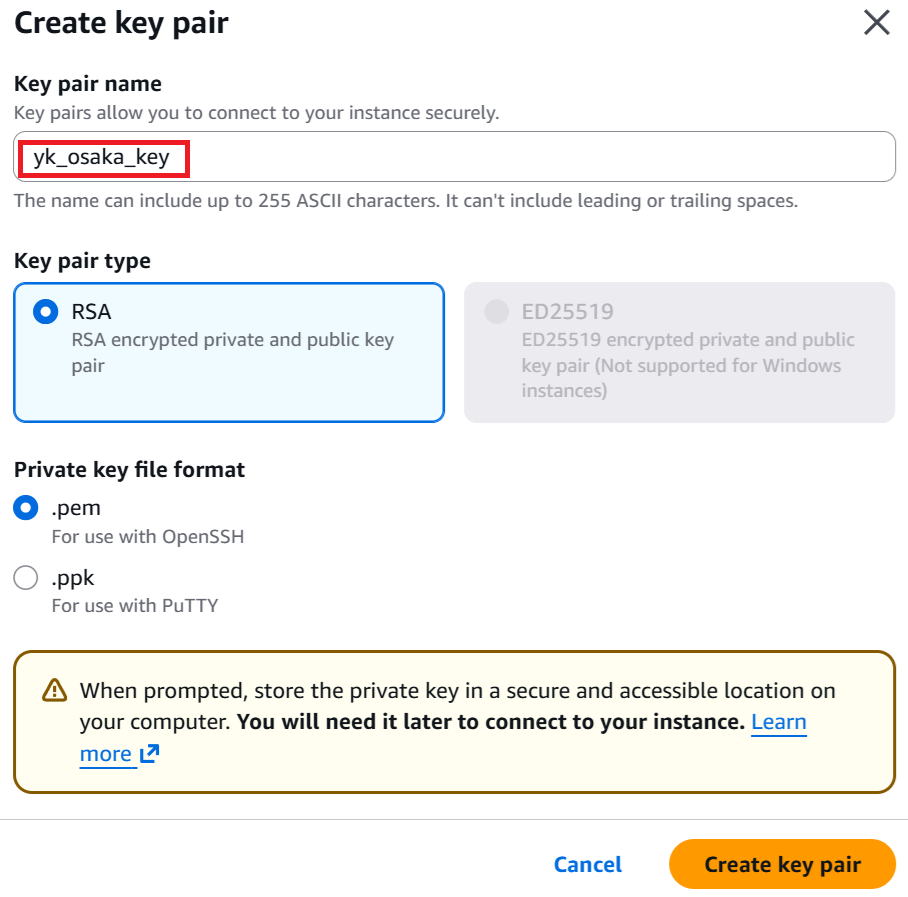
⑤ Enter any name for the Key pair name (this time: yk_osaka_key) and click "Create key pair" in the bottom-right.
A file called "yk_osaka_key.pem" will be downloaded — keep it safe.
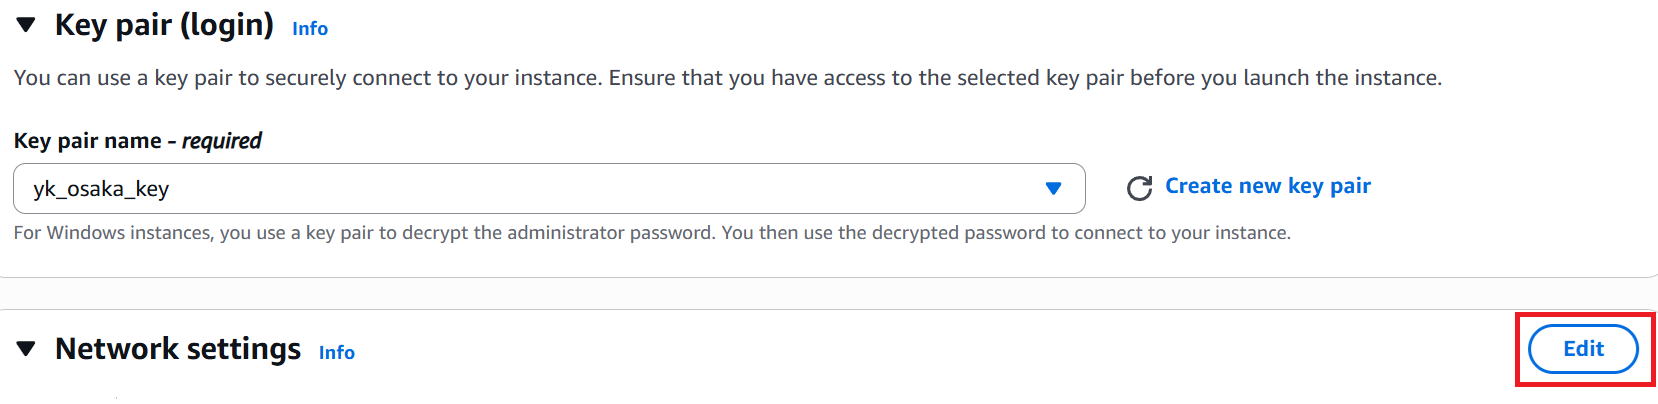
⑥ Click "Edit" in the Network settings section.
⑦ Select "yk_vpc_172.26.0.0/16" for VPC.
Select "yk_sub_172.26.1.0/24" for Subnet.
Set Auto-assign public IP to Enable.
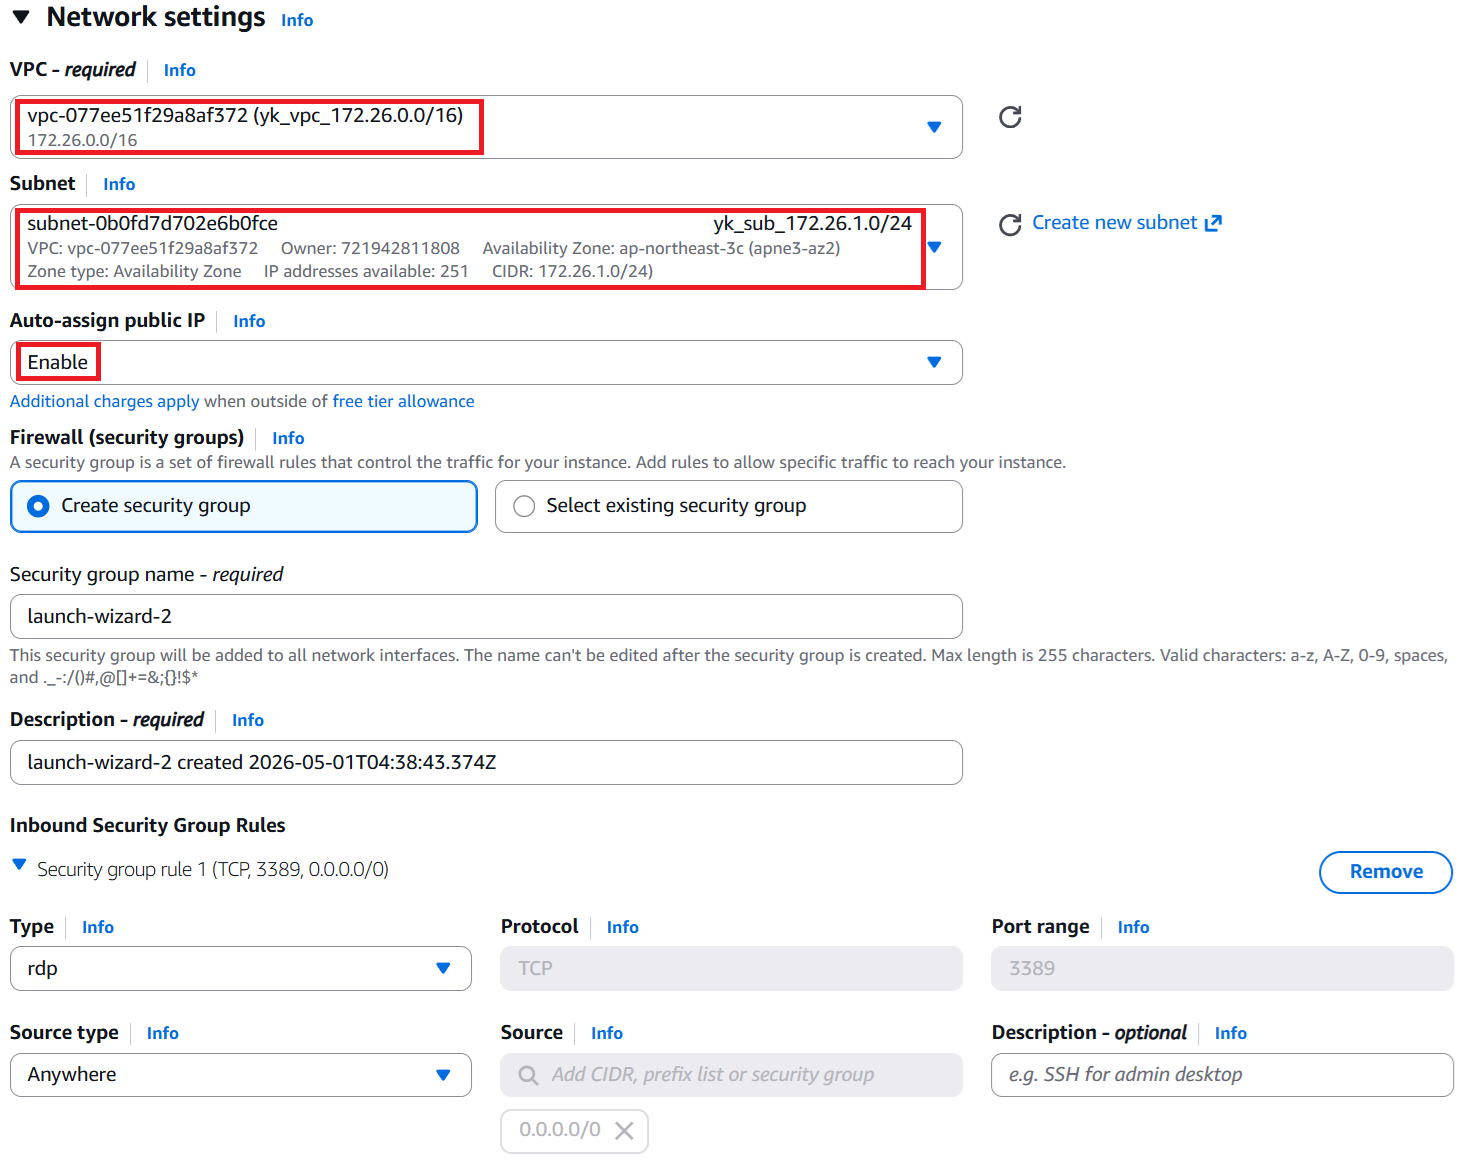
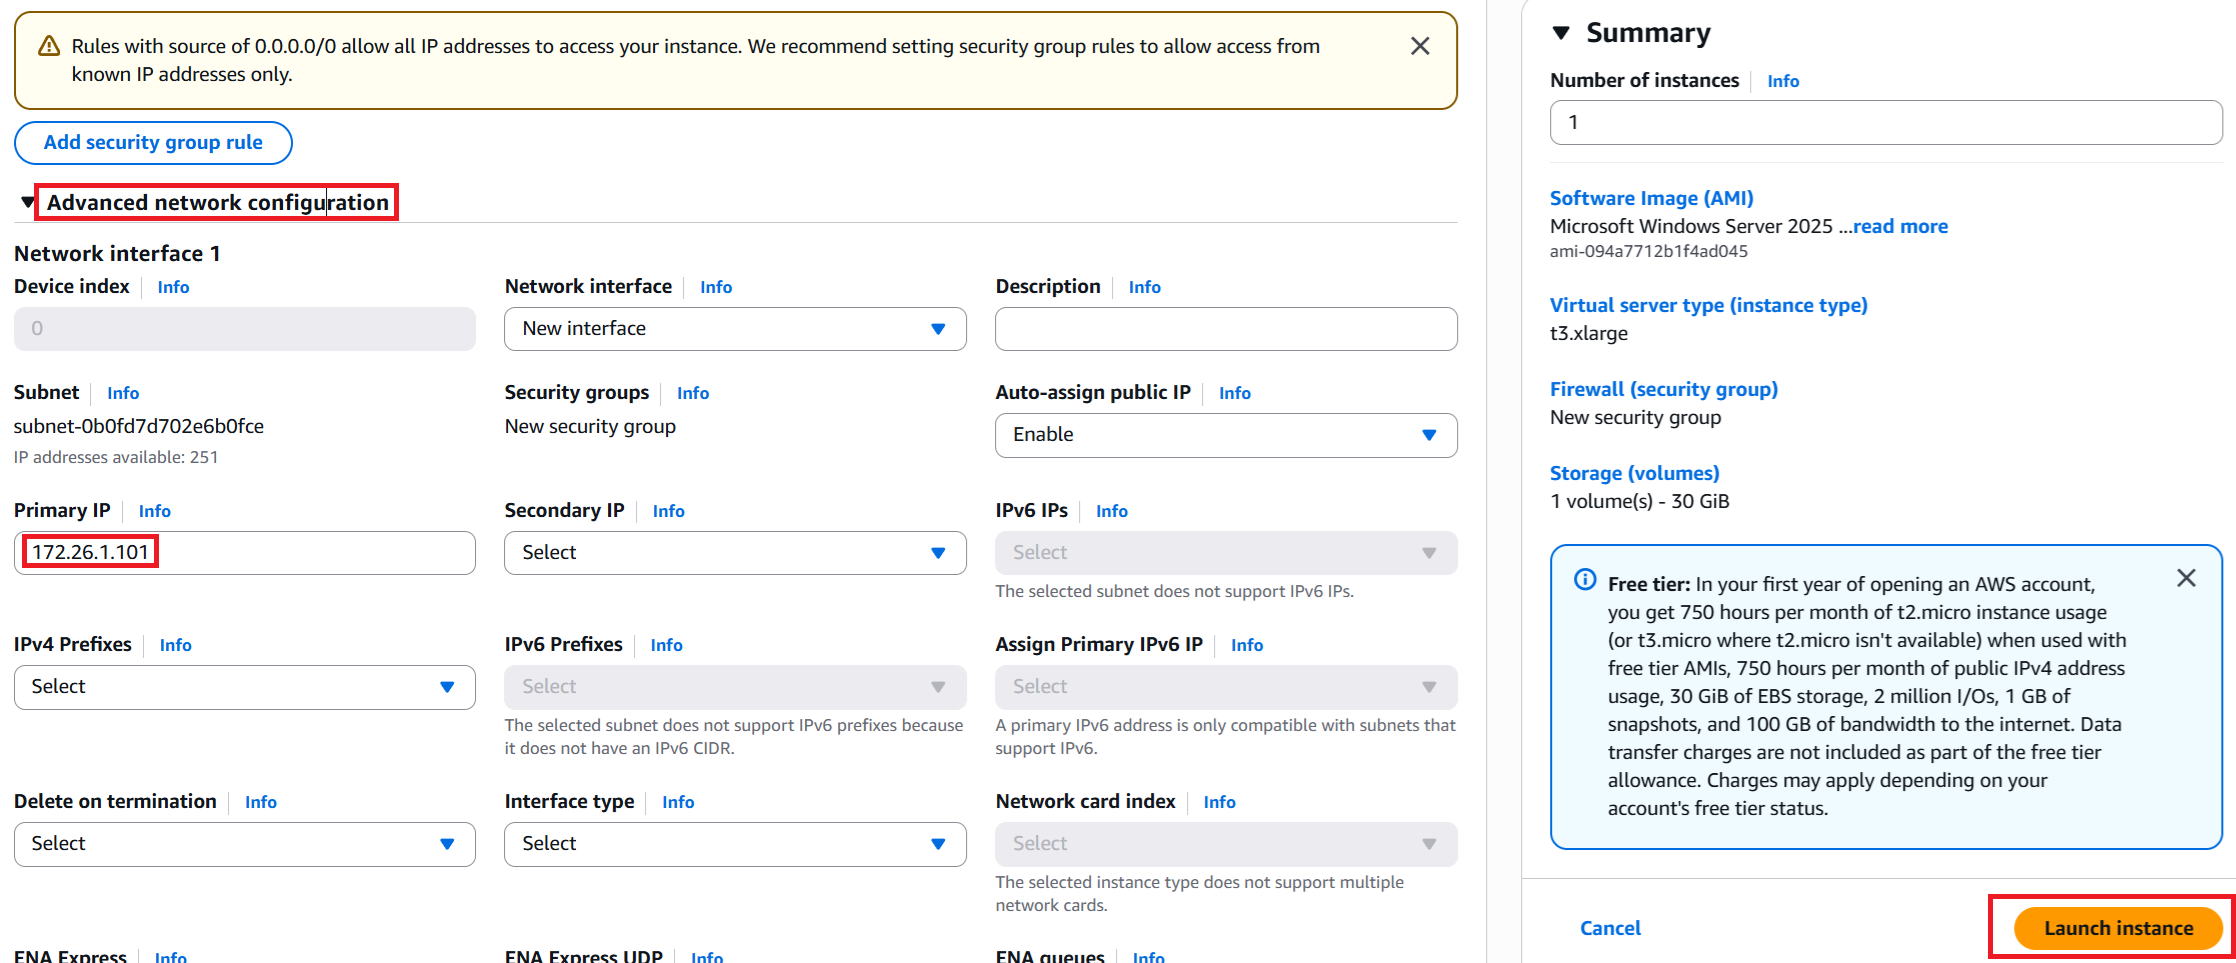
⑧ Click "Advanced network configuration" to expand the detailed settings.
Enter "172.26.1.101" in the Primary IP field.
Leave everything else as-is and click "Launch instance" in the bottom-right.
⑨ A success message is displayed. Click the instance ID in the red box.

⑩ The details screen is displayed. Note down the auto-assigned IP address in the red box, then click "Connect" in the top-right.

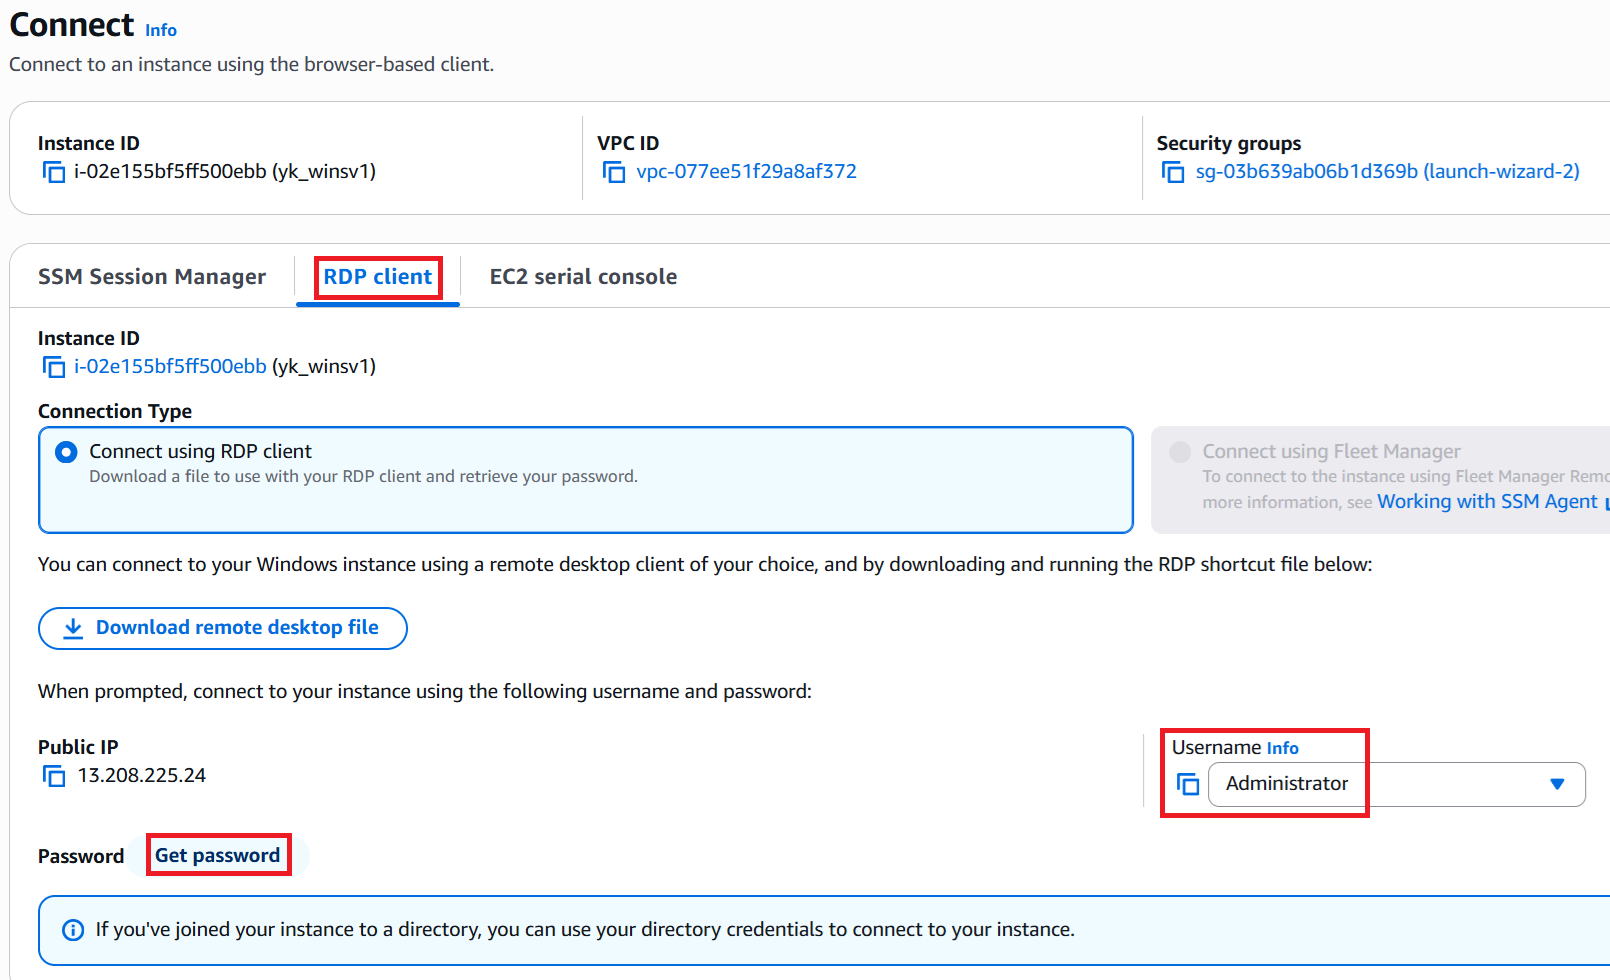
⑪ Click "RDP client" and the following screen will appear.
The Username is "Administrator". This is the login ID for RDP. It's fixed, but note it down anyway.
Then click "Get password" in the bottom-left.
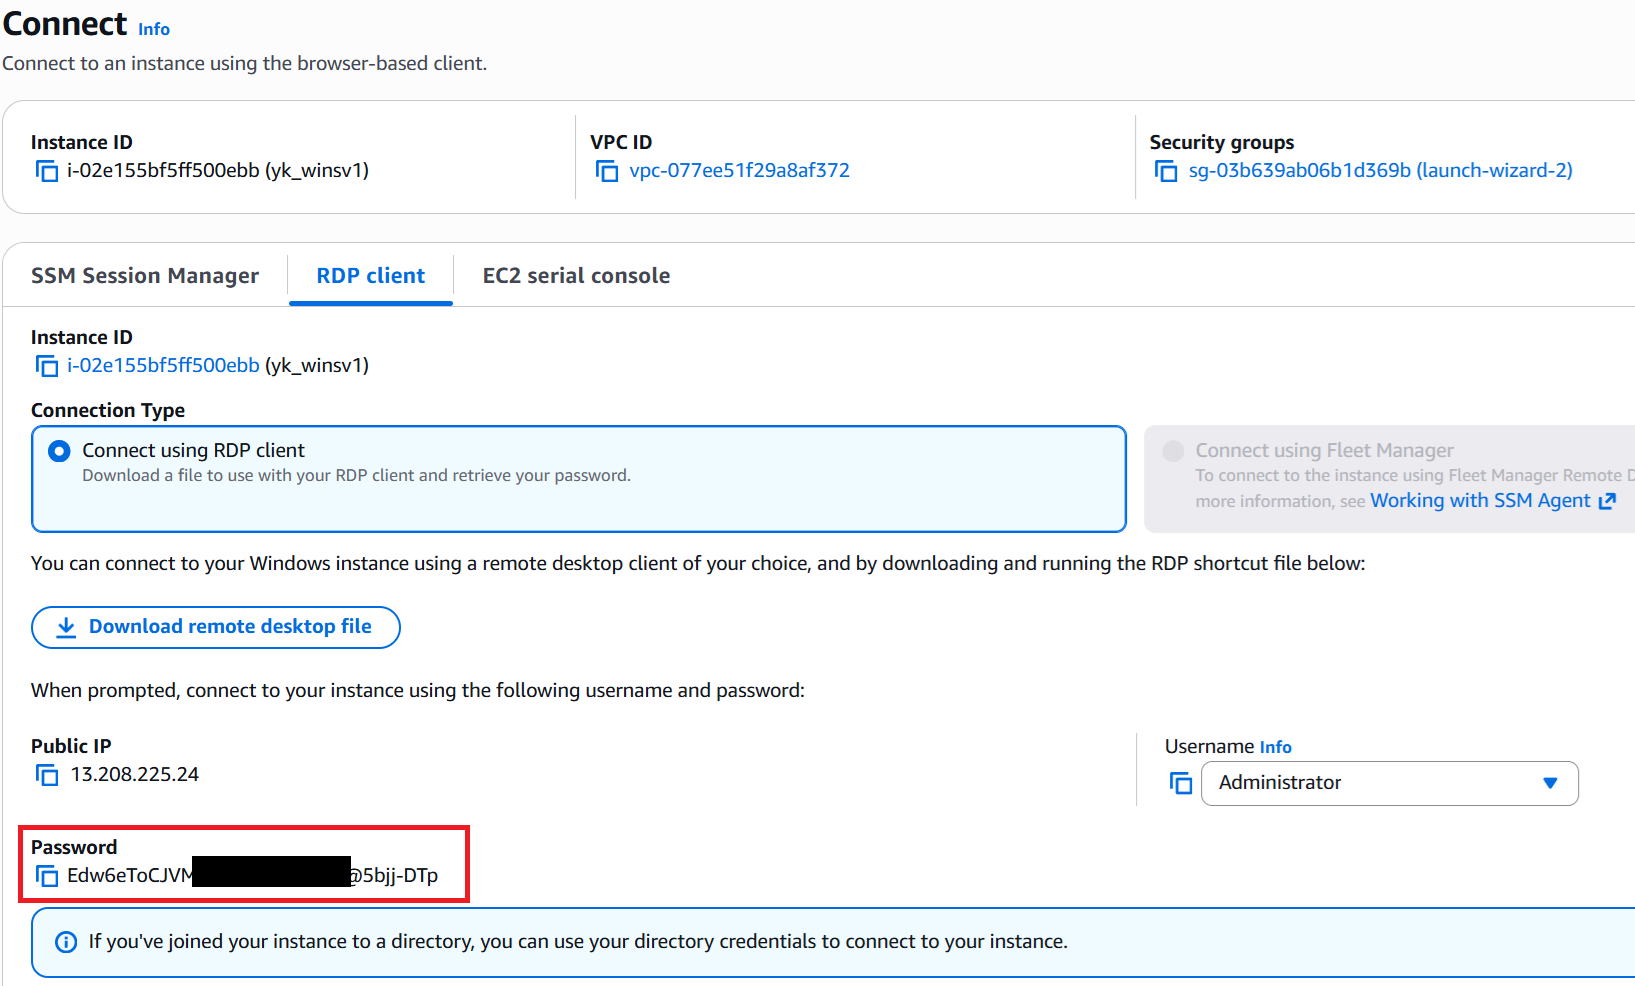
⑫ Click "Upload private key file", select the key used when creating the VM (this time: yk_osaka_key), and click "Decrypt password" in the bottom-right.
※ This screen may not appear immediately after the VM is created. Wait 2–3 minutes after creation before trying again.

⑬ The password is generated — note it down.
|
Isn't it risky to expose a GIP (global IP address) like this? |
|
The GIP we got with "auto-assign" is a dynamic IP — the next time the VM starts, a different GIP will be assigned, so it's not a problem. |
|
Got it. |
Verify the connection
|
Let's try connecting via RDP from our home PC. |
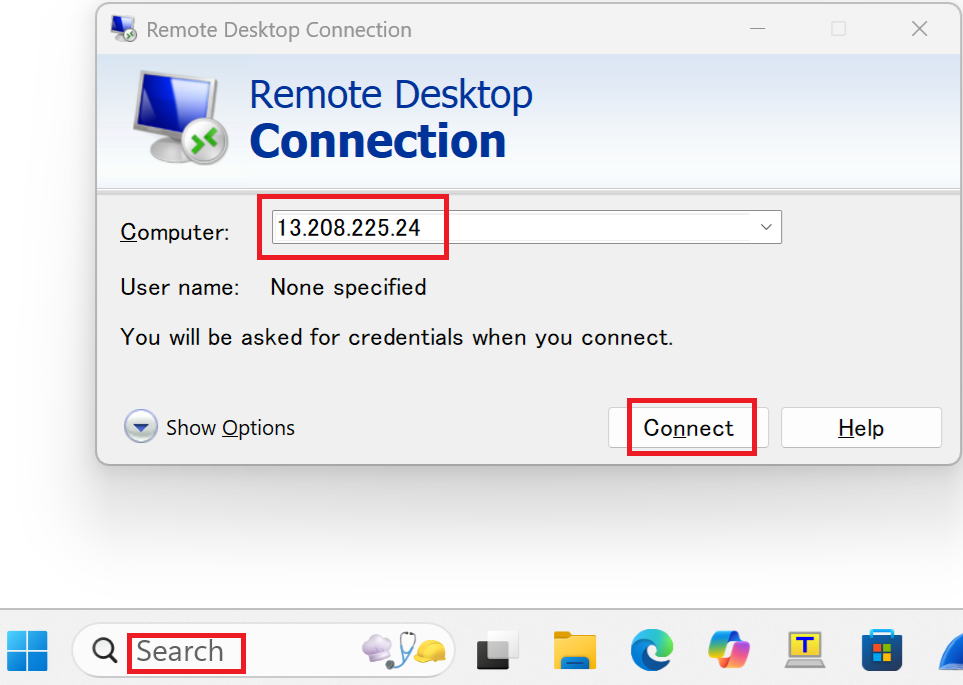
① Type "RDP" in the Search bar at the bottom-left and press Enter.
Enter the GIP from this session in the Computer field and click Connect.
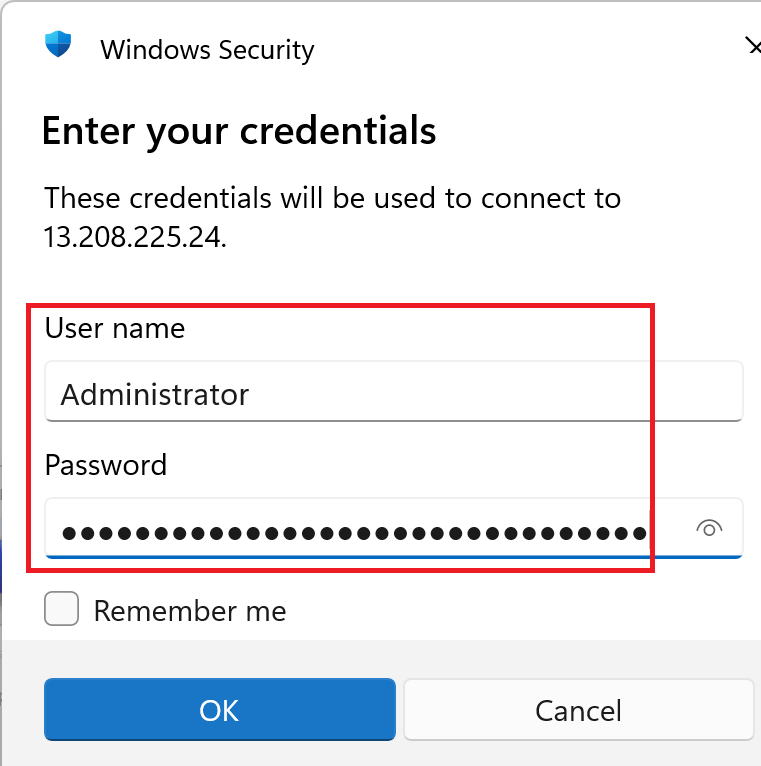
② Enter the Username and Password, then click OK.
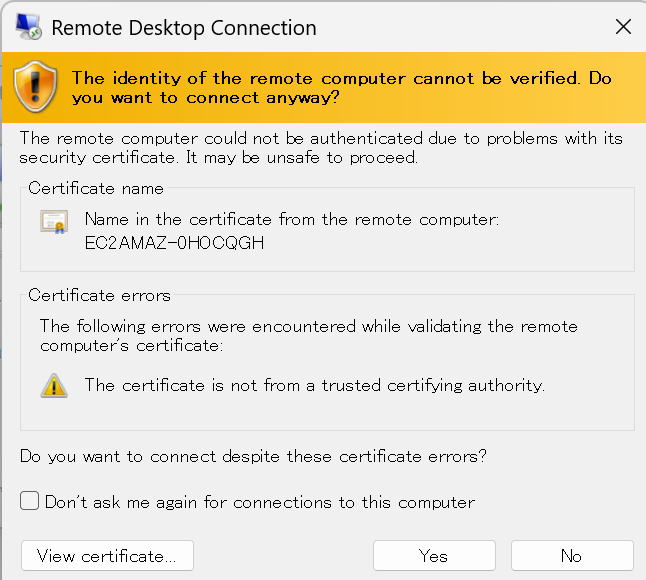
③ A confirmation dialog appears — click Yes.
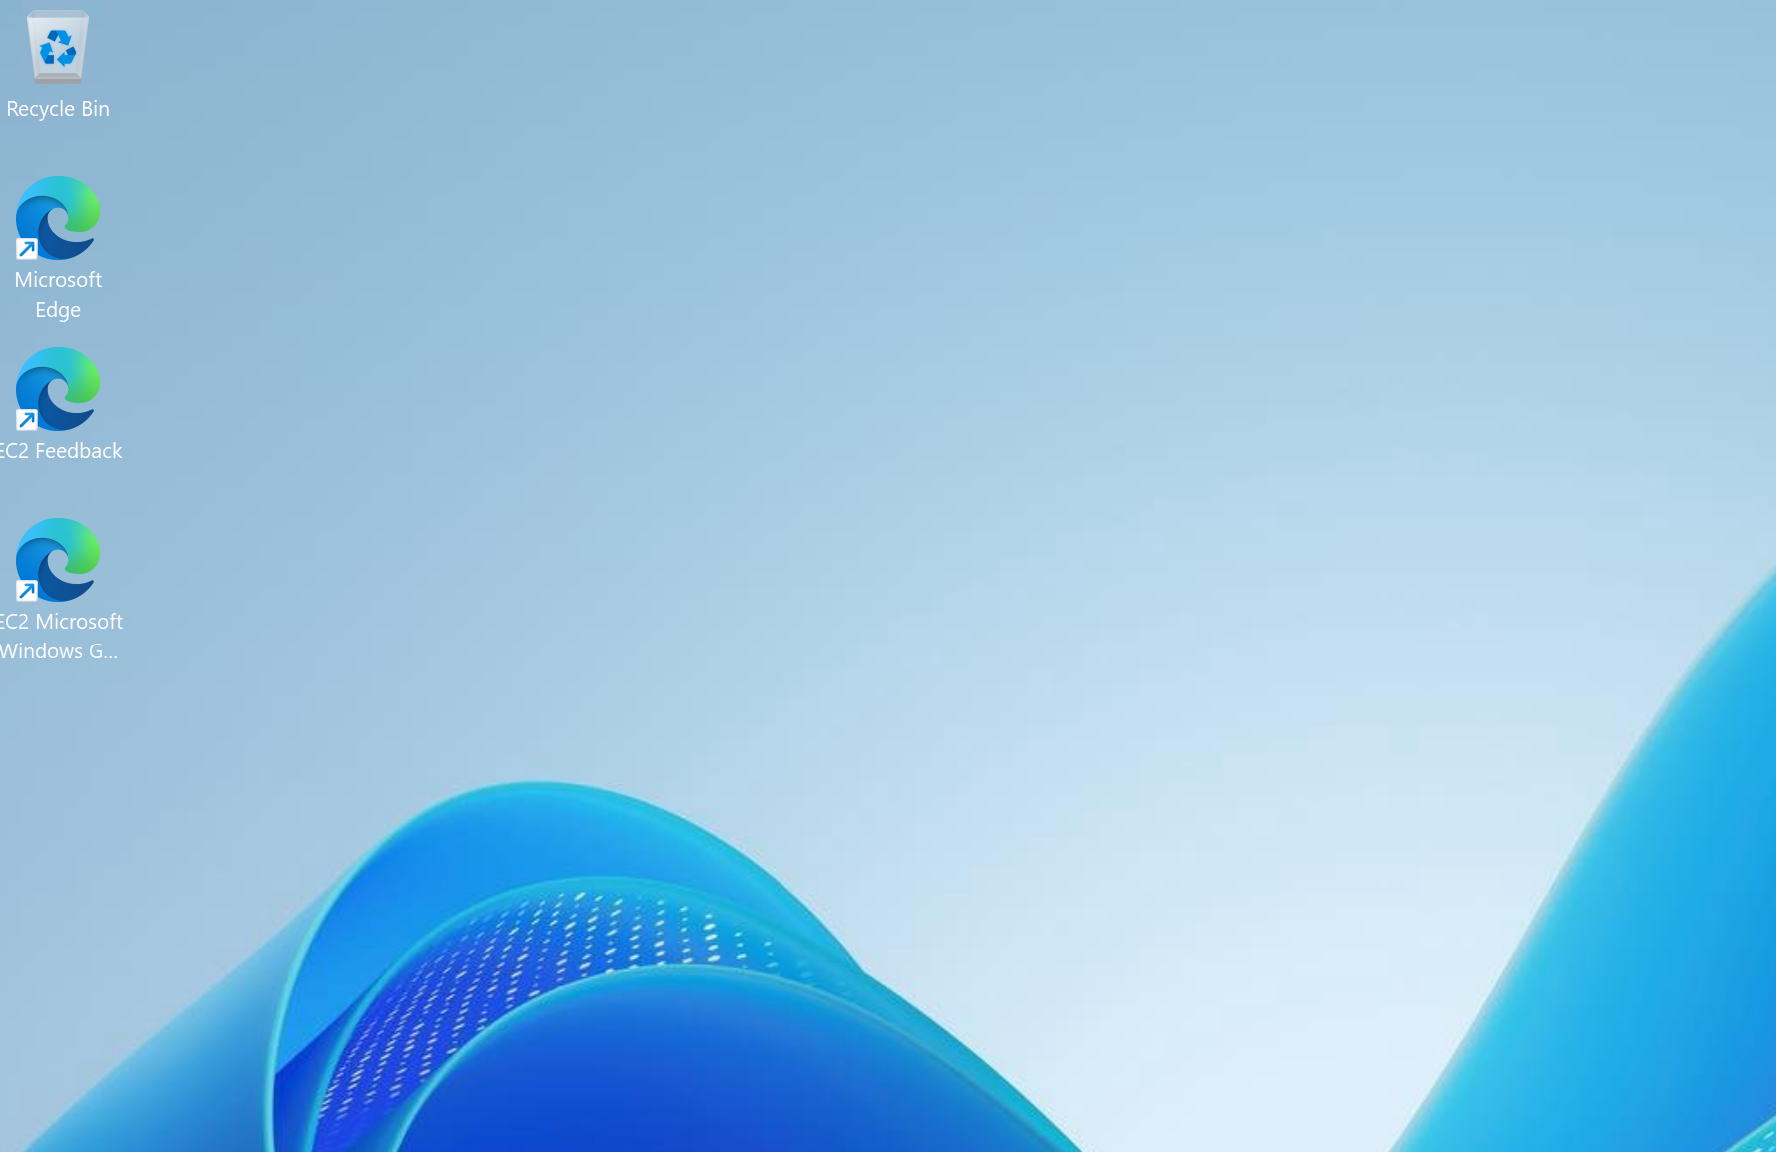
④ The RDP connection is successful and the desktop is displayed.
|
That was a long journey, but we made it to the goal! |
|
That's right. From here, we'll be adding more subnets and VMs for further testing. |
|
Got it. By the way, how much does what we built today actually cost? |
|
VPC, subnet, and route table are free. The IGW is charged based on data transfer, but for testing purposes the traffic is minimal, so don't worry about it. Dynamic IP usage is only charged while the VM is running and a GIP is assigned — again, negligible for testing. Note that static IPs continue to be charged even when the VM is stopped — about $4 (~¥600) per month. VM usage in this case is about $0.40 (~¥60) per hour while running. Storage costs while the VM is stopped are also charged, but they're at a negligible level. |
|
So at $0.40/hour, that's $9.60 (~¥1,440) if you leave it on for a full day. Forgetting to stop it could really add up! |
|
Absolutely. I've burned myself by forgetting to stop VMs more times than I'd like to admit. To stop a VM, check the target VM, then click "Stop Instance" from the Instance state menu in the top-right, as shown below. Be careful not to click "Terminate instance" — that will delete the VM permanently. Actually, I notice they've also added a "delete" label now, which makes it clearer. That label wasn't there until fairly recently. |

|
I see — with VMs you can spin them up and tear them down whenever you want, which is nice. |
|
Exactly. That flexibility is what makes it great. Alright, that's it for today. Thanks for reading! |