Last updated: 2026.9.7
| Contents of this page |
Purpose of this session
 |
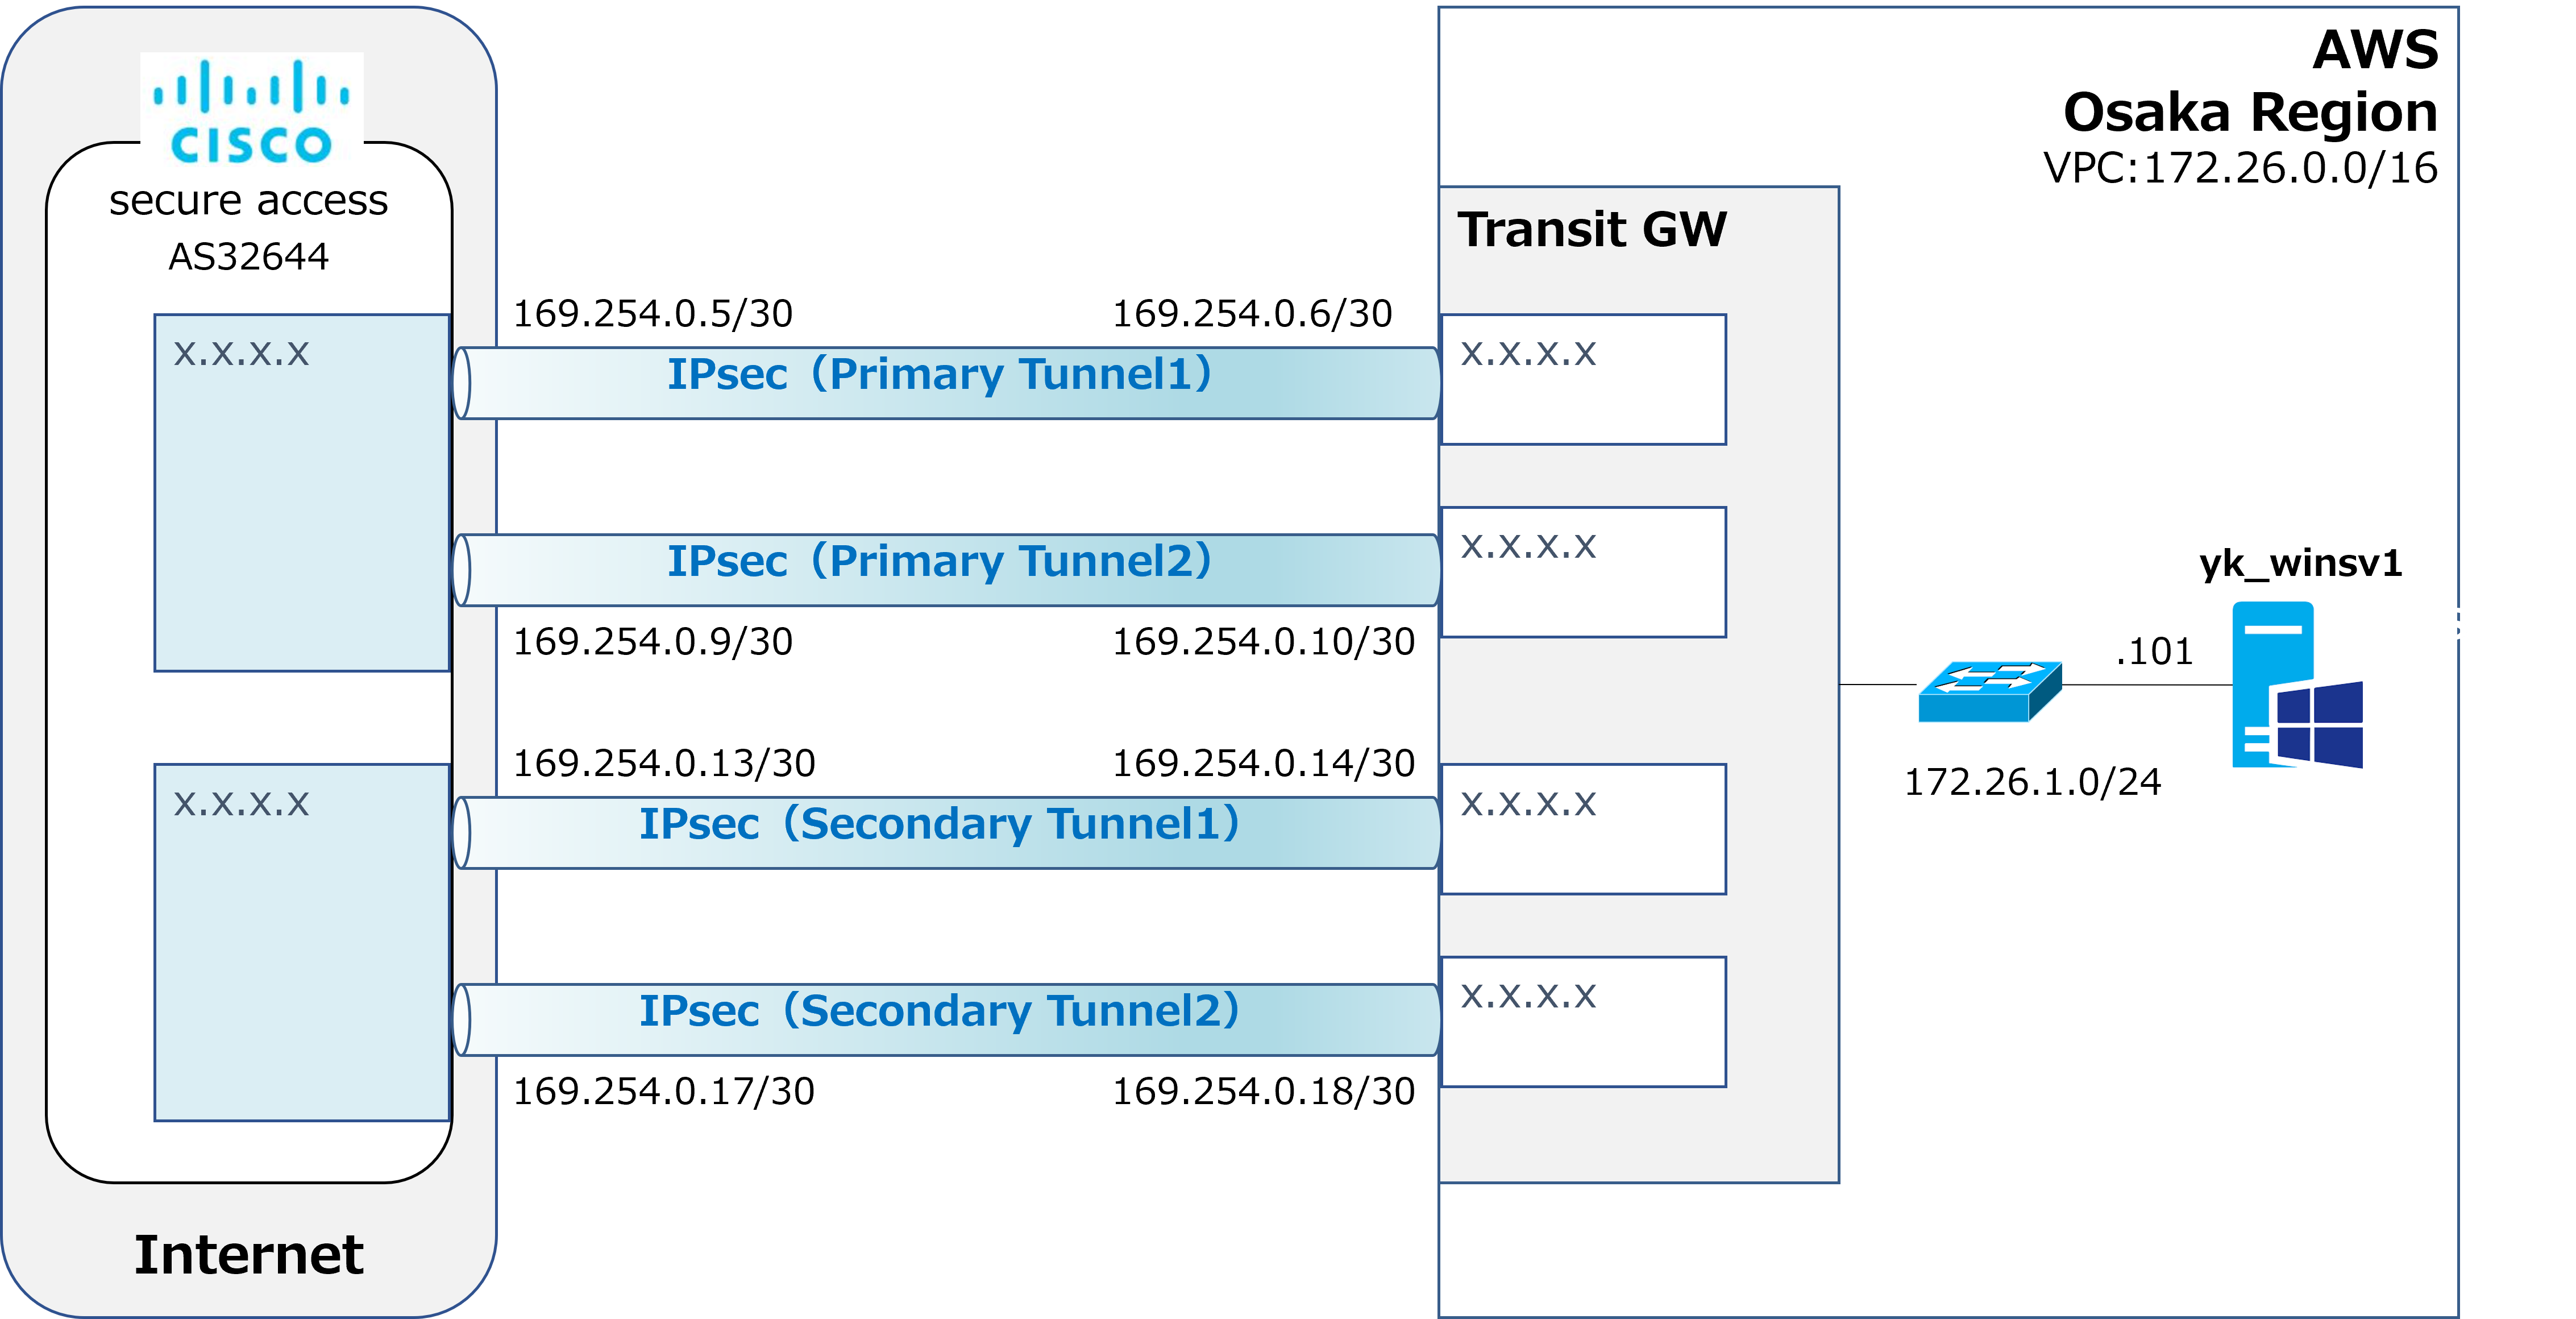
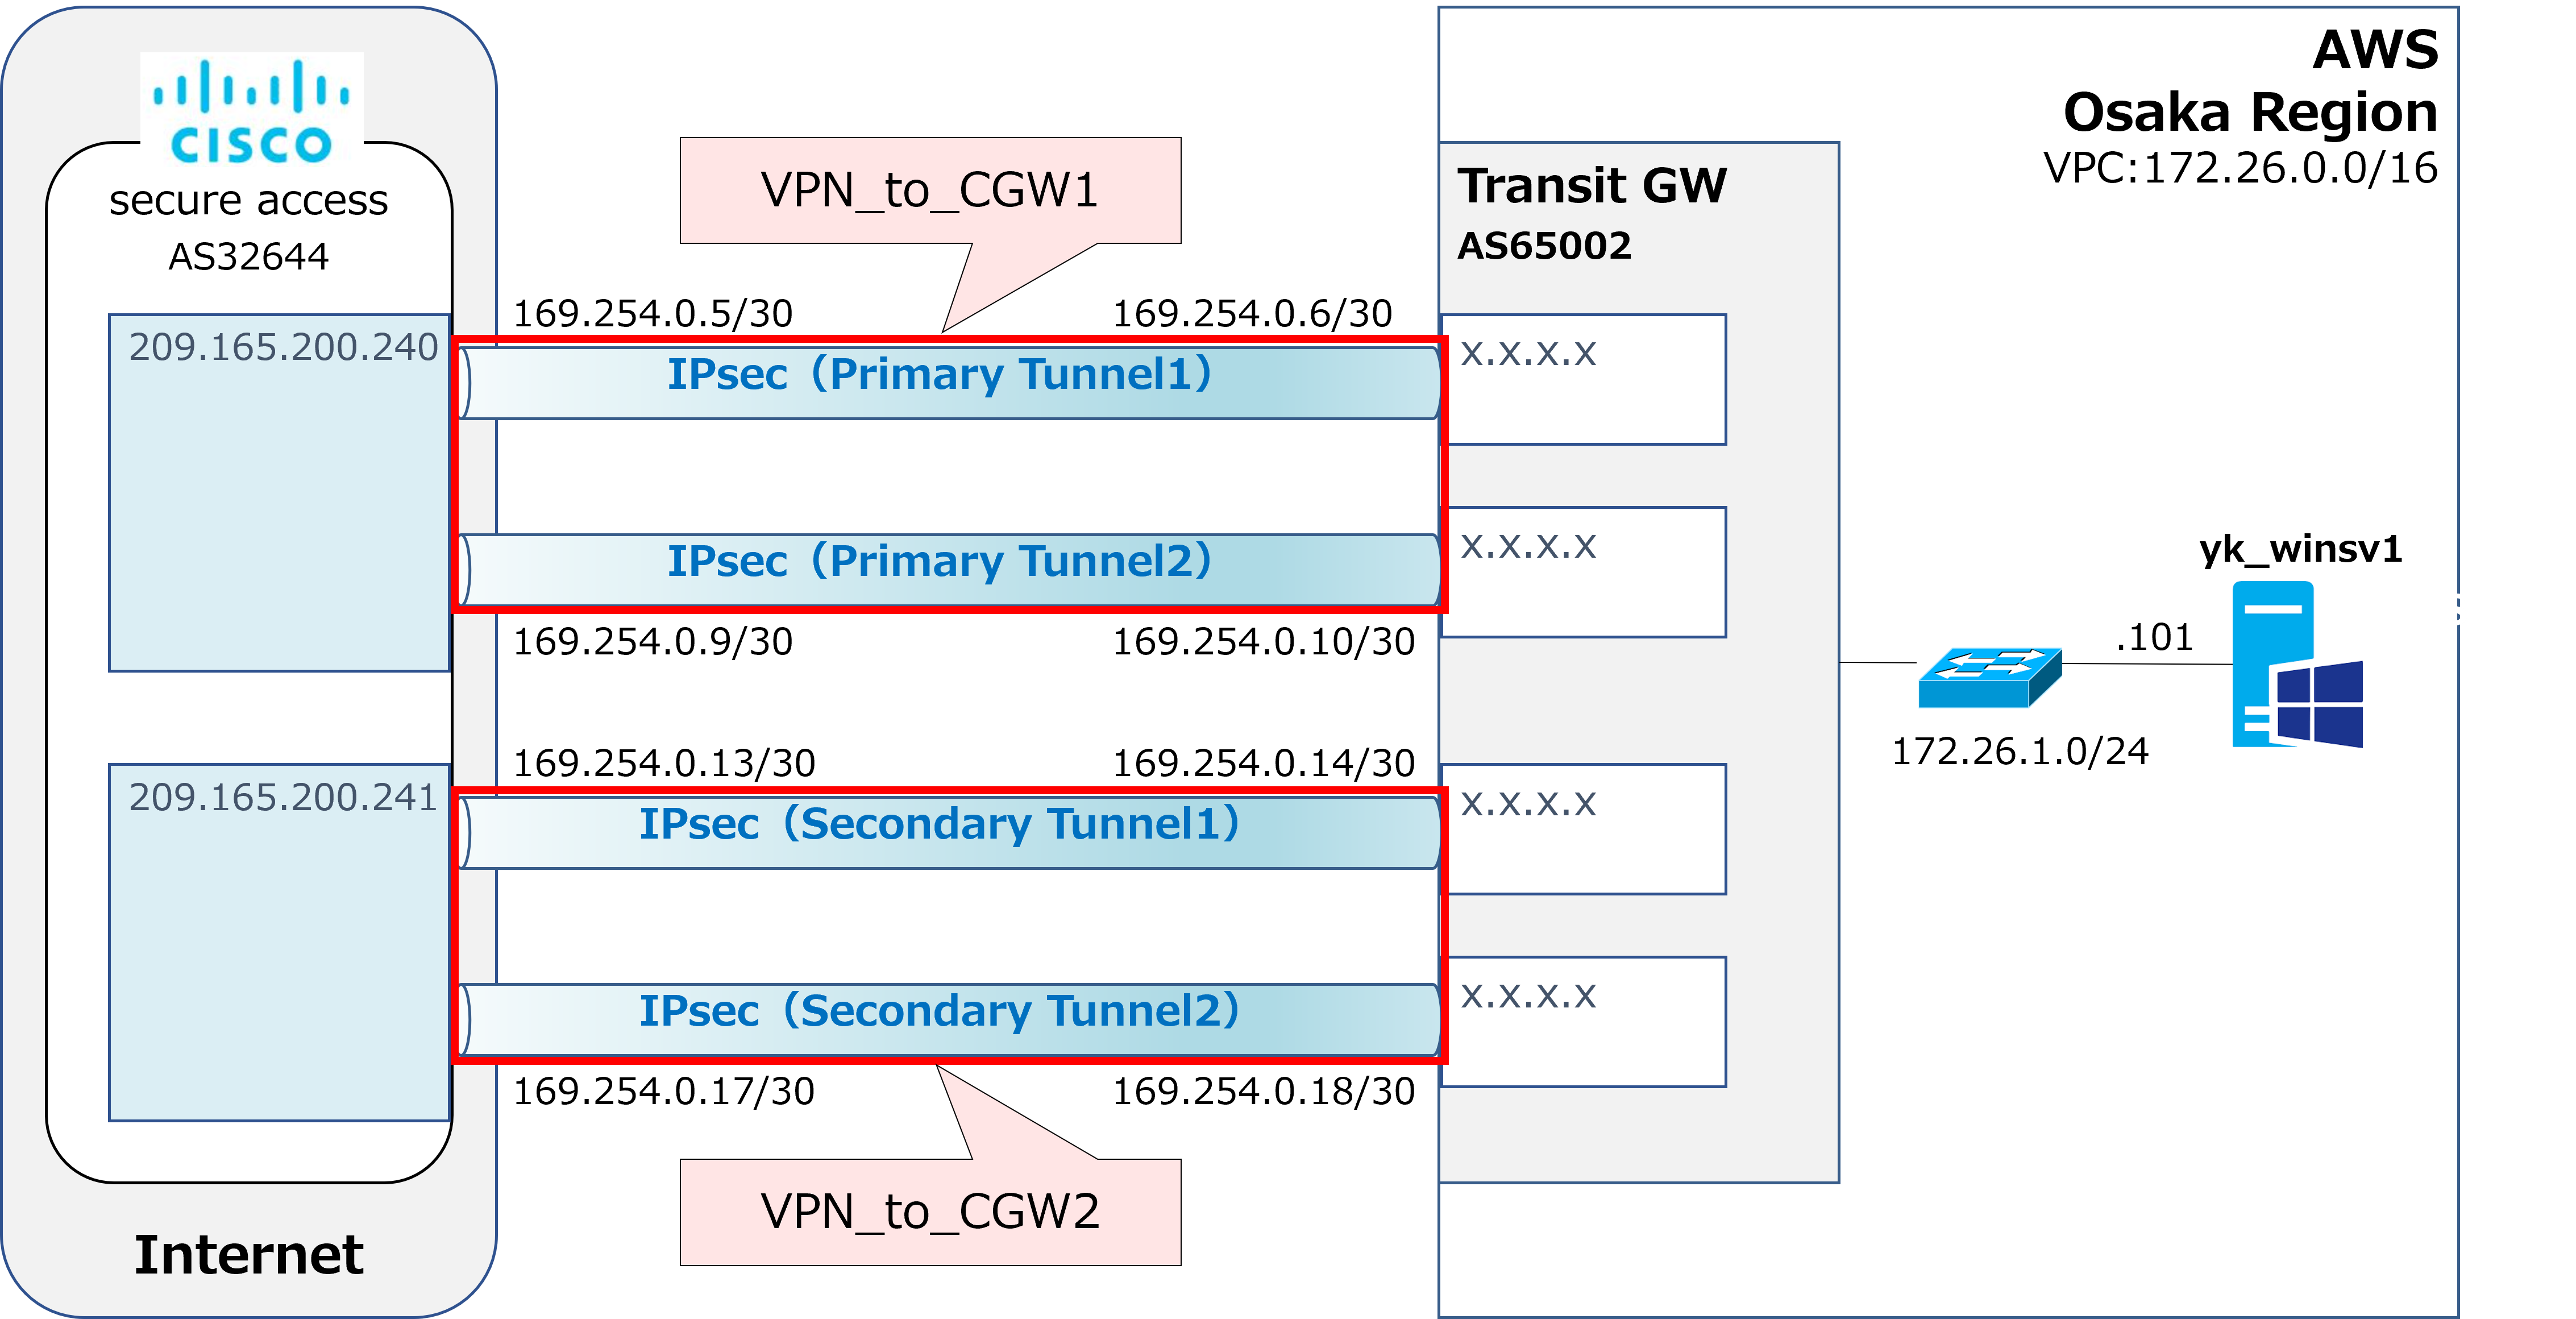
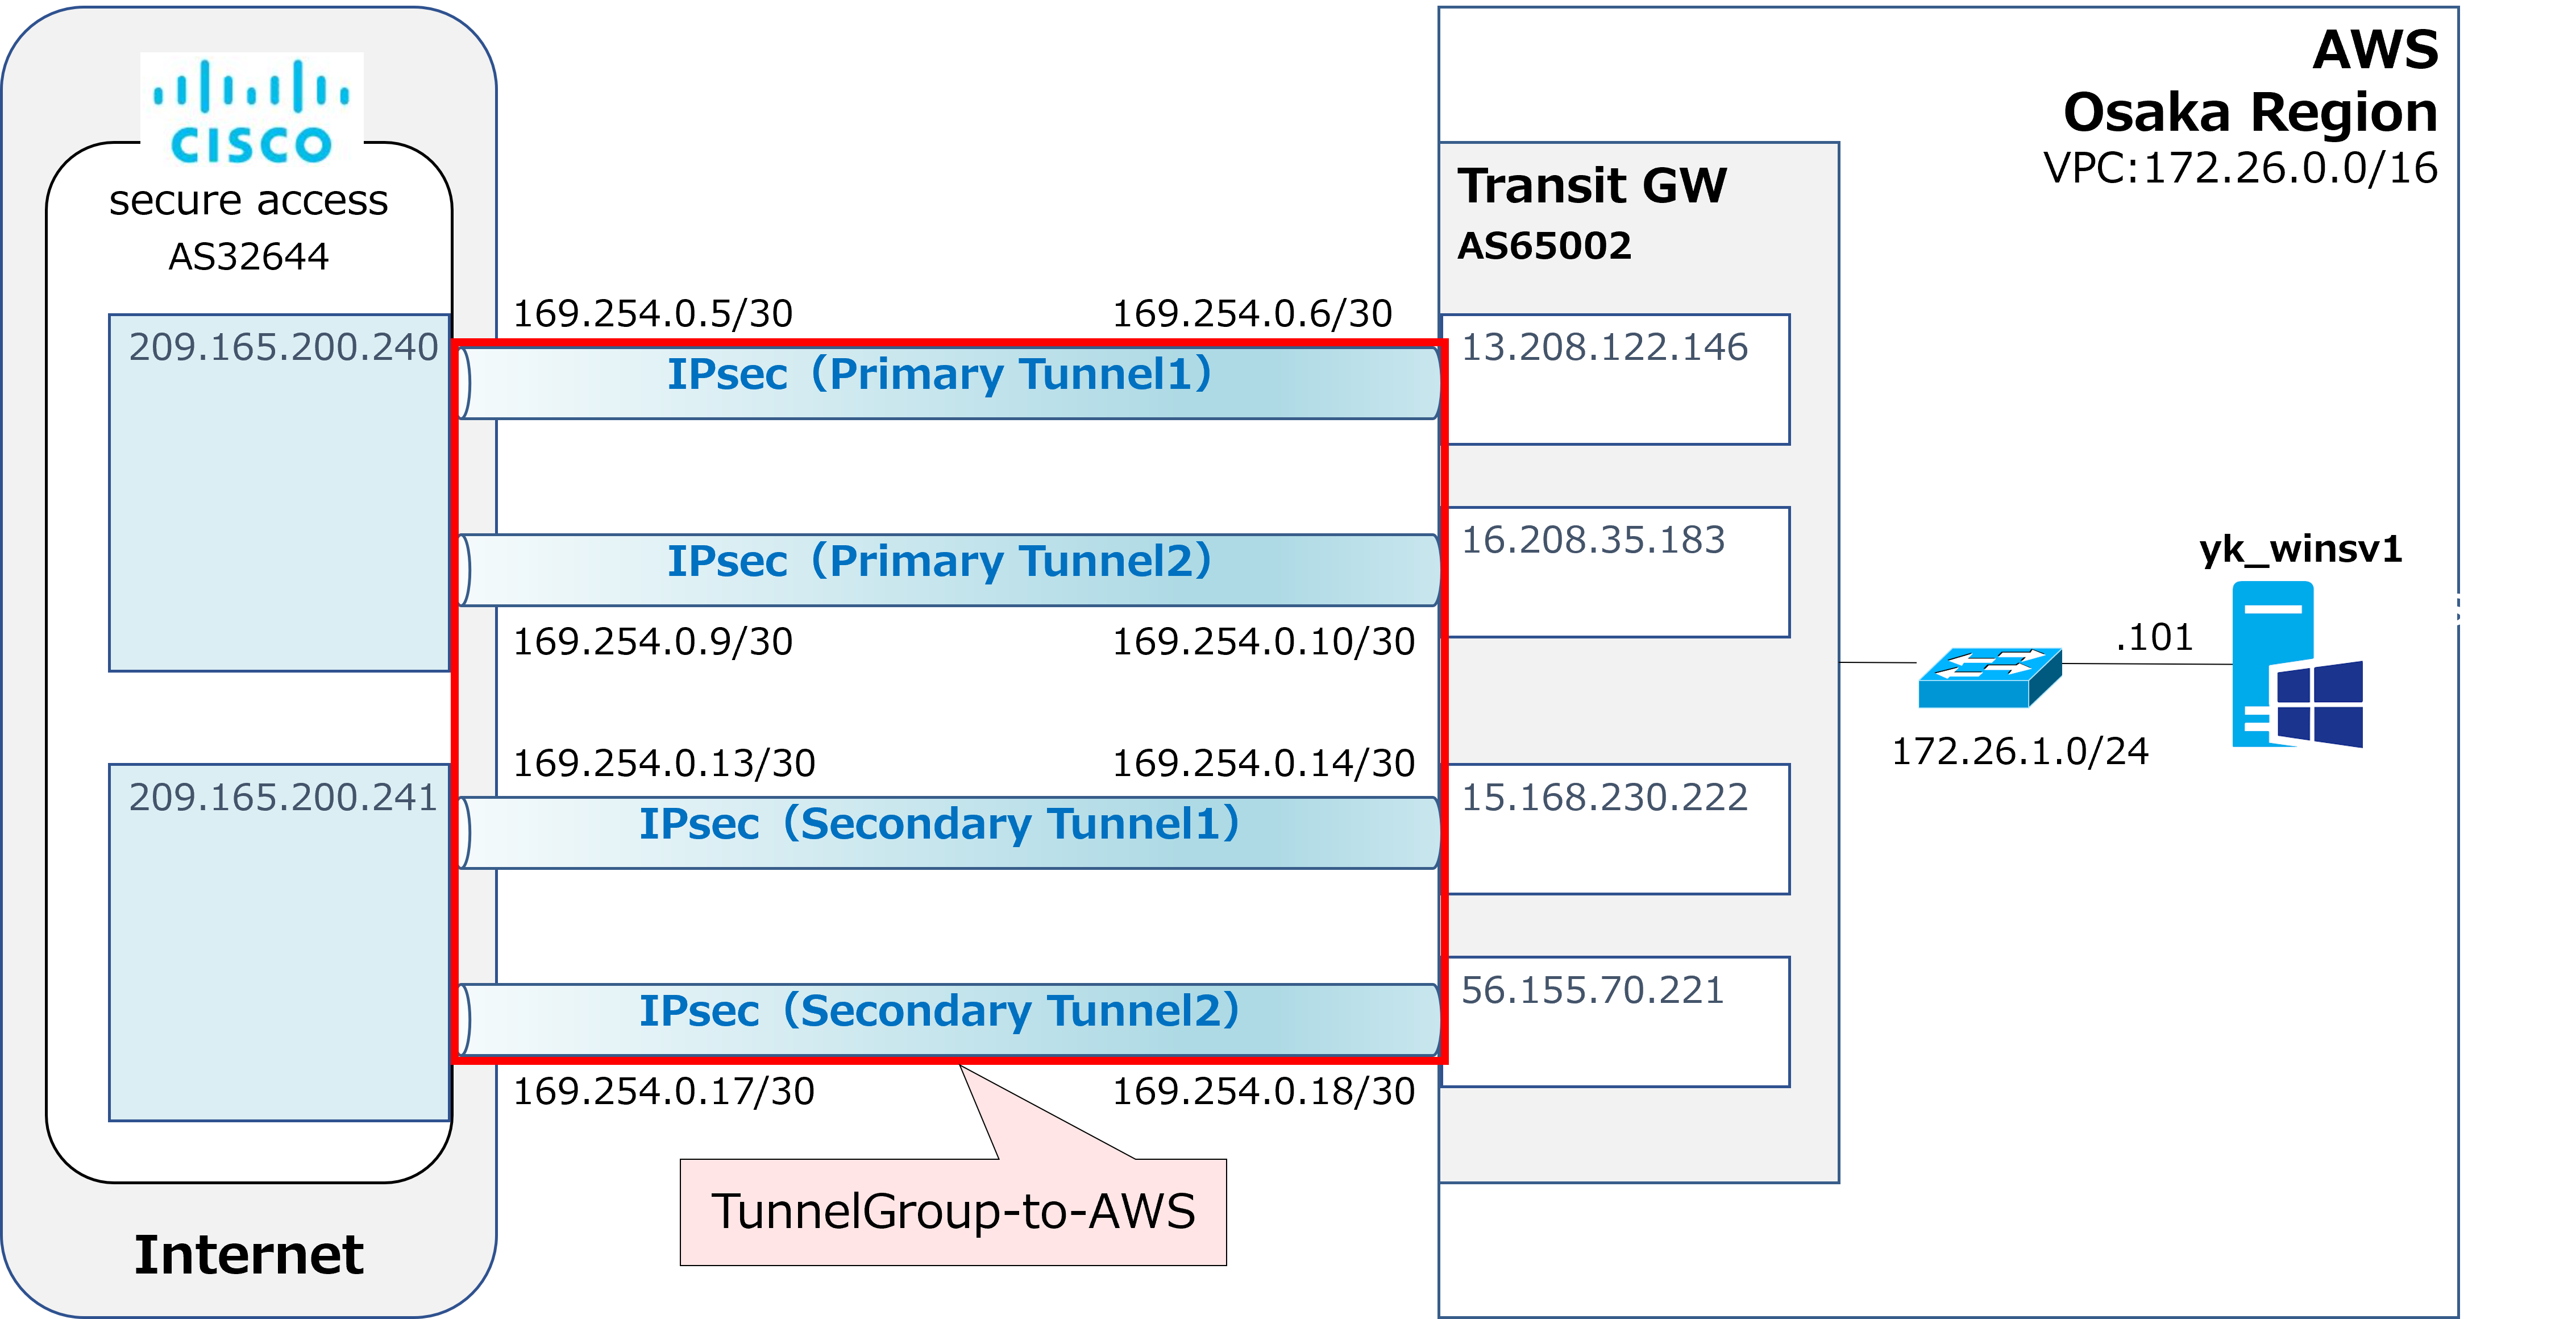
This time, as shown in the diagram above, we'll try connecting Cisco Secure Access and AWS over IPsec. |
 |
Huh? We're setting up as many as four IPsec tunnels? When we connected Secure Access and Fortigate over IPsec, it was only two, wasn't it? |
|
That's right. It surprised me too—I thought, wow, that's really tight security. |
|
Right. Plus the Primary tunnel is split into tunnel1 and tunnel2, and the Secondary tunnel is also split into tunnel1 and tunnel2, which makes it hard to follow. Are the x.x.x.x parts in the diagram above IP addresses that haven't been decided yet? |
|
Yes, that's right. As we go through the steps ahead, GIPs (Global IP addresses) get assigned along the way, and that part is a bit of a hassle. The flow is: proceed through the steps using placeholder addresses first, then swap them out for the official GIPs afterward. |
|
That sounds kind of complicated. |
|
It is, but I'll try to walk through the steps as simply as possible. |
AWS work: Creating the Transit GW
|
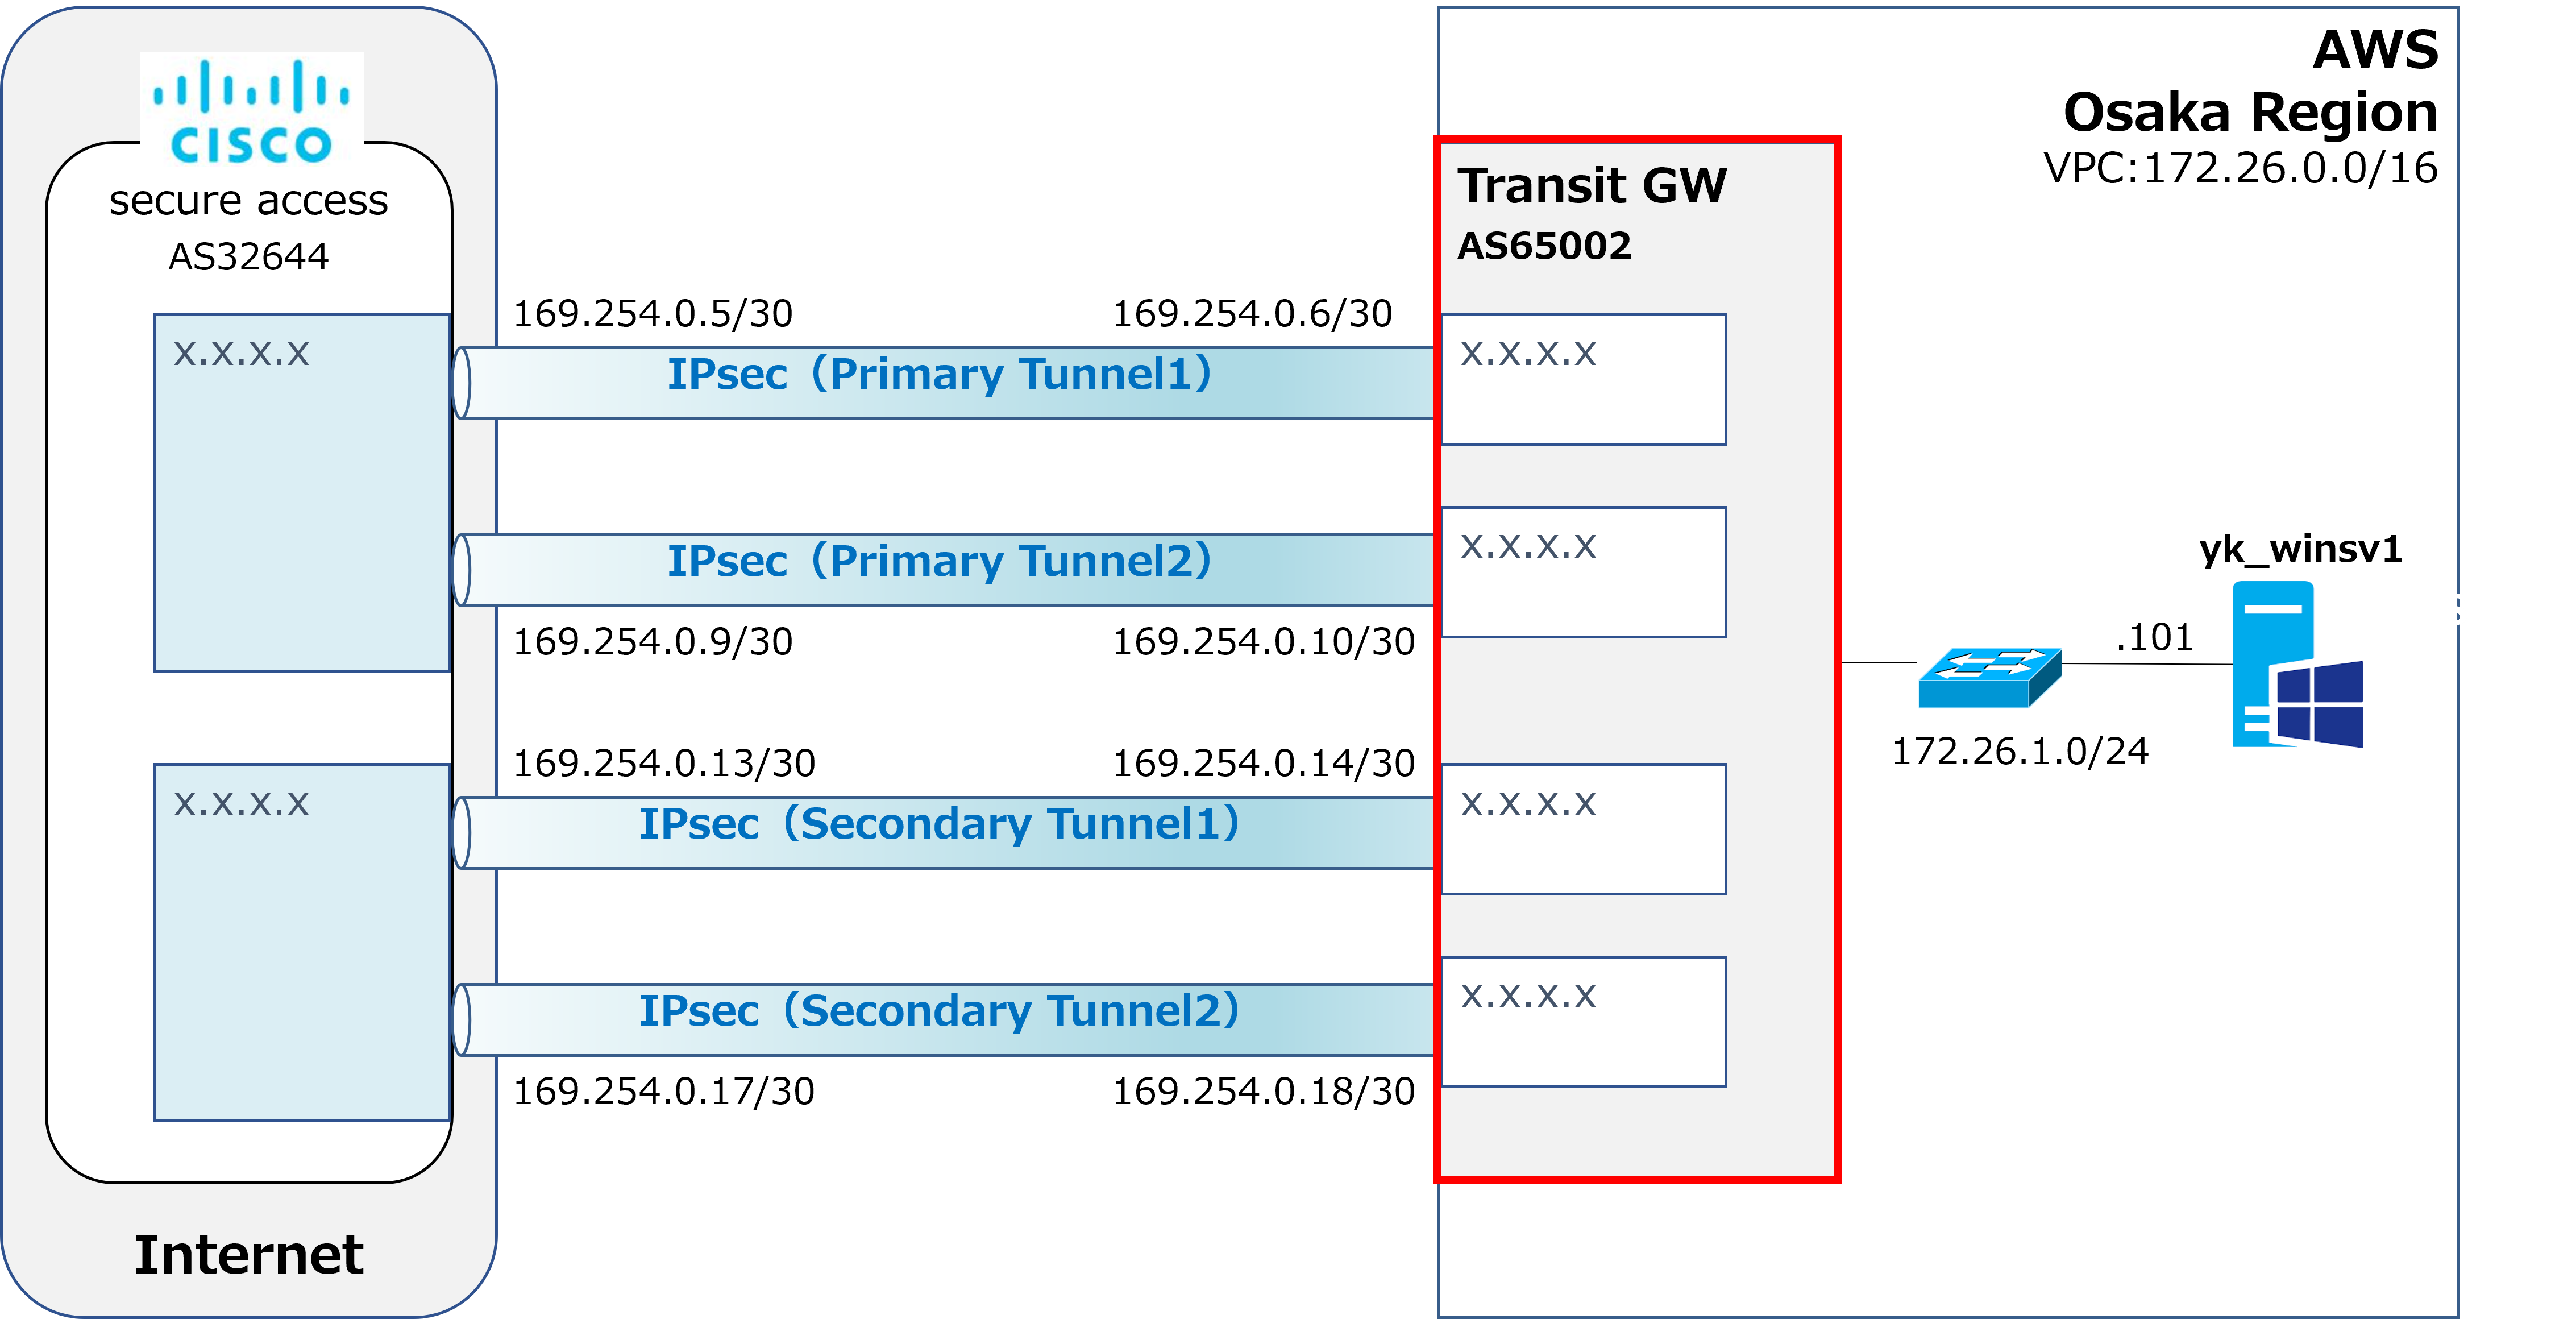
Now, first we'll build the Transit GW shown in the red box. Note that the VPC (172.26.0.0/16), subnet (172.26.1.0/24), and yk_winsv1 (172.26.1.101) are assumed to already be built. |
①From the AWS VPC screen, go to Transit gateways → Create transit gateway.
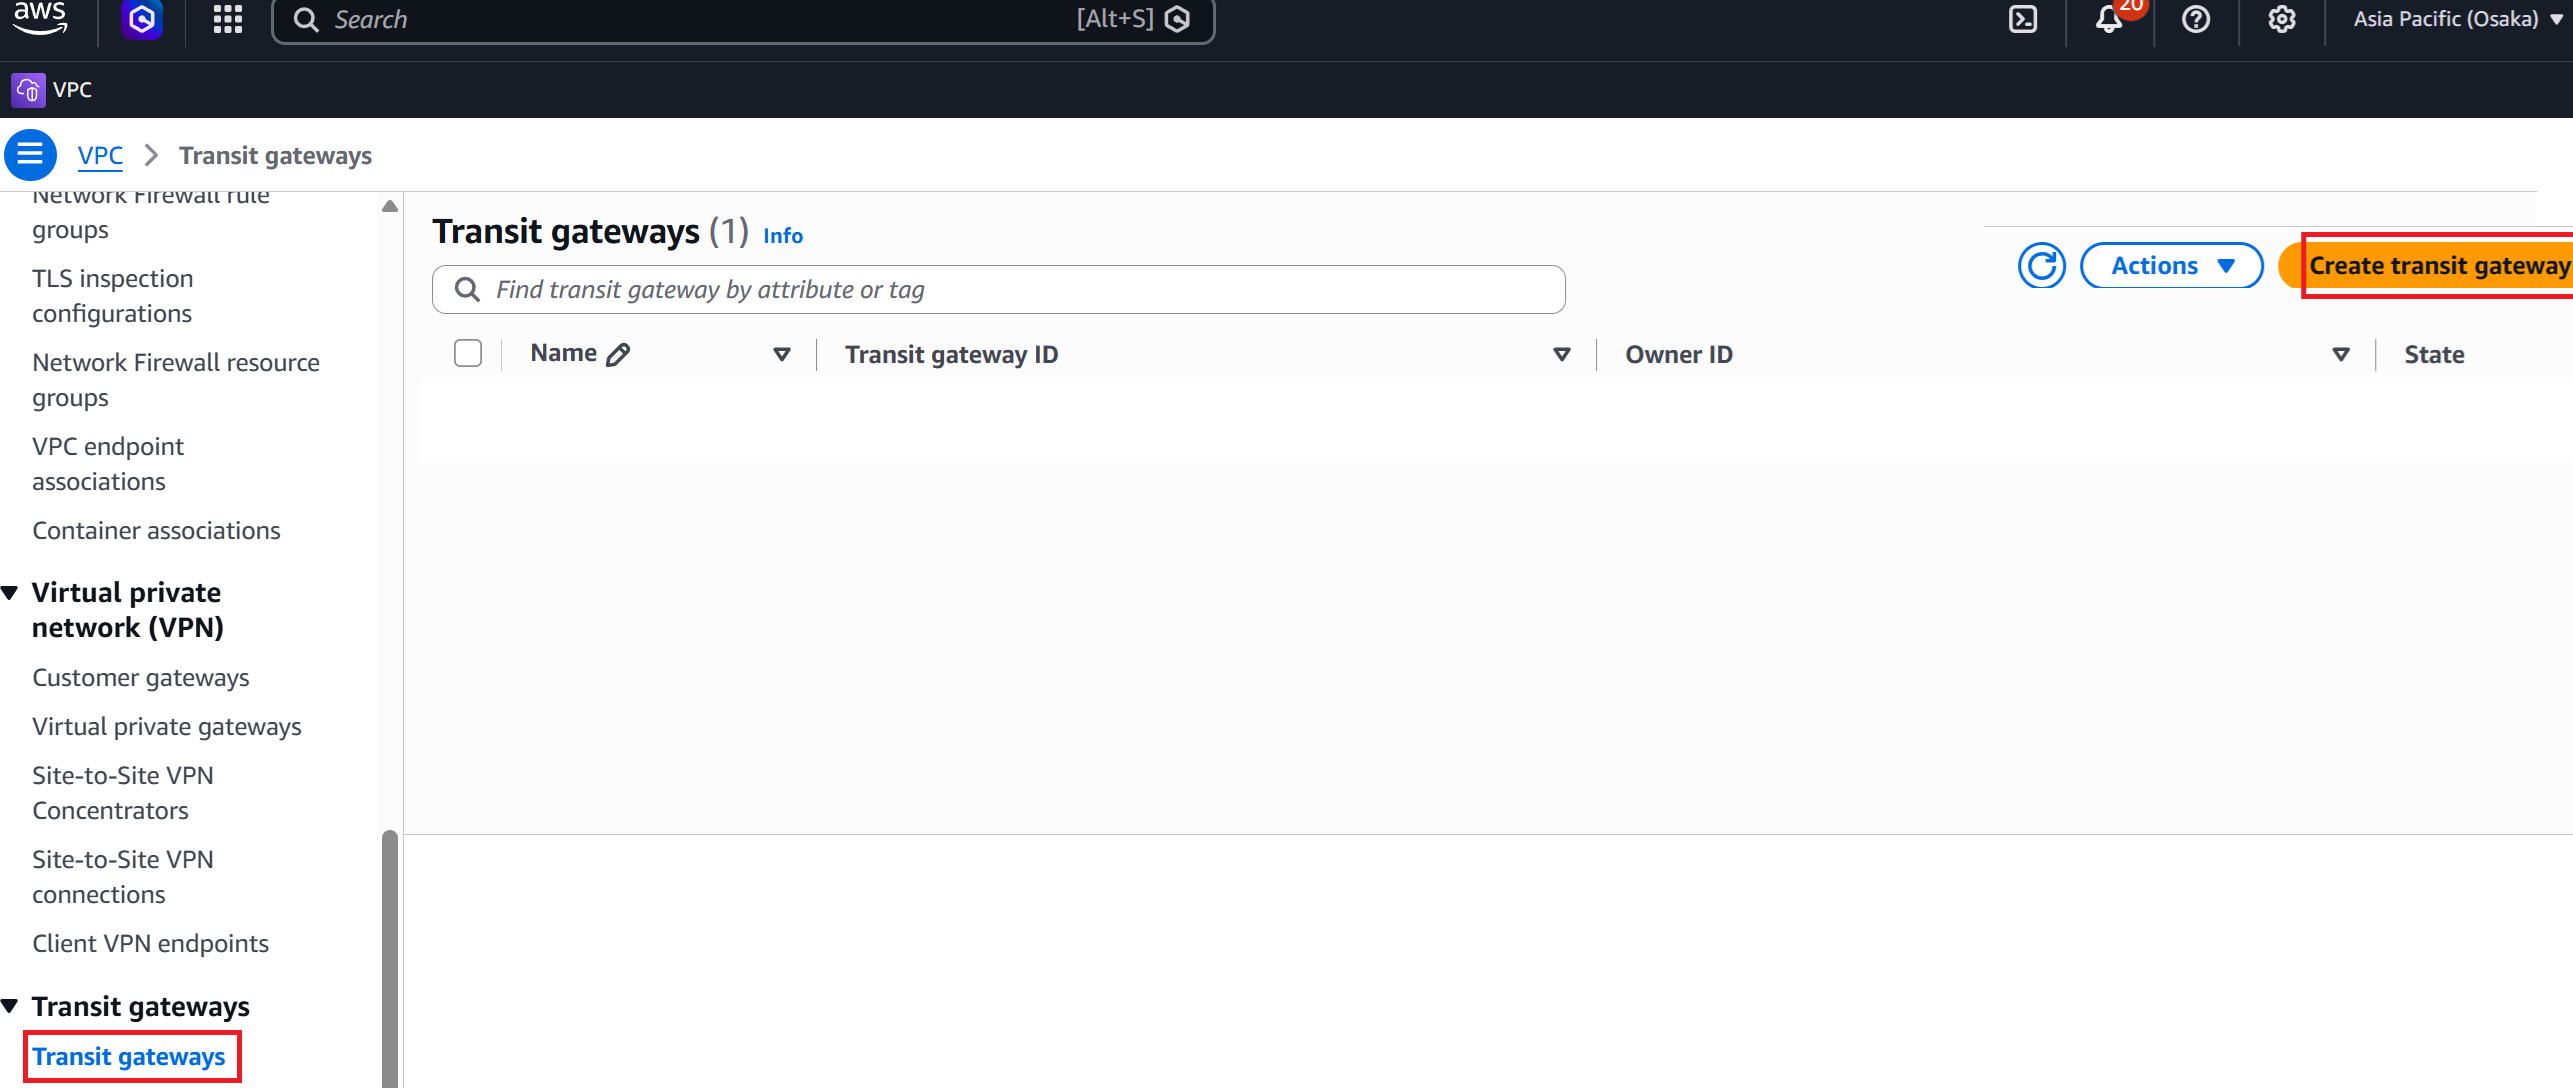
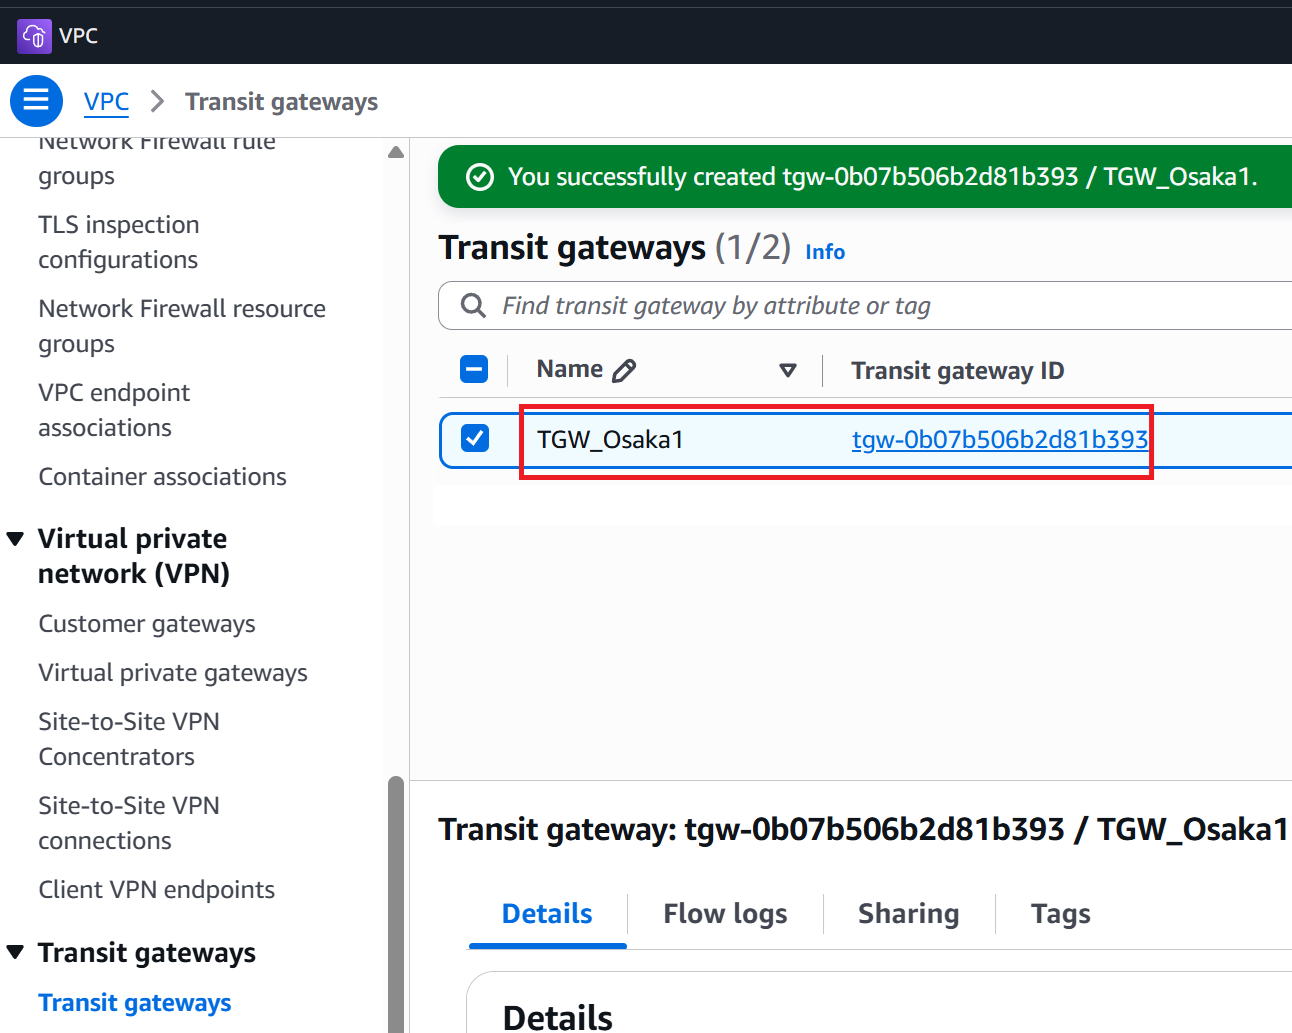
②Enter any name you like for Name tag. This time I used TGW_Osaka1.
Enter 65002 as the AS number for the AWS side. Then click Create Transit Gateway at the bottom right.
③Creation complete.
AWS work: Creating the Transit gateway attachment
|
Next, we'll create the Transit gateway attachment. This isn't a physical thing—it's a configuration that associates the VPC with the Transit gateway we just created, shown in the red box. |
①Go to Transit gateway attachments → Create transit gateway attachment

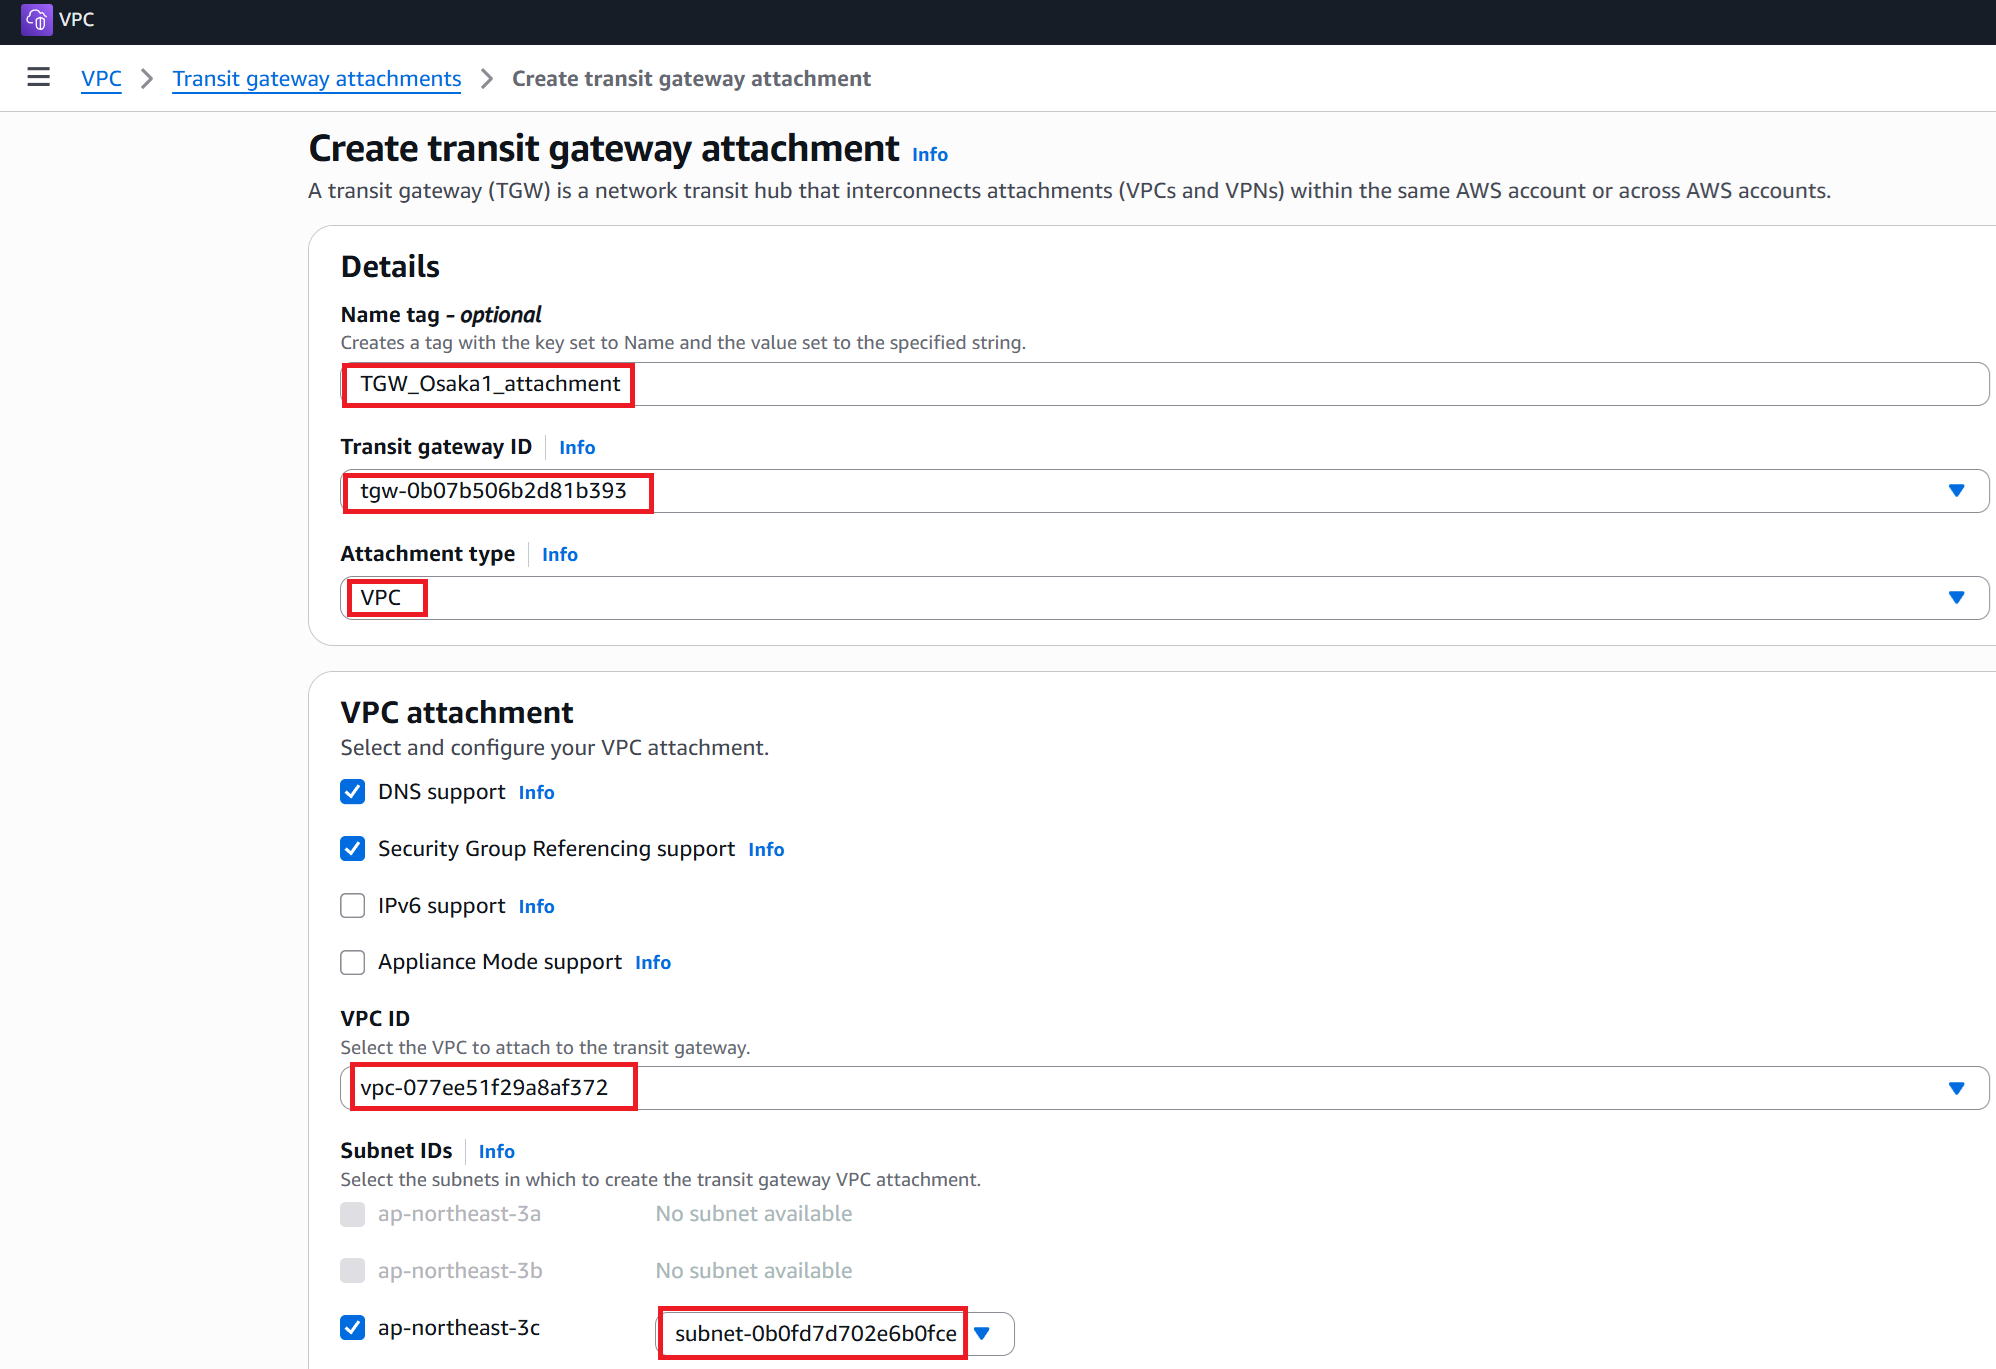
②Enter any name you like for Name tag. This time I used TGW_Osaka1_attachment.
For Transit gateway ID, select the ID of TGW_OS1 that we just created.
Attachment type is VPC by default.
For VPC ID, select the existing 172.26.0.0/16 VPC.
For subnet, select the existing 172.26.1.0/24 subnet within ap-northeast-3c.
Then click Create Transit gateway attachment at the bottom right.

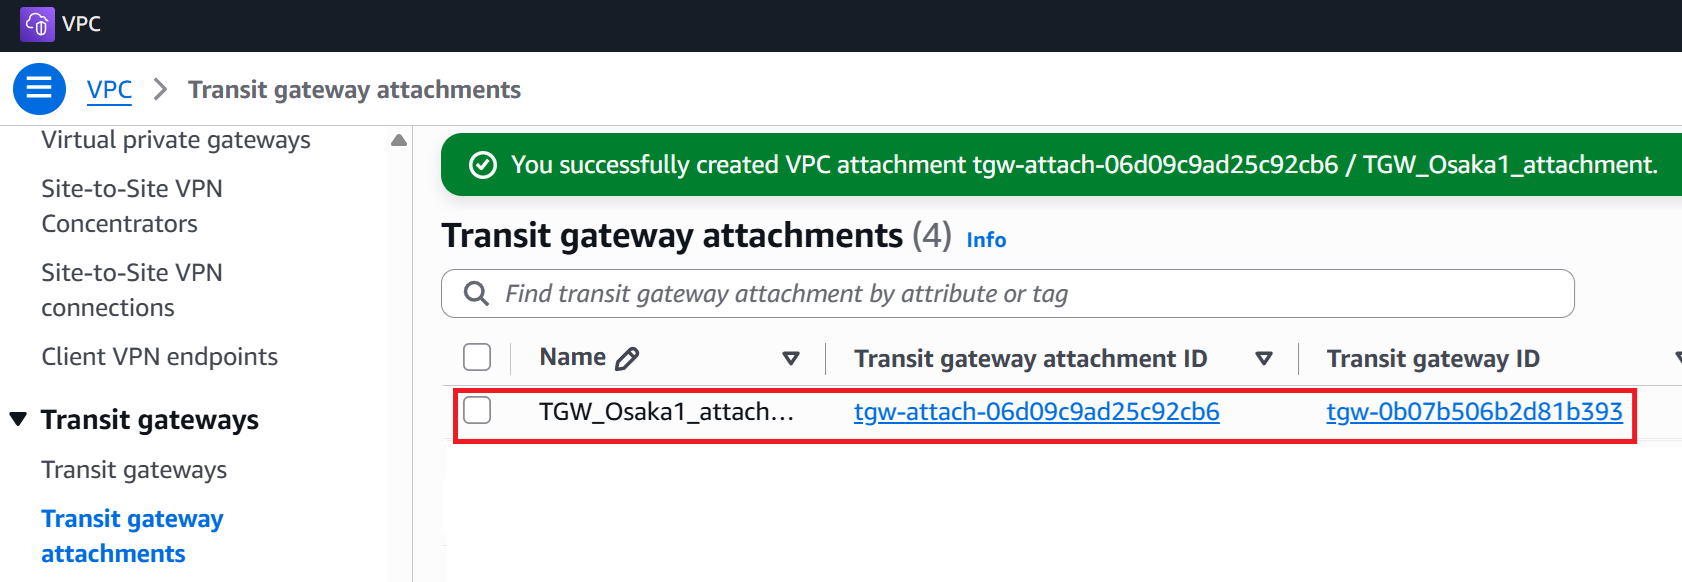
③Creation complete.
AWS work: Creating a placeholder Customer gateway
|
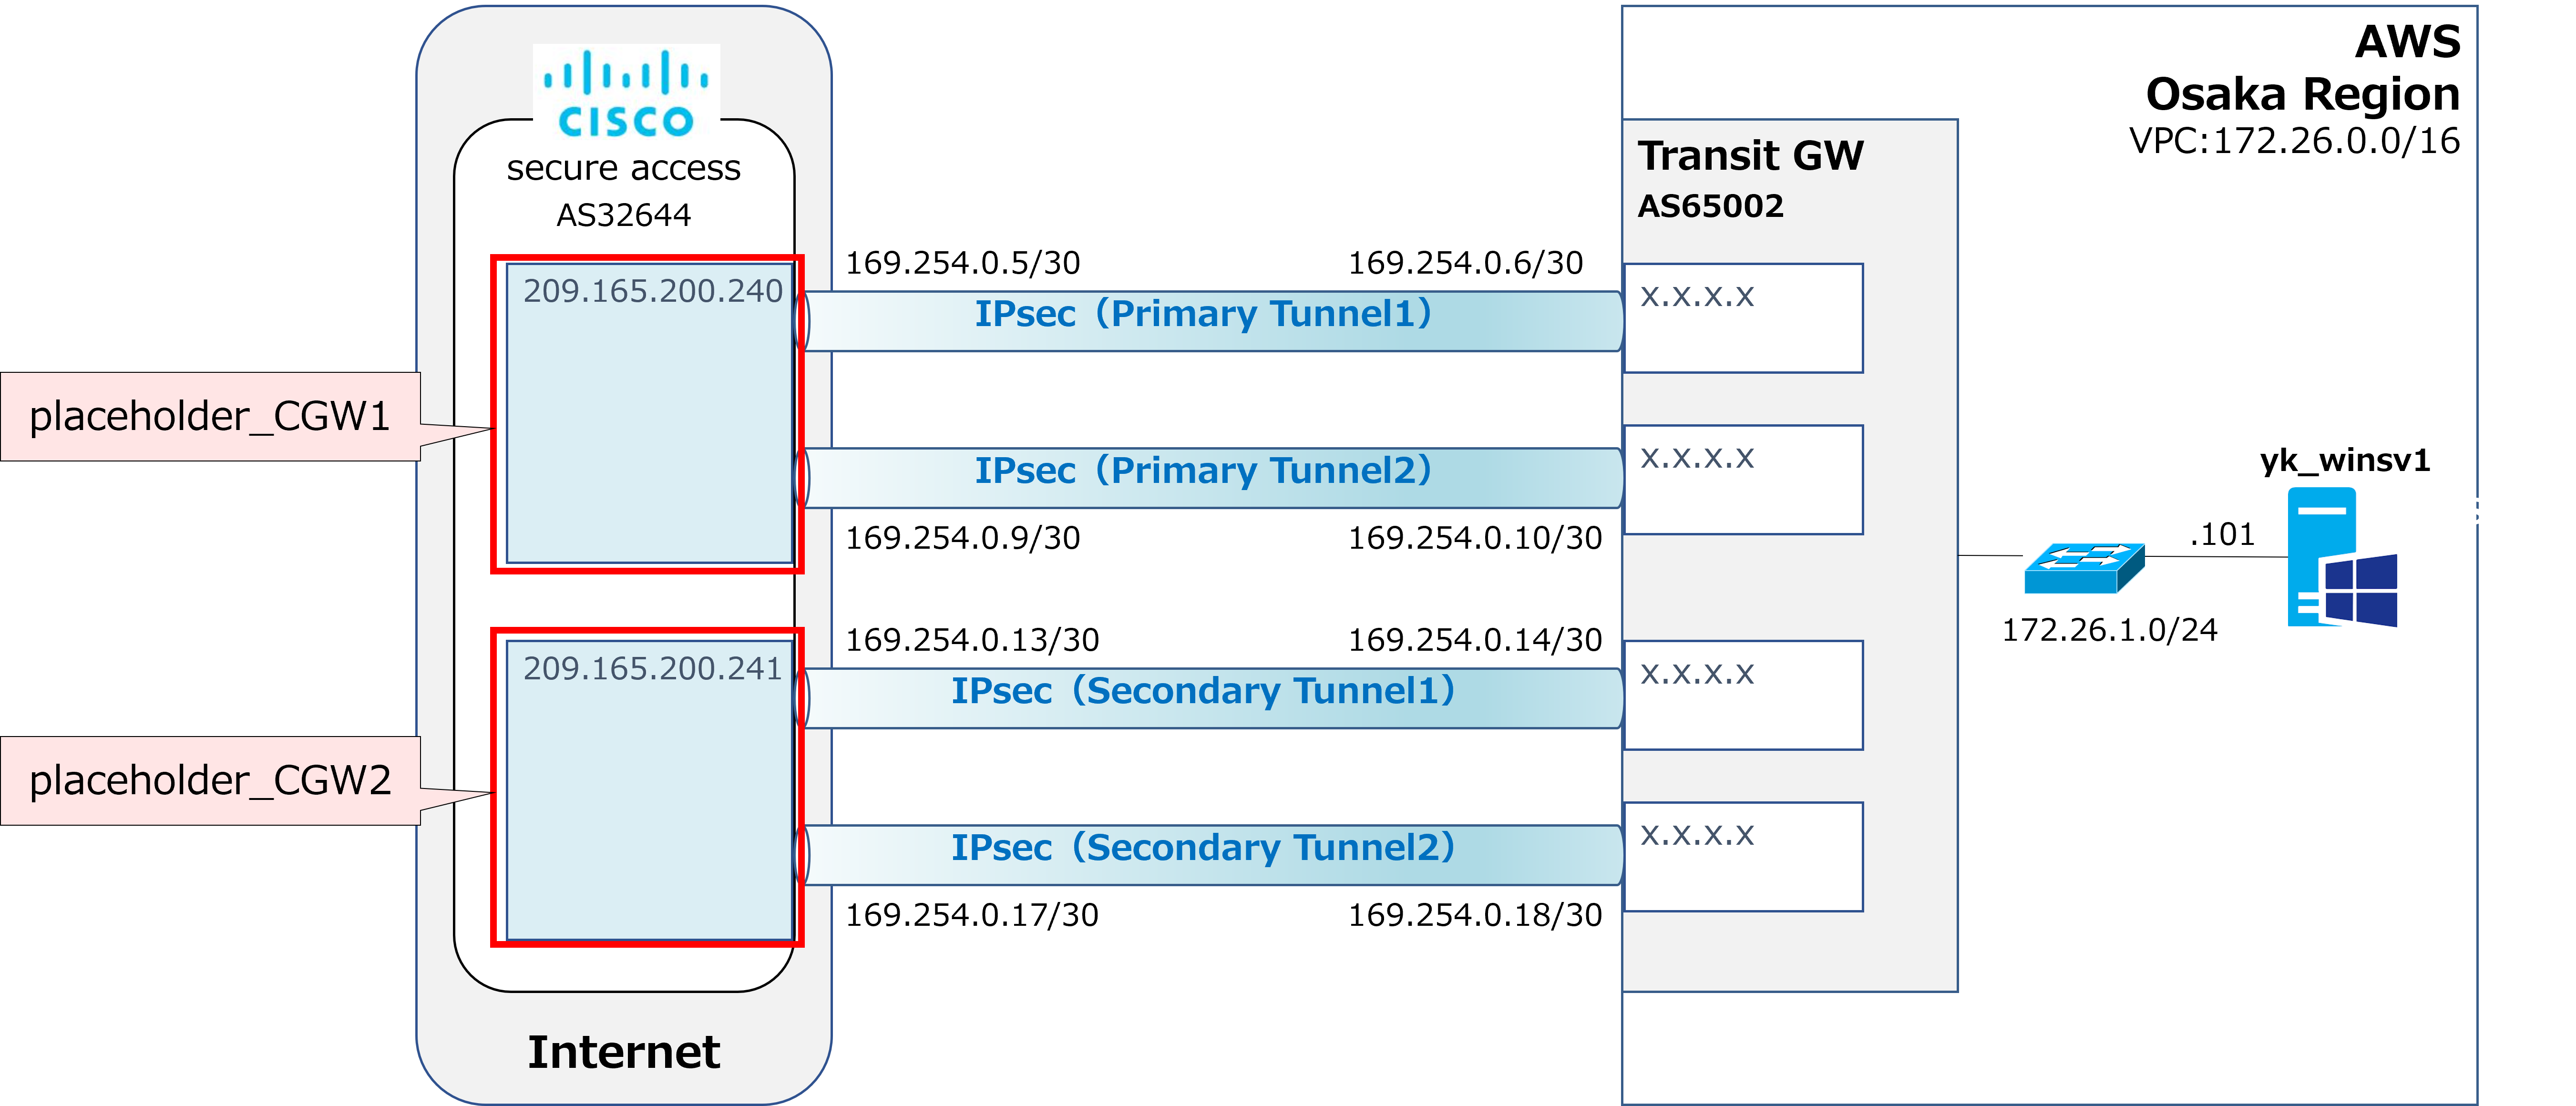
Next, we'll create two sets of Customer gateway. This isn't a physical thing either. As the name customer gateway suggests, this is the step where you configure information about the peer's connection point as seen from AWS—in other words, Secure Access's connection point. Specifically, you configure the IPsec destination IP address and AS number. Here's the tricky part though: at this stage, neither the Secure Access side nor the AWS side has yet been assigned the GIP to use for the IPsec connection. So, we'll first create placeholder Customer gateways using placeholder GIPs. The IP addresses shown in the diagram above are those placeholder values. |
①First, let's create the first set of Customer gateway. Go to Customer gateways → Create customer gateway.
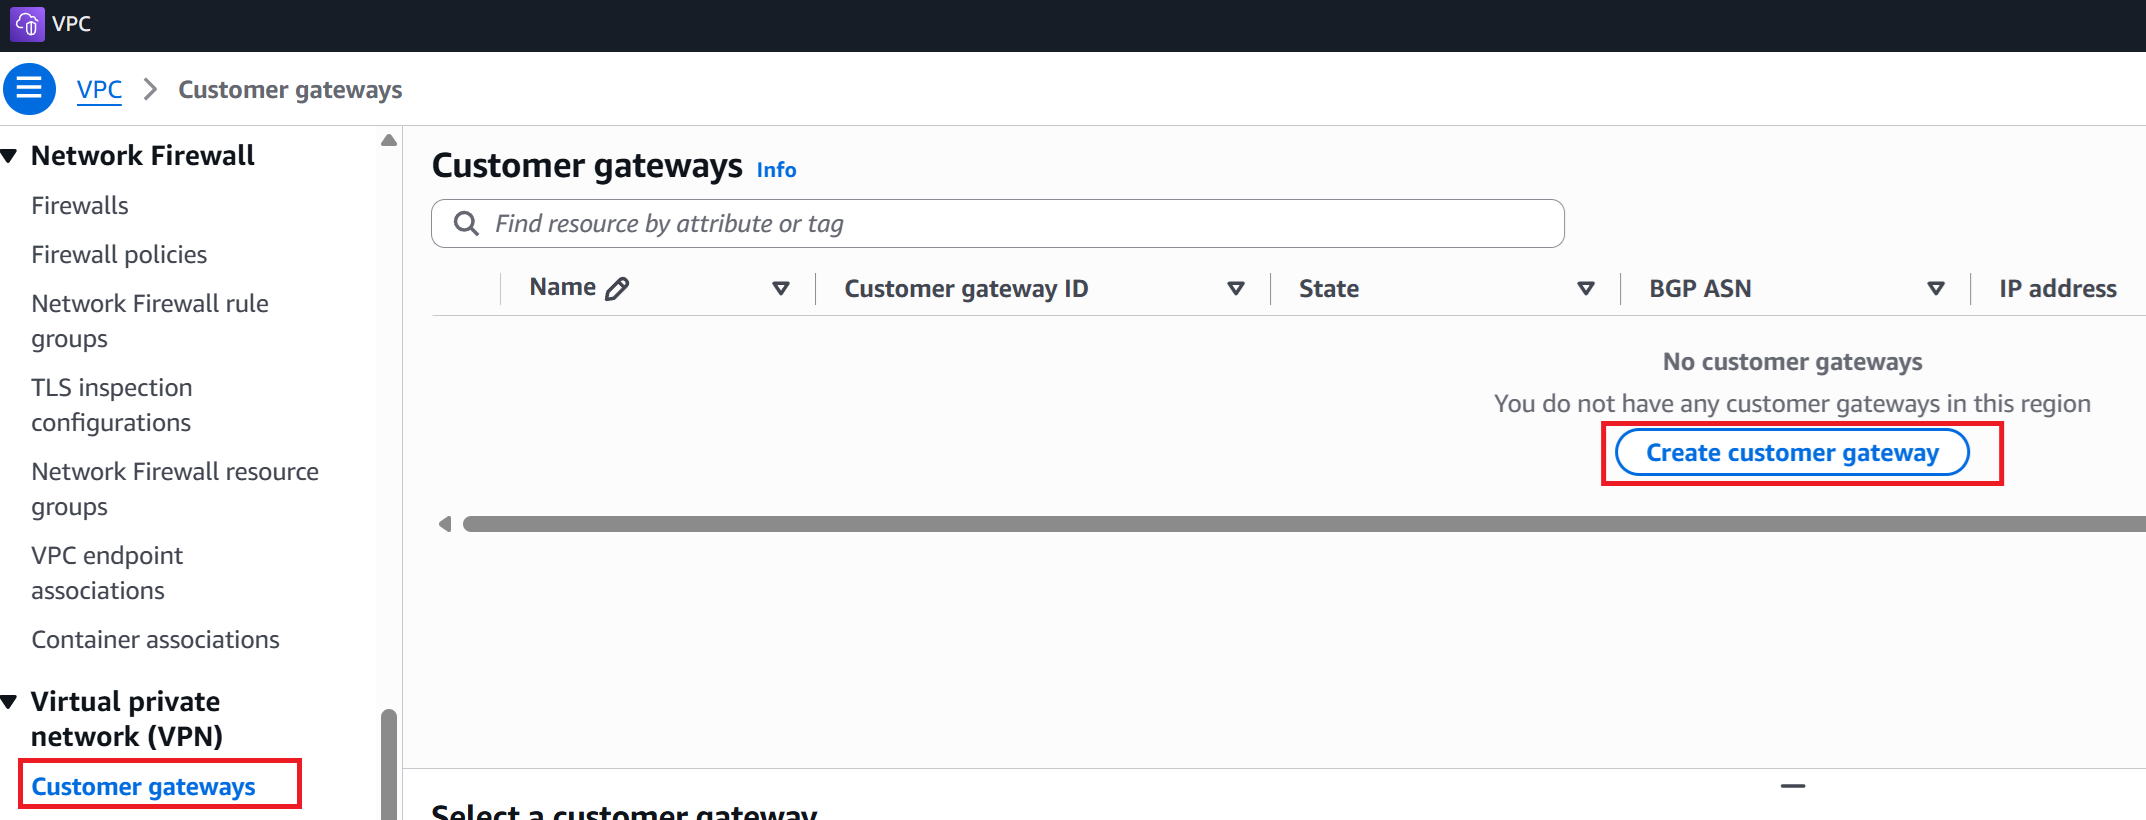
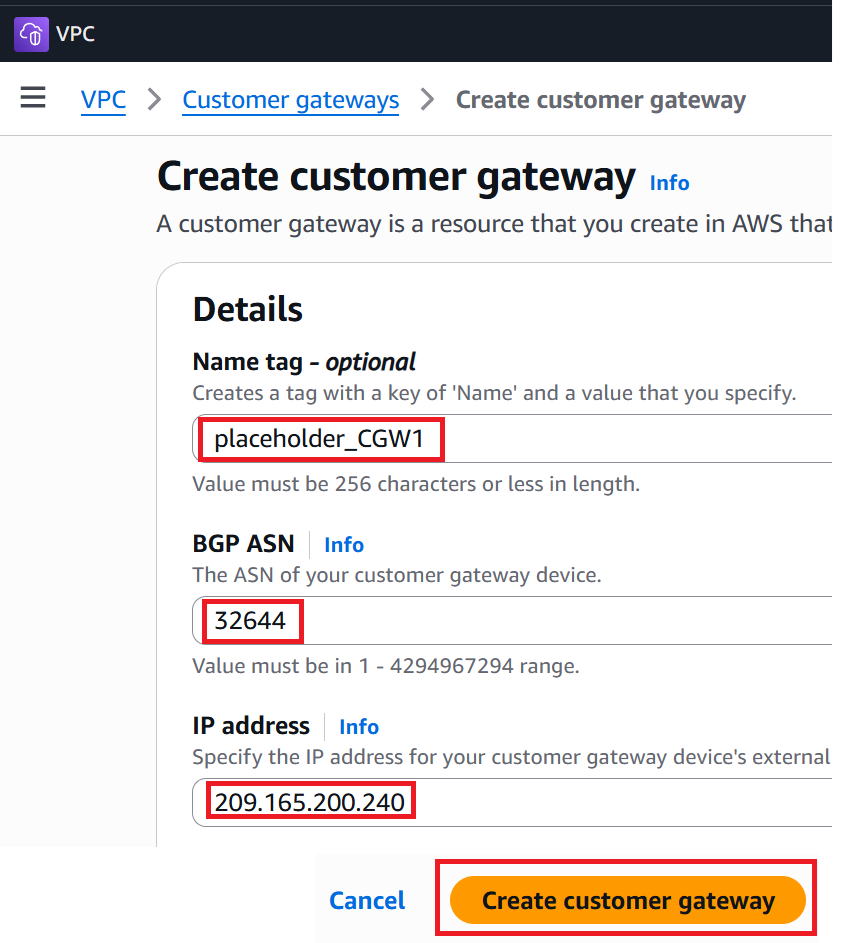
②Enter a name for the placeholder customer gateway in Name tag. This time I used placeholder_CGW1.
For BGP ASN, enter 32644, which is Cisco Secure Access's AS number.
For IP address, enter a placeholder GIP. This time I used 209.165.200.240, a placeholder IP listed on Cisco's site.
Then click Create customer gateway.
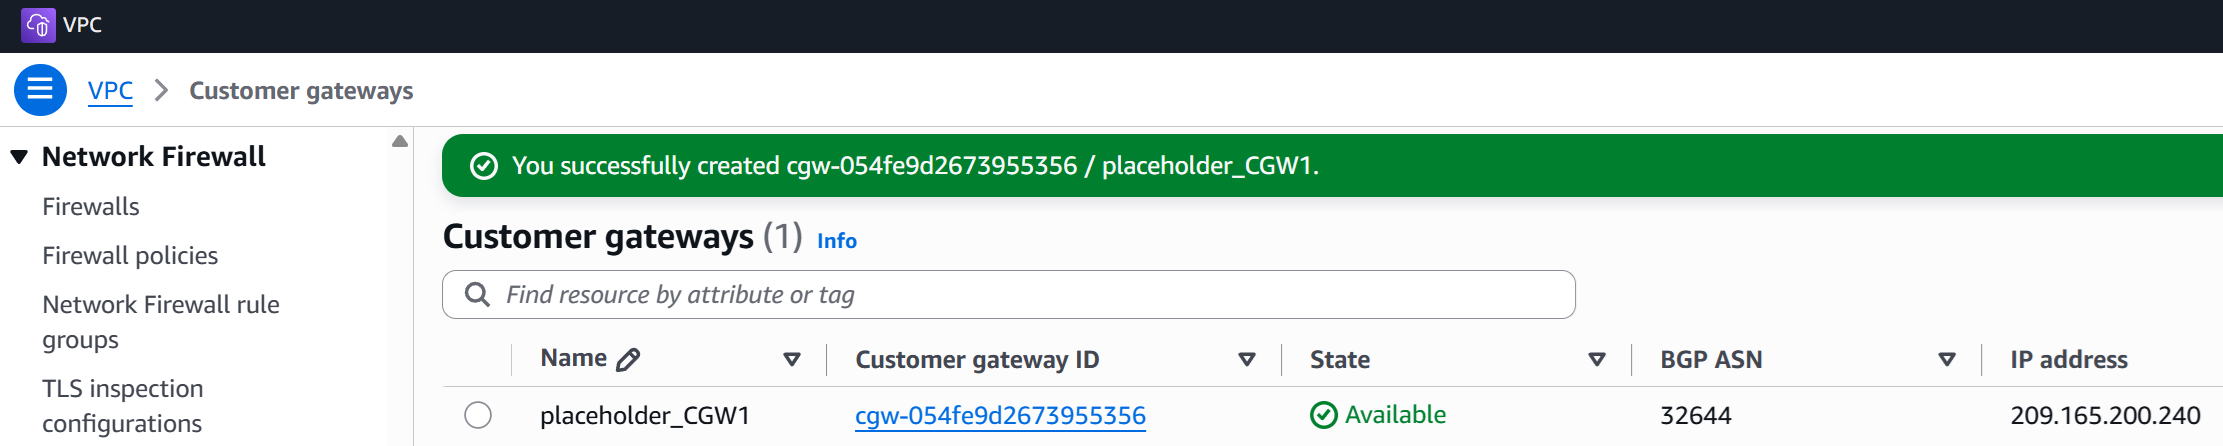
③The placeholder customer gateway has been created.
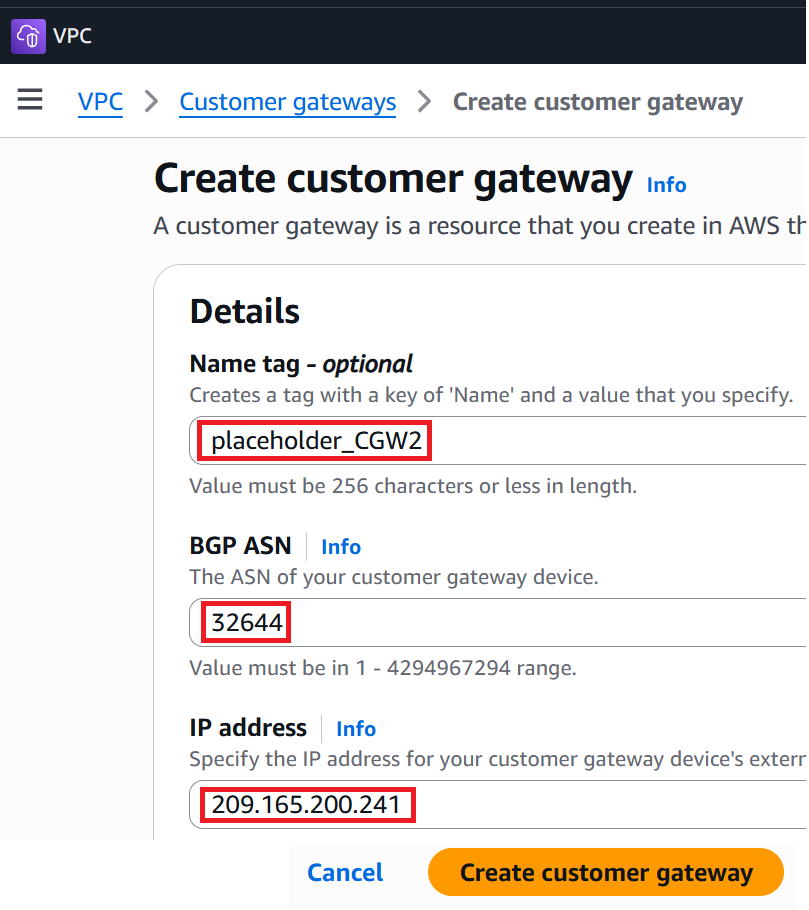
④Following the same steps, create another placeholder customer gateway. Enter the values shown below and proceed through to Create.
AWS work: Creating the VPN Connection
|
Next, as shown in the red box, we'll create two sets of VPN Connection. This isn't a physical thing either. Here you configure things like the IPsec tunnel IP addresses and the PSK (Pre-shared key), which acts as the password for the tunnel connection. |
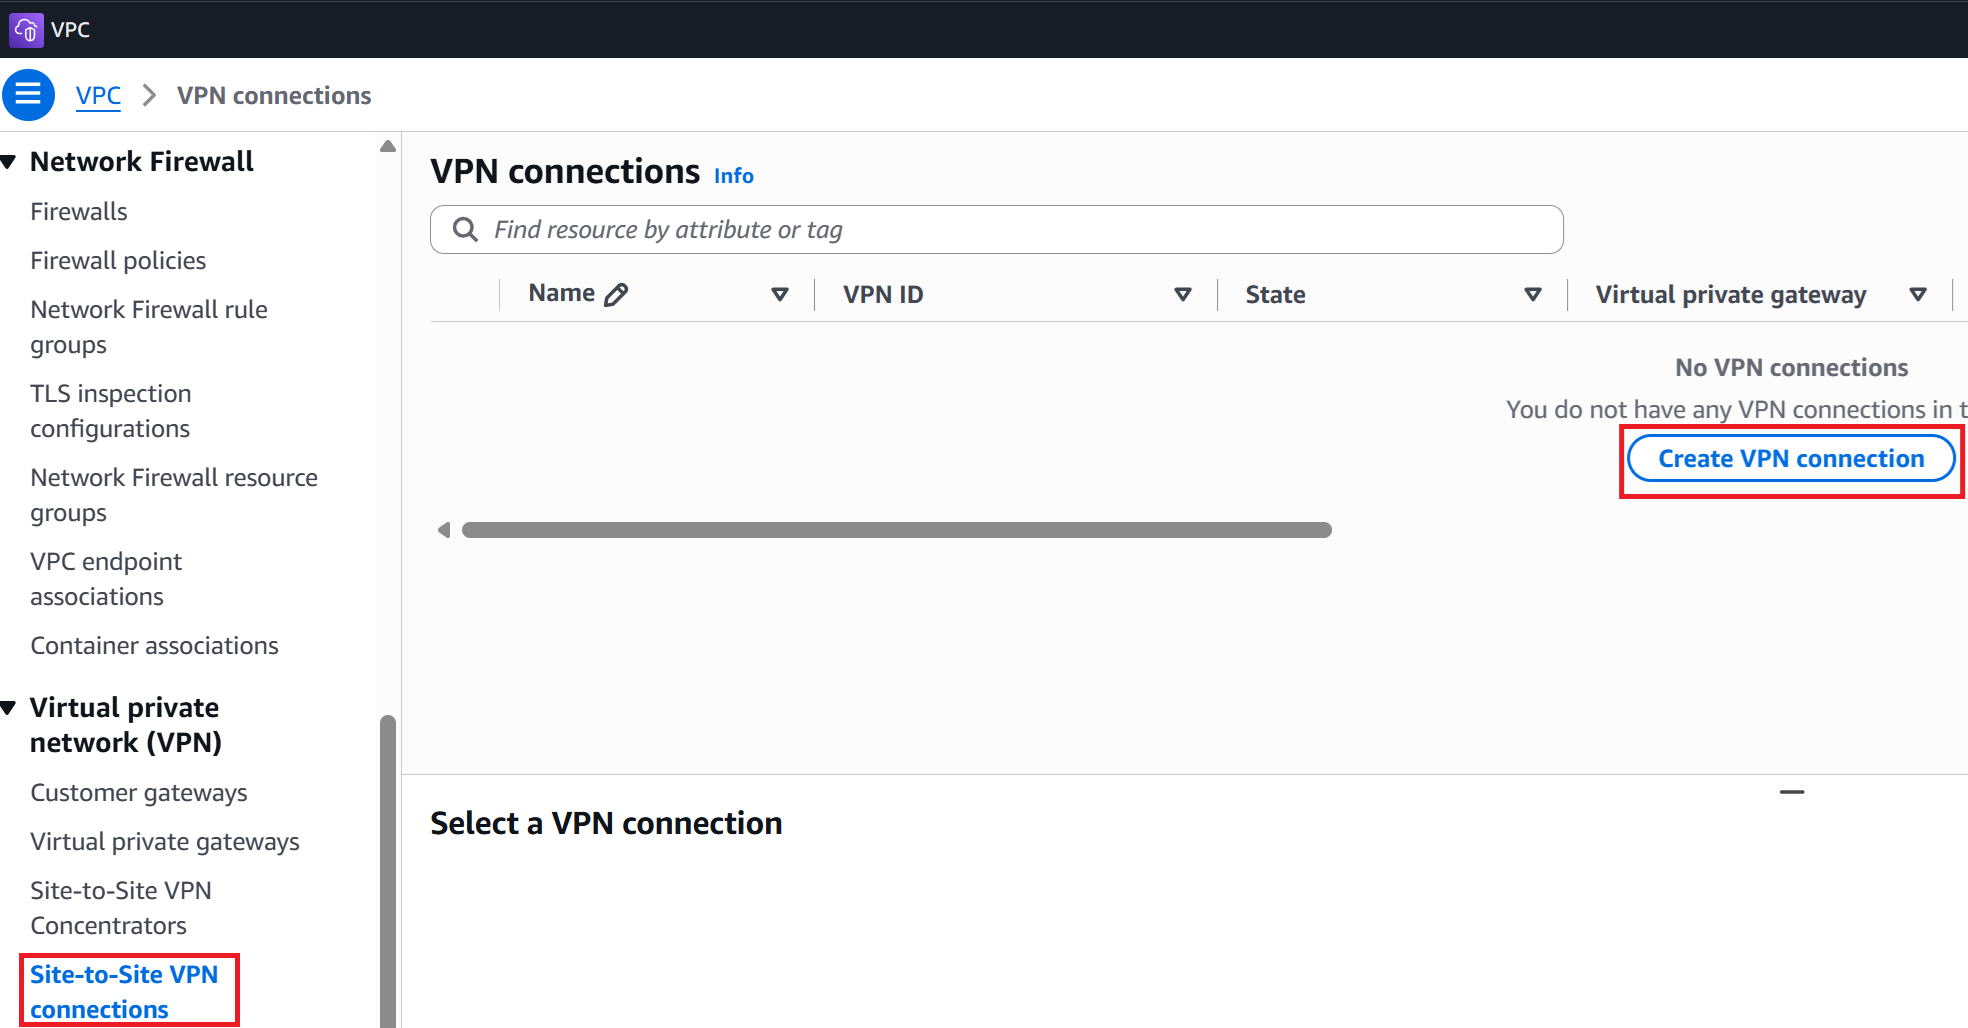
①Let's start by creating the first set. Go to Site-to-Site VPN connections → Create VPN connection.
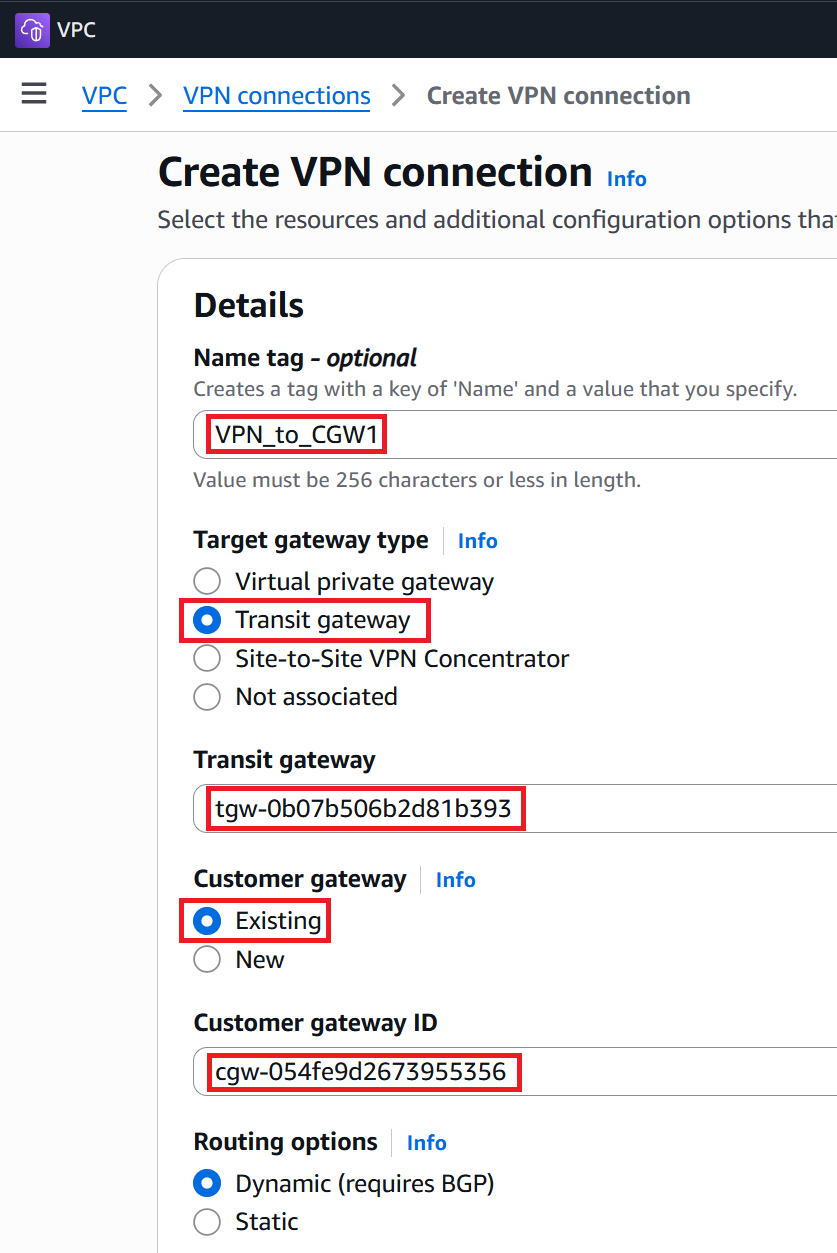
②Enter any name you like for Name tag. This time I used VPN_to_CGW1.
For Target gateway type, check Transit gateway and select the ID of the Transit gateway we created earlier.
For Customer gateway, check Existing and select the ID of placeholder_CGW1 we created earlier.
Then scroll down the screen.
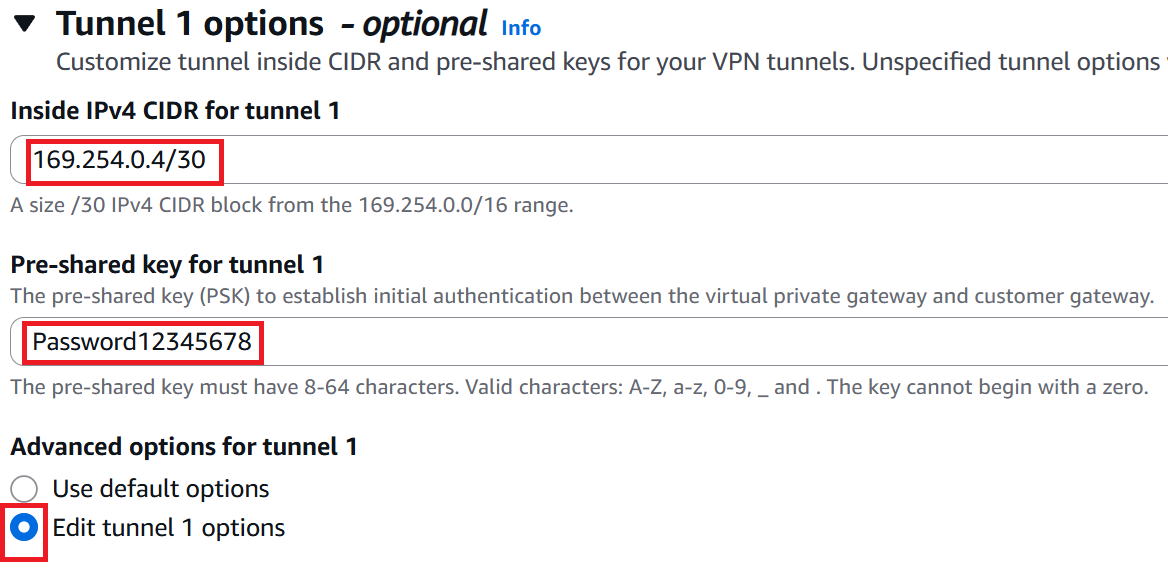
③Move on to Tunnel 1 options.
For Inside IPv4 CIDR for tunnel 1, enter 169.254.0.4/30, the network address for the first IPsec tunnel.
For Pre-shared key for tunnel 1, enter the PSK. This time I used Password12345678.
For Advanced options for tunnel 1, select Edit tunnel 1 options. Scroll further down the screen.
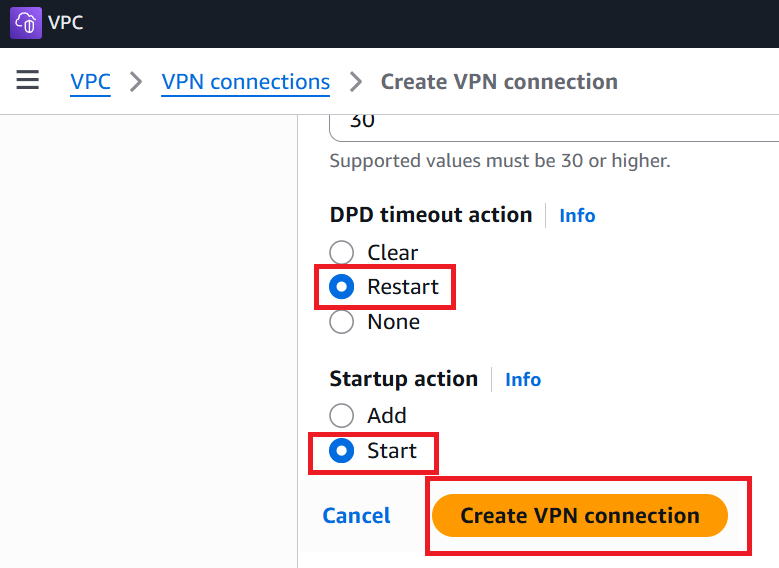
④Select Restart for DPD timeout action, and Start for Startup action.
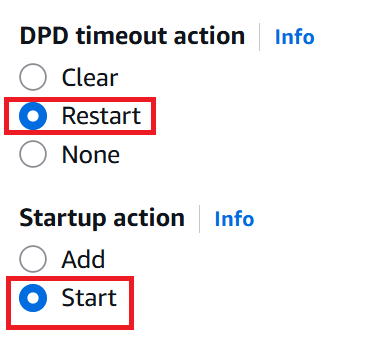
⑤Move on to Tunnel 2 options.
For Inside IPv4 CIDR for tunnel 1, enter 169.254.0.8/30, the network address for the second IPsec tunnel.
For Pre-shared key for tunnel 2, enter Password12345678, same as for tunnel1.
For Advanced options for tunnel 2, select Edit tunnel 2 options. Scroll further down the screen.
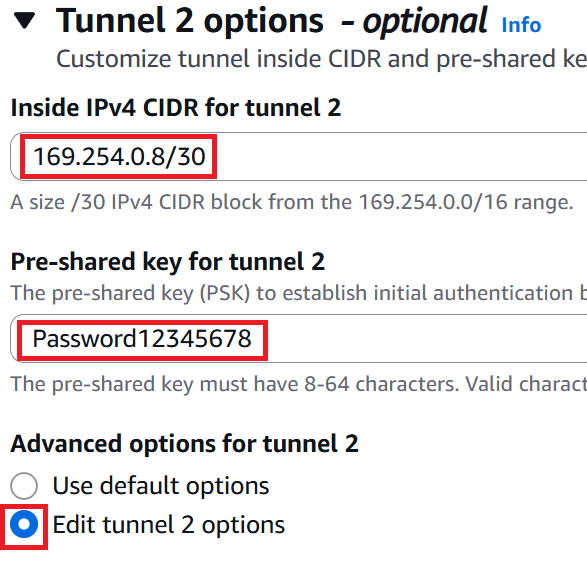
⑥Select Restart for DPD timeout action and Start for Startup action, then click Create VPN connection to finish.
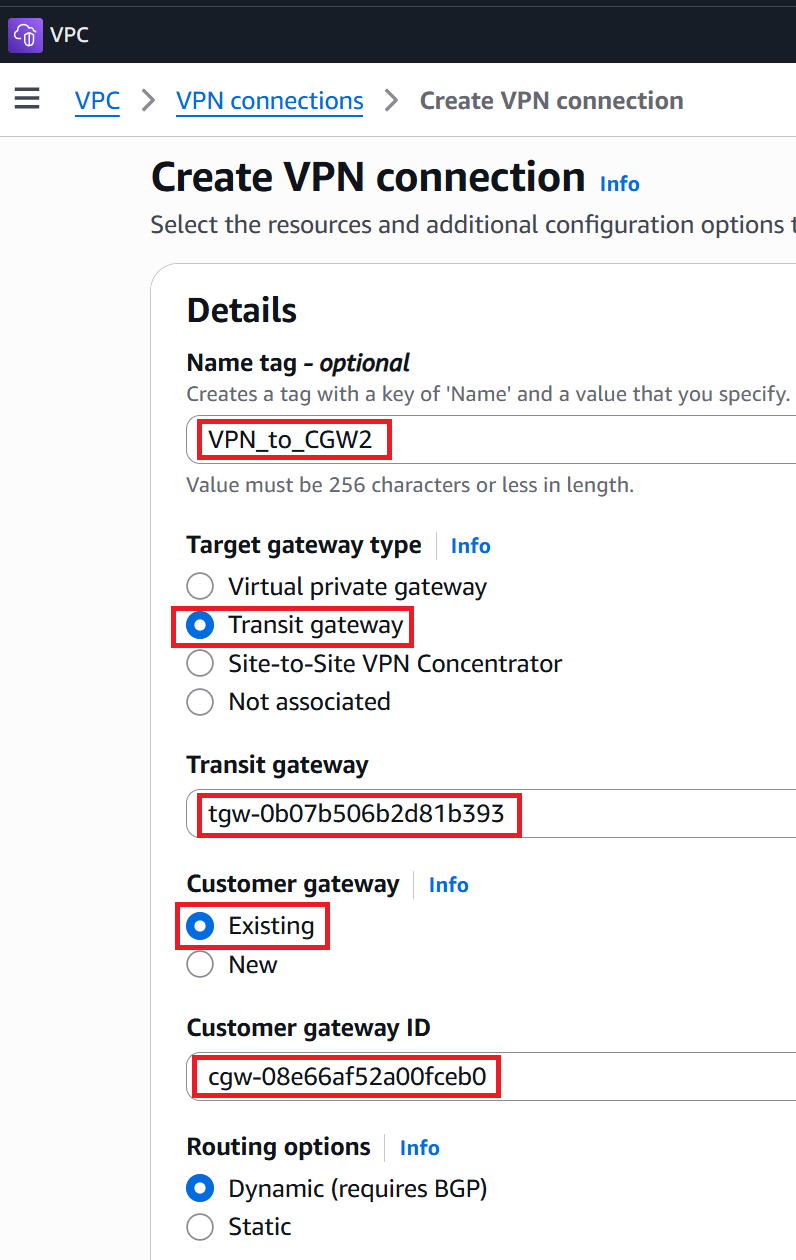
①Let's create the second set as well. Enter any name you like for Name tag. This time I used VPN_to_CGW2.
For Target gateway type, check Transit gateway and select the ID of the Transit gateway we created earlier.
For Customer gateway, check Existing and select the ID of placeholder_CGW2 we created earlier.
Then scroll down the screen.
②Move on to Tunnel 1 options.
For Inside IPv4 CIDR for tunnel 1, enter 169.254.0.12/30, the network address for the first IPsec tunnel.
For Pre-shared key for tunnel 1, enter the PSK. This time I used Password12345678.
For Advanced options for tunnel 1, select Edit tunnel 1 options. Scroll further down the screen.
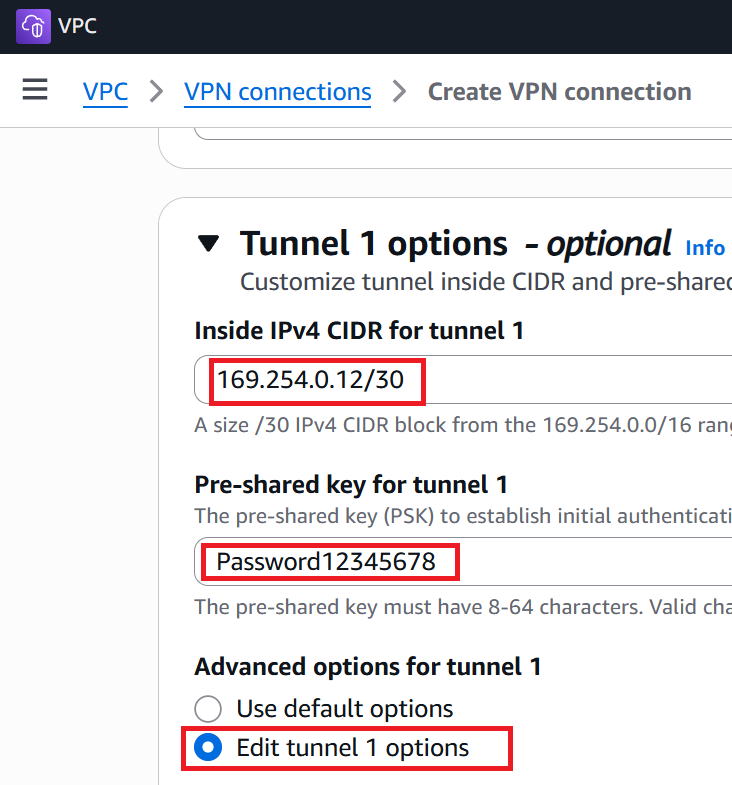
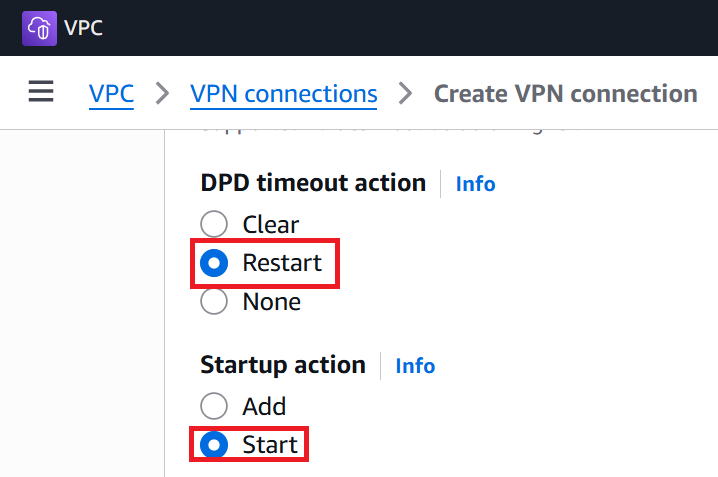
③Select Restart for DPD timeout action, and Start for Startup action.
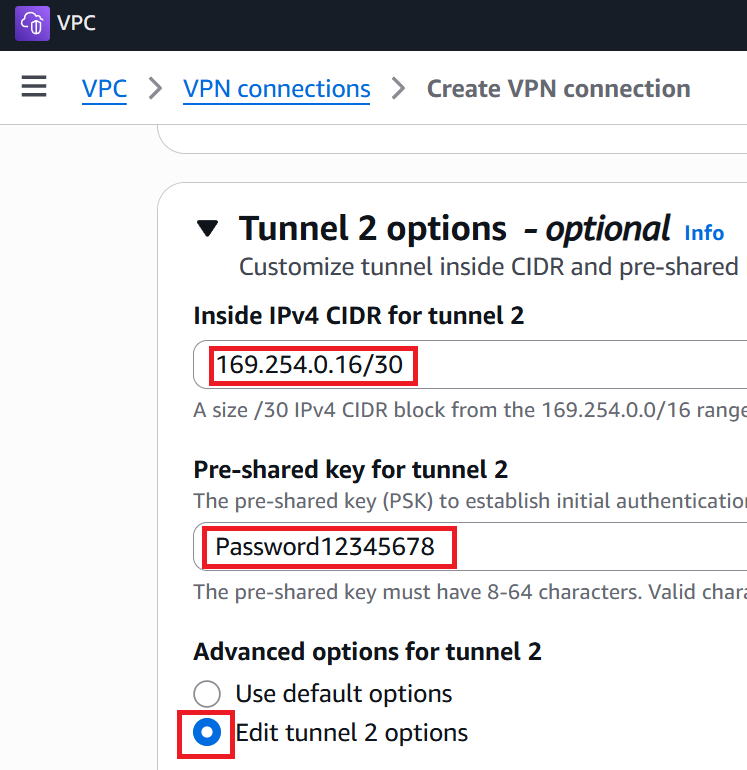
④Move on to Tunnel 2 options.
For Inside IPv4 CIDR for tunnel 1, enter 169.254.0.16/30, the network address for the second IPsec tunnel.
For Pre-shared key for tunnel 2, enter Password12345678, same as for tunnel1.
For Advanced options for tunnel 2, select Edit tunnel 2 options. Scroll further down the screen.
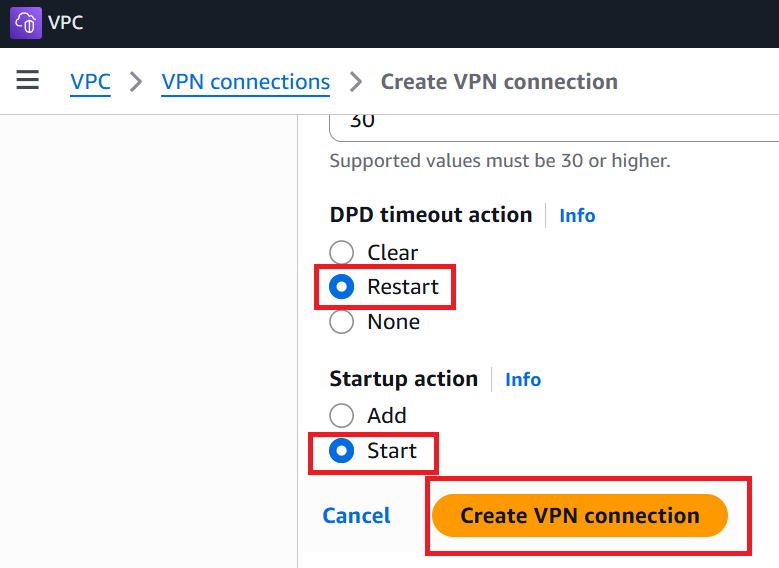
⑤Select Restart for DPD timeout action and Start for Startup action, then click Create VPN connection to finish.
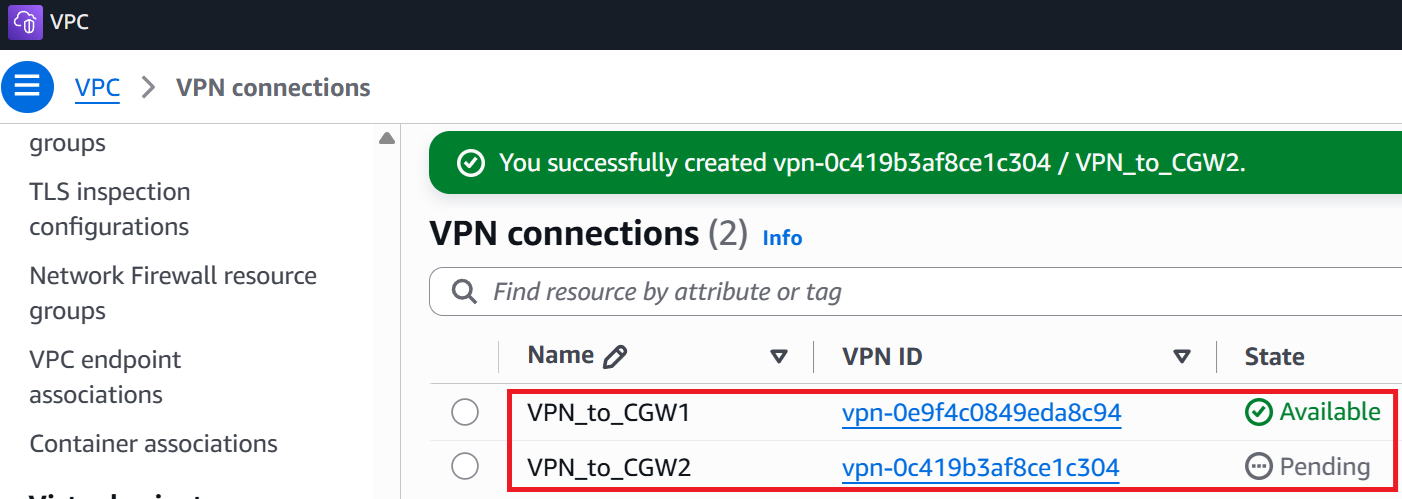
⑥As shown in the red box, both sets of VPN connection have been created.
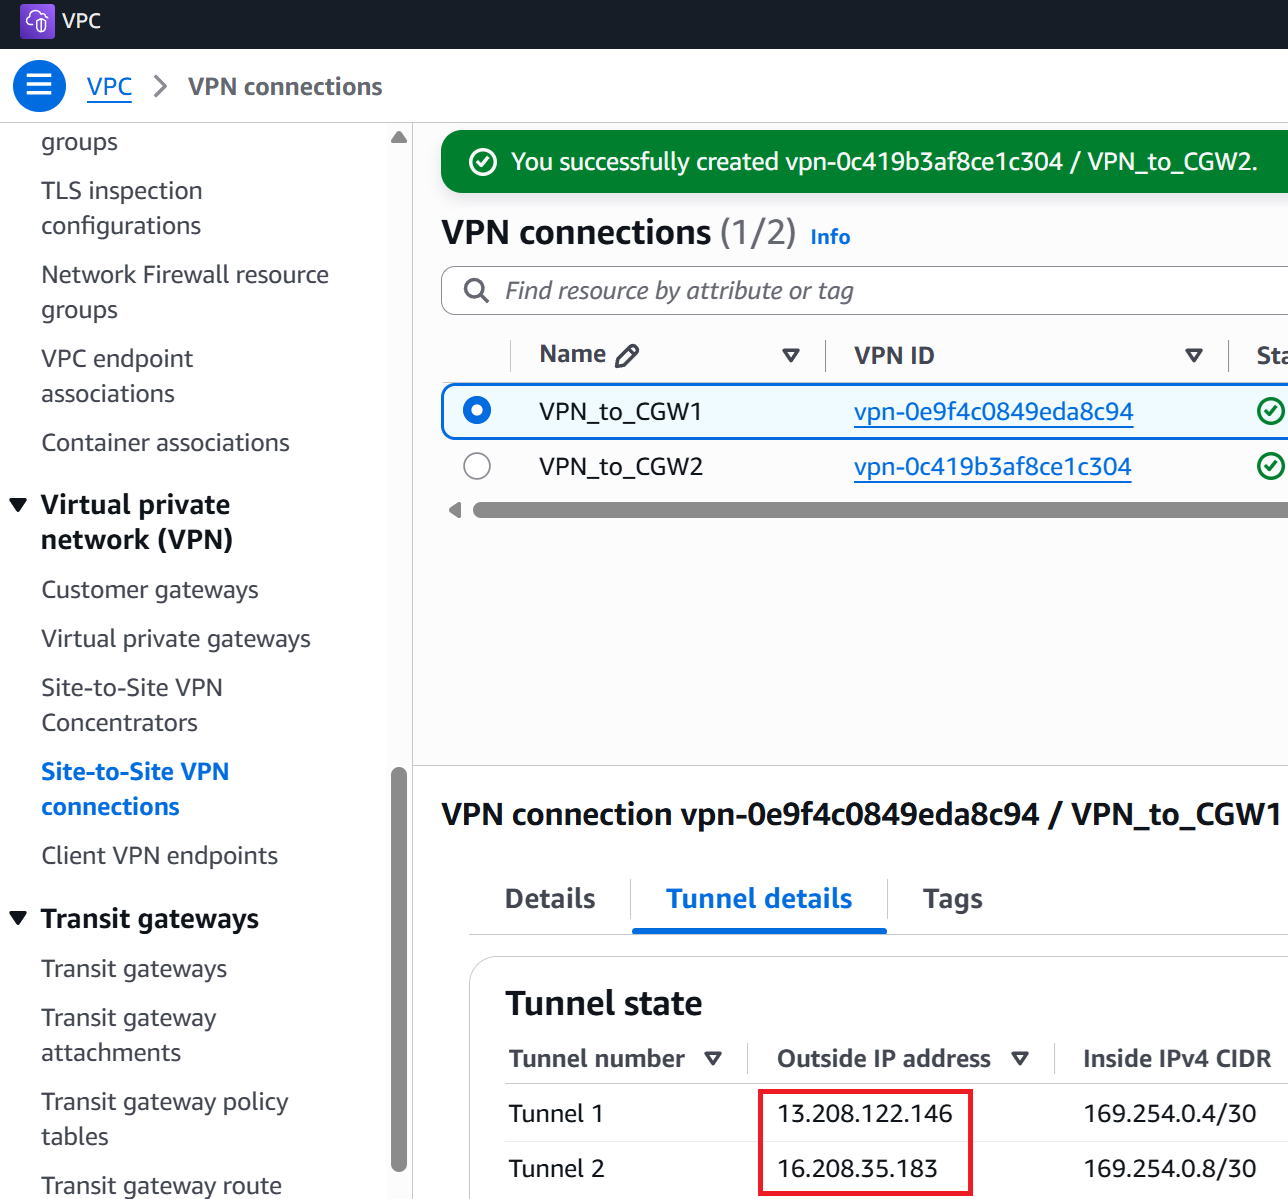
⑦Check one of them and click Tunnel details in the bottom half of the screen; the Global IP address appears under Outside IP address.
This is the IP address AWS has assigned for the IPsec connection, so make a note of it.
Cisco Secure Access work: Creating the Network Tunnel Group
|
Now it's time for the work on the Cisco Secure Access side. As shown in the red box, we'll create one Network Tunnel Group that bundles together the four IPsec tunnels. This isn't a physical thing either. Here you configure things like the AWS-side IP addresses and PSKs. |
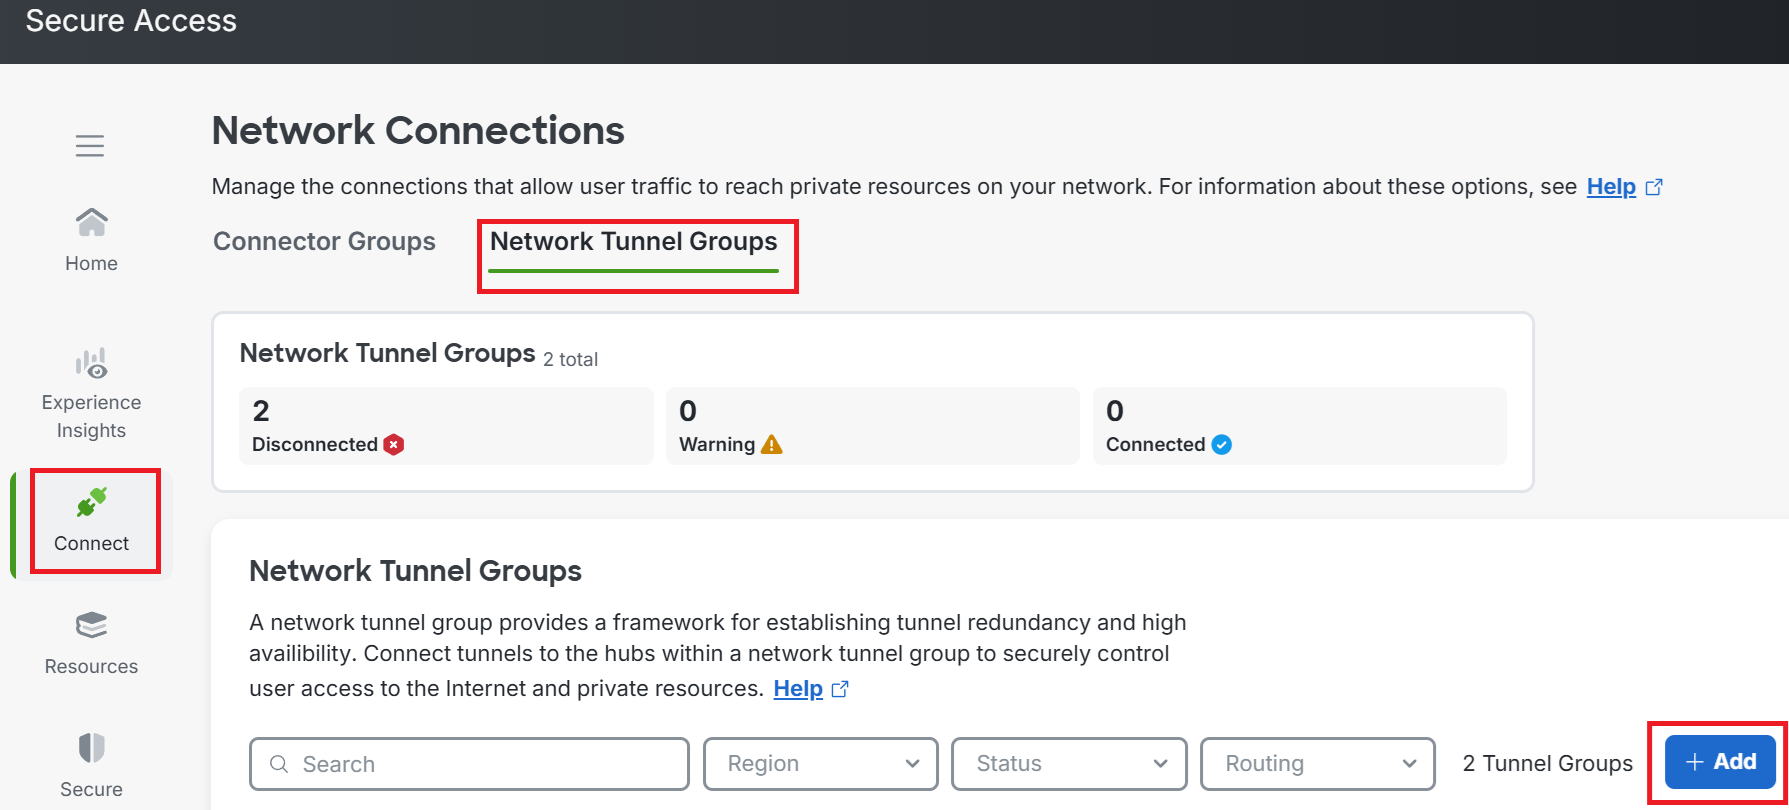
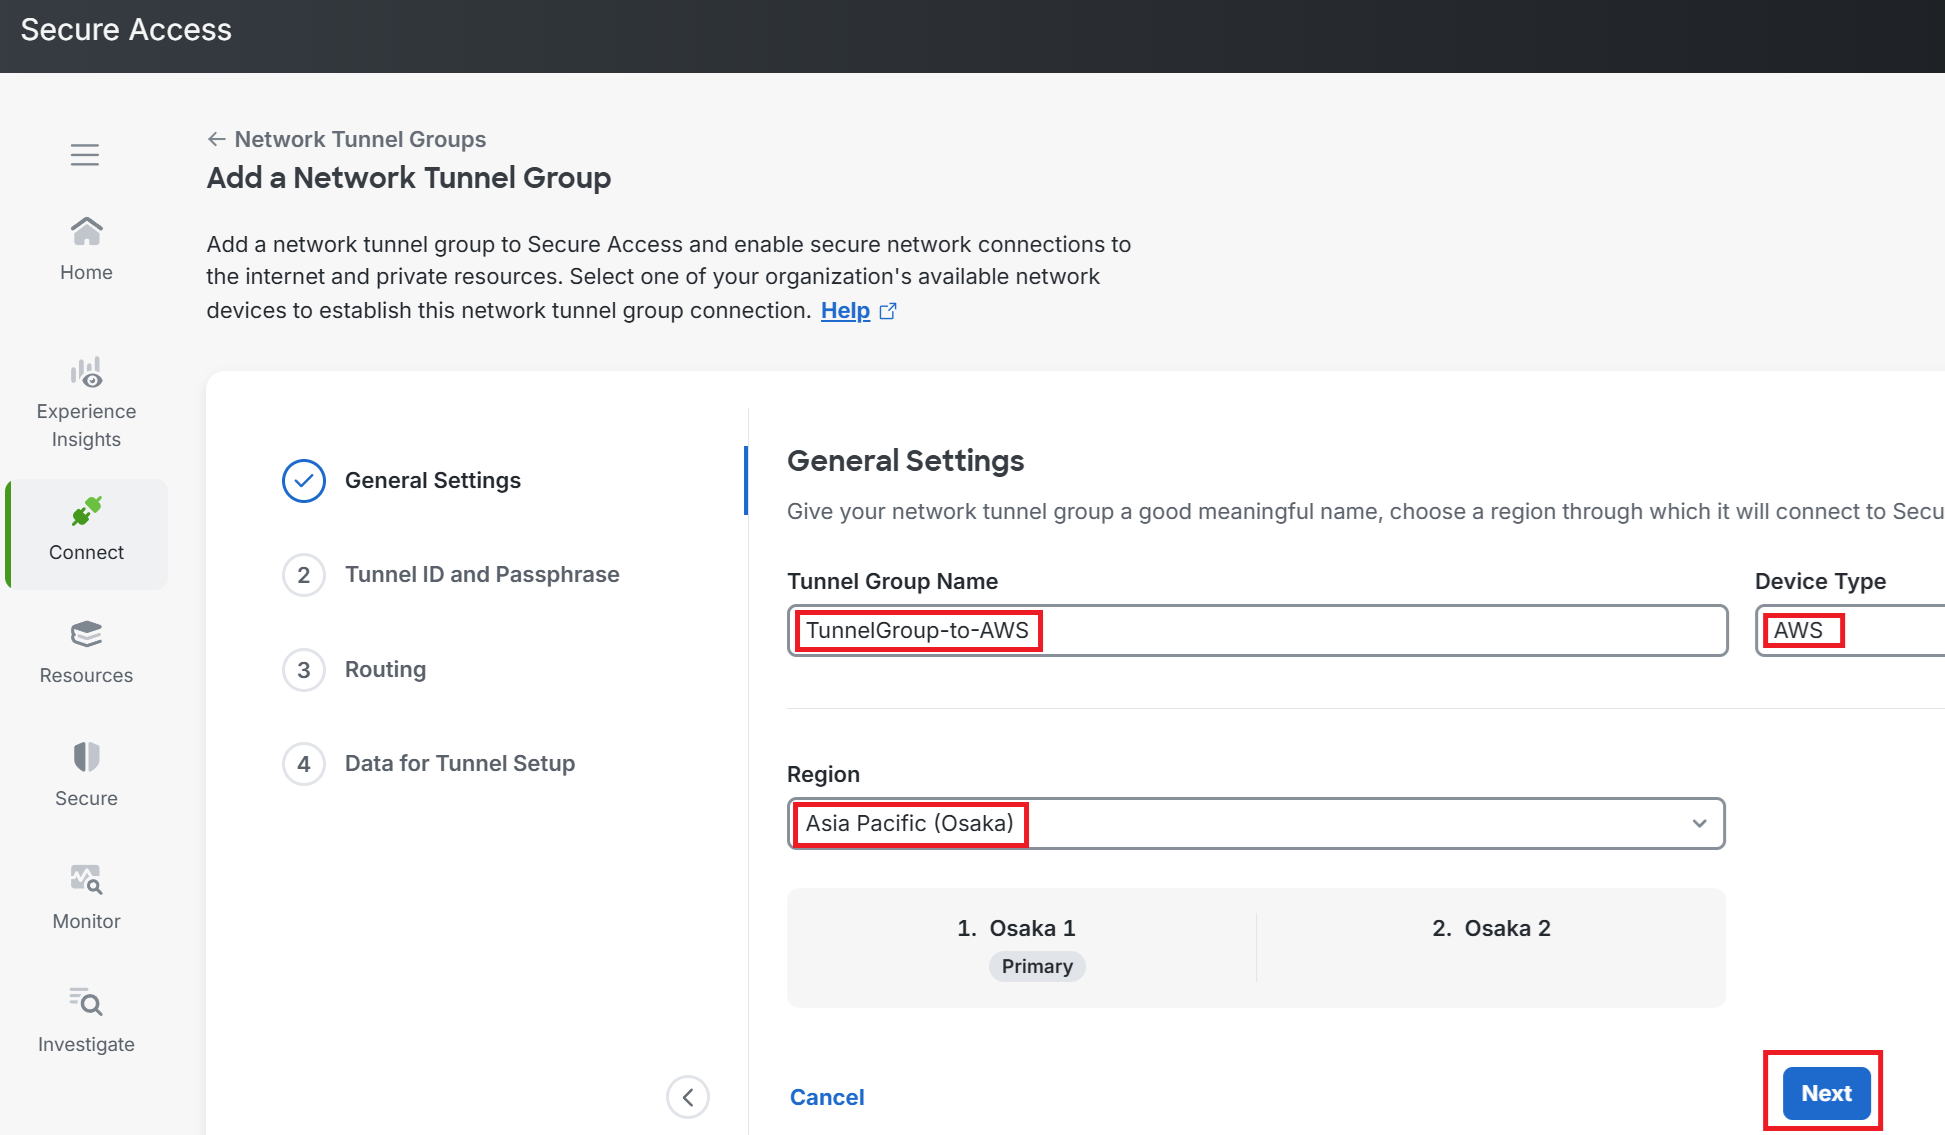
①Go to Connect → Network Tunnel Groups → Add
②Enter any name you like for Tunnel Group Name. This time I used TunnelGroup-to-AWS.
Select AWS for Device Type.
Select Asia Pacific (Osaka) for Region, then click Next.
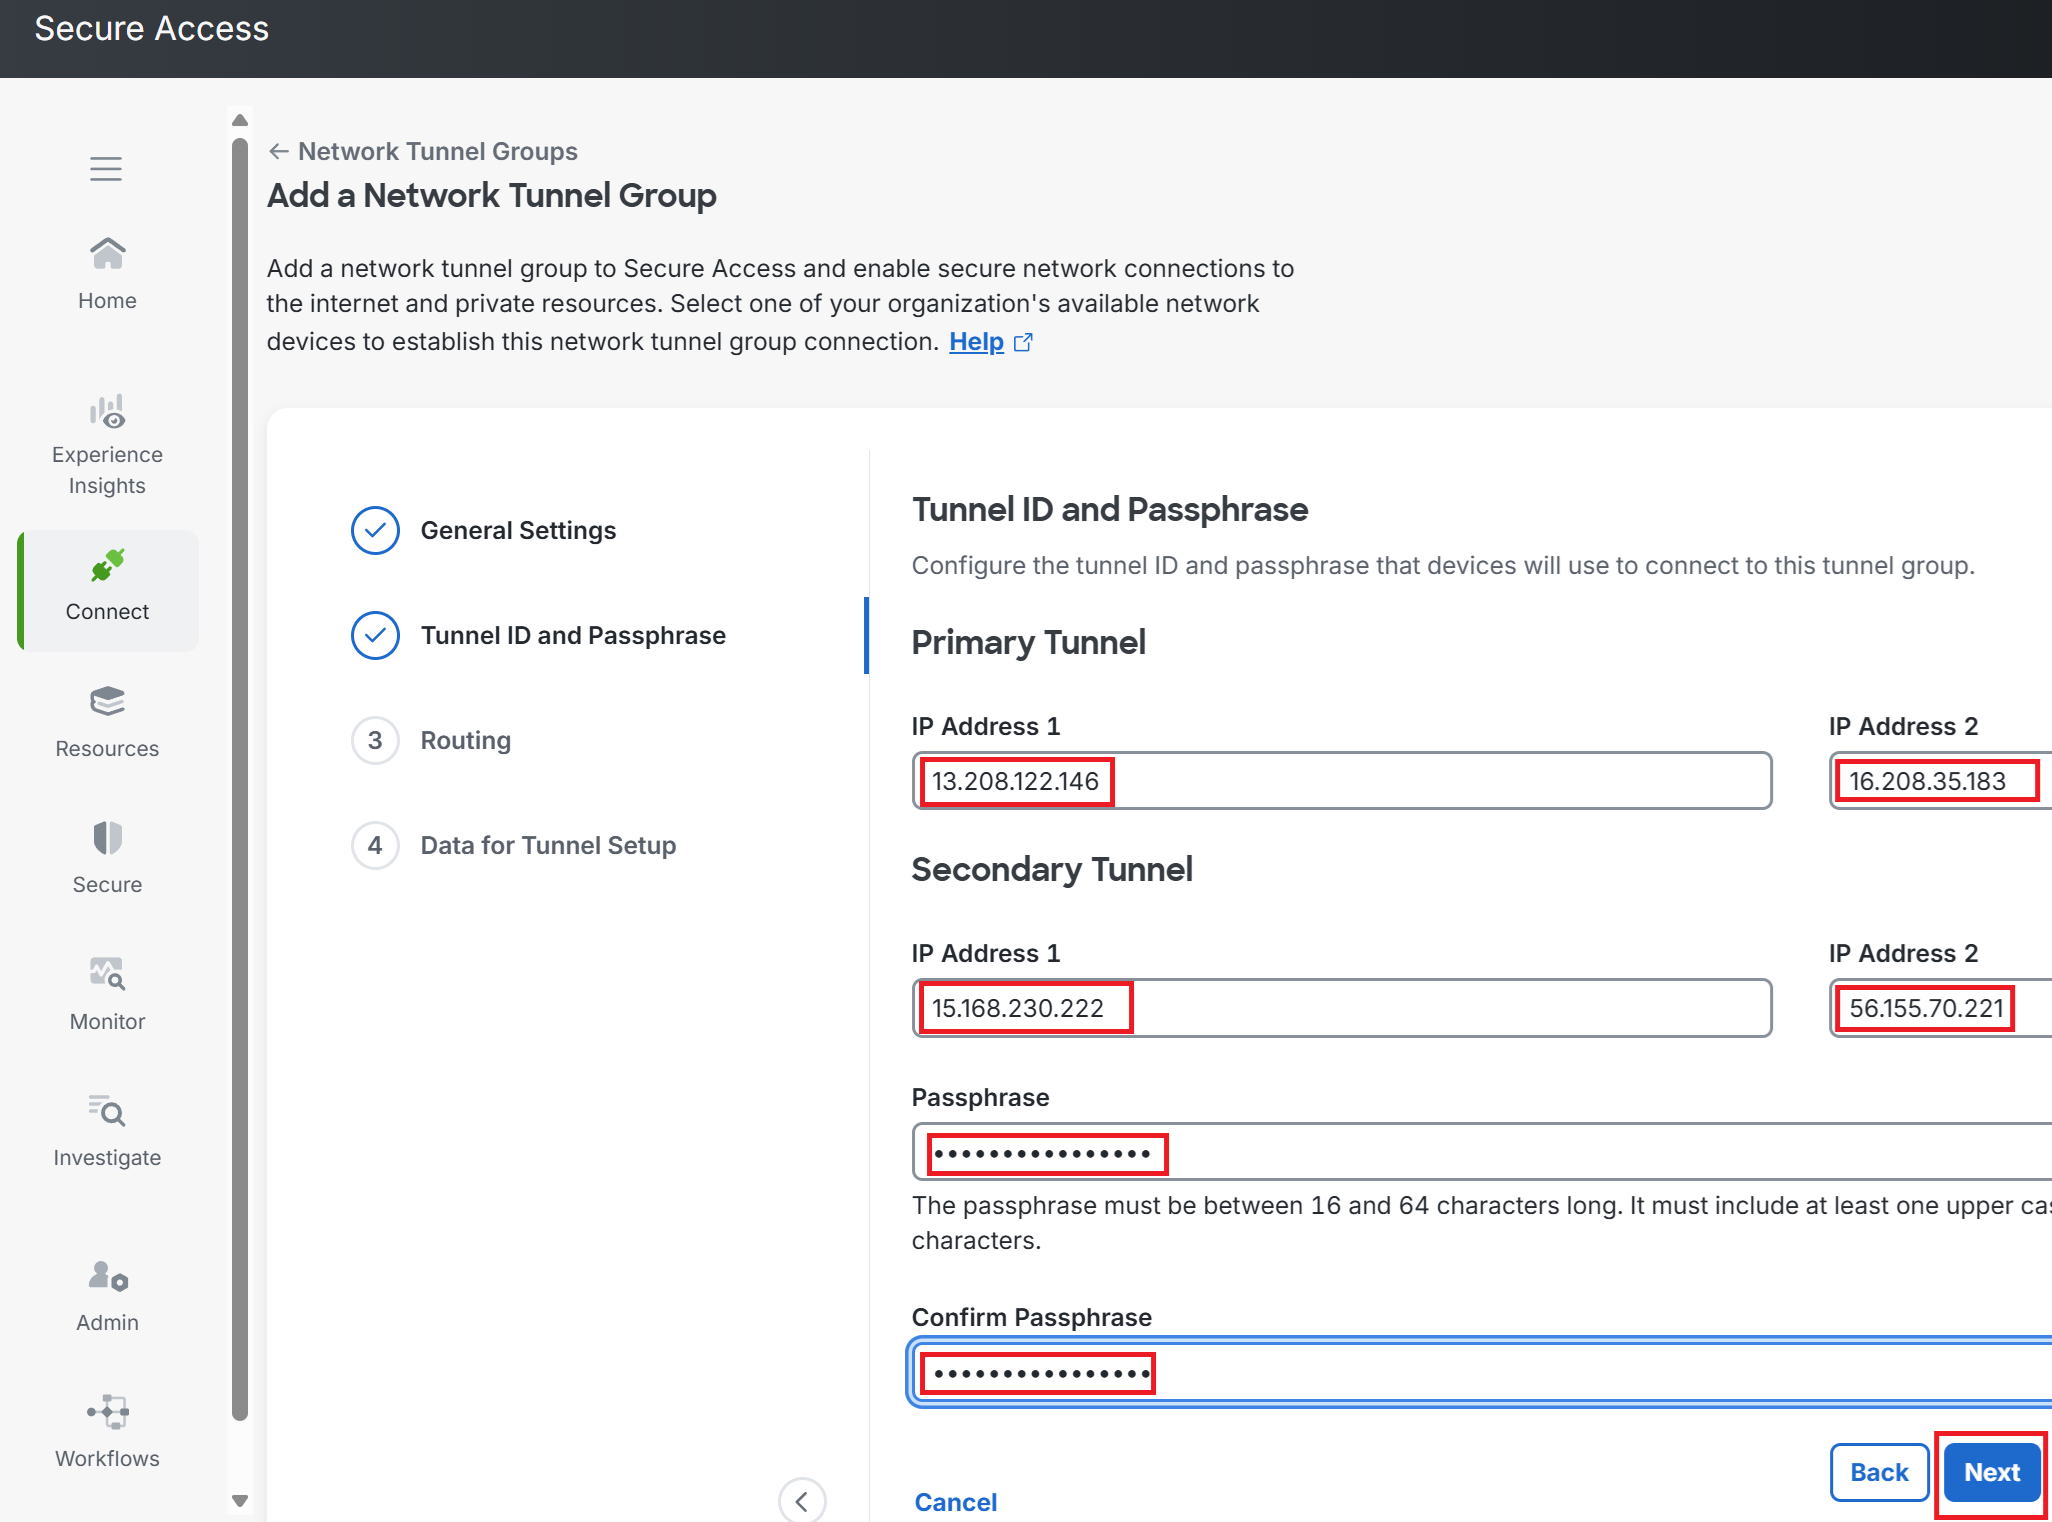
③Enter the four GIPs on the AWS side and the Passphrase (PSK), then click Next.
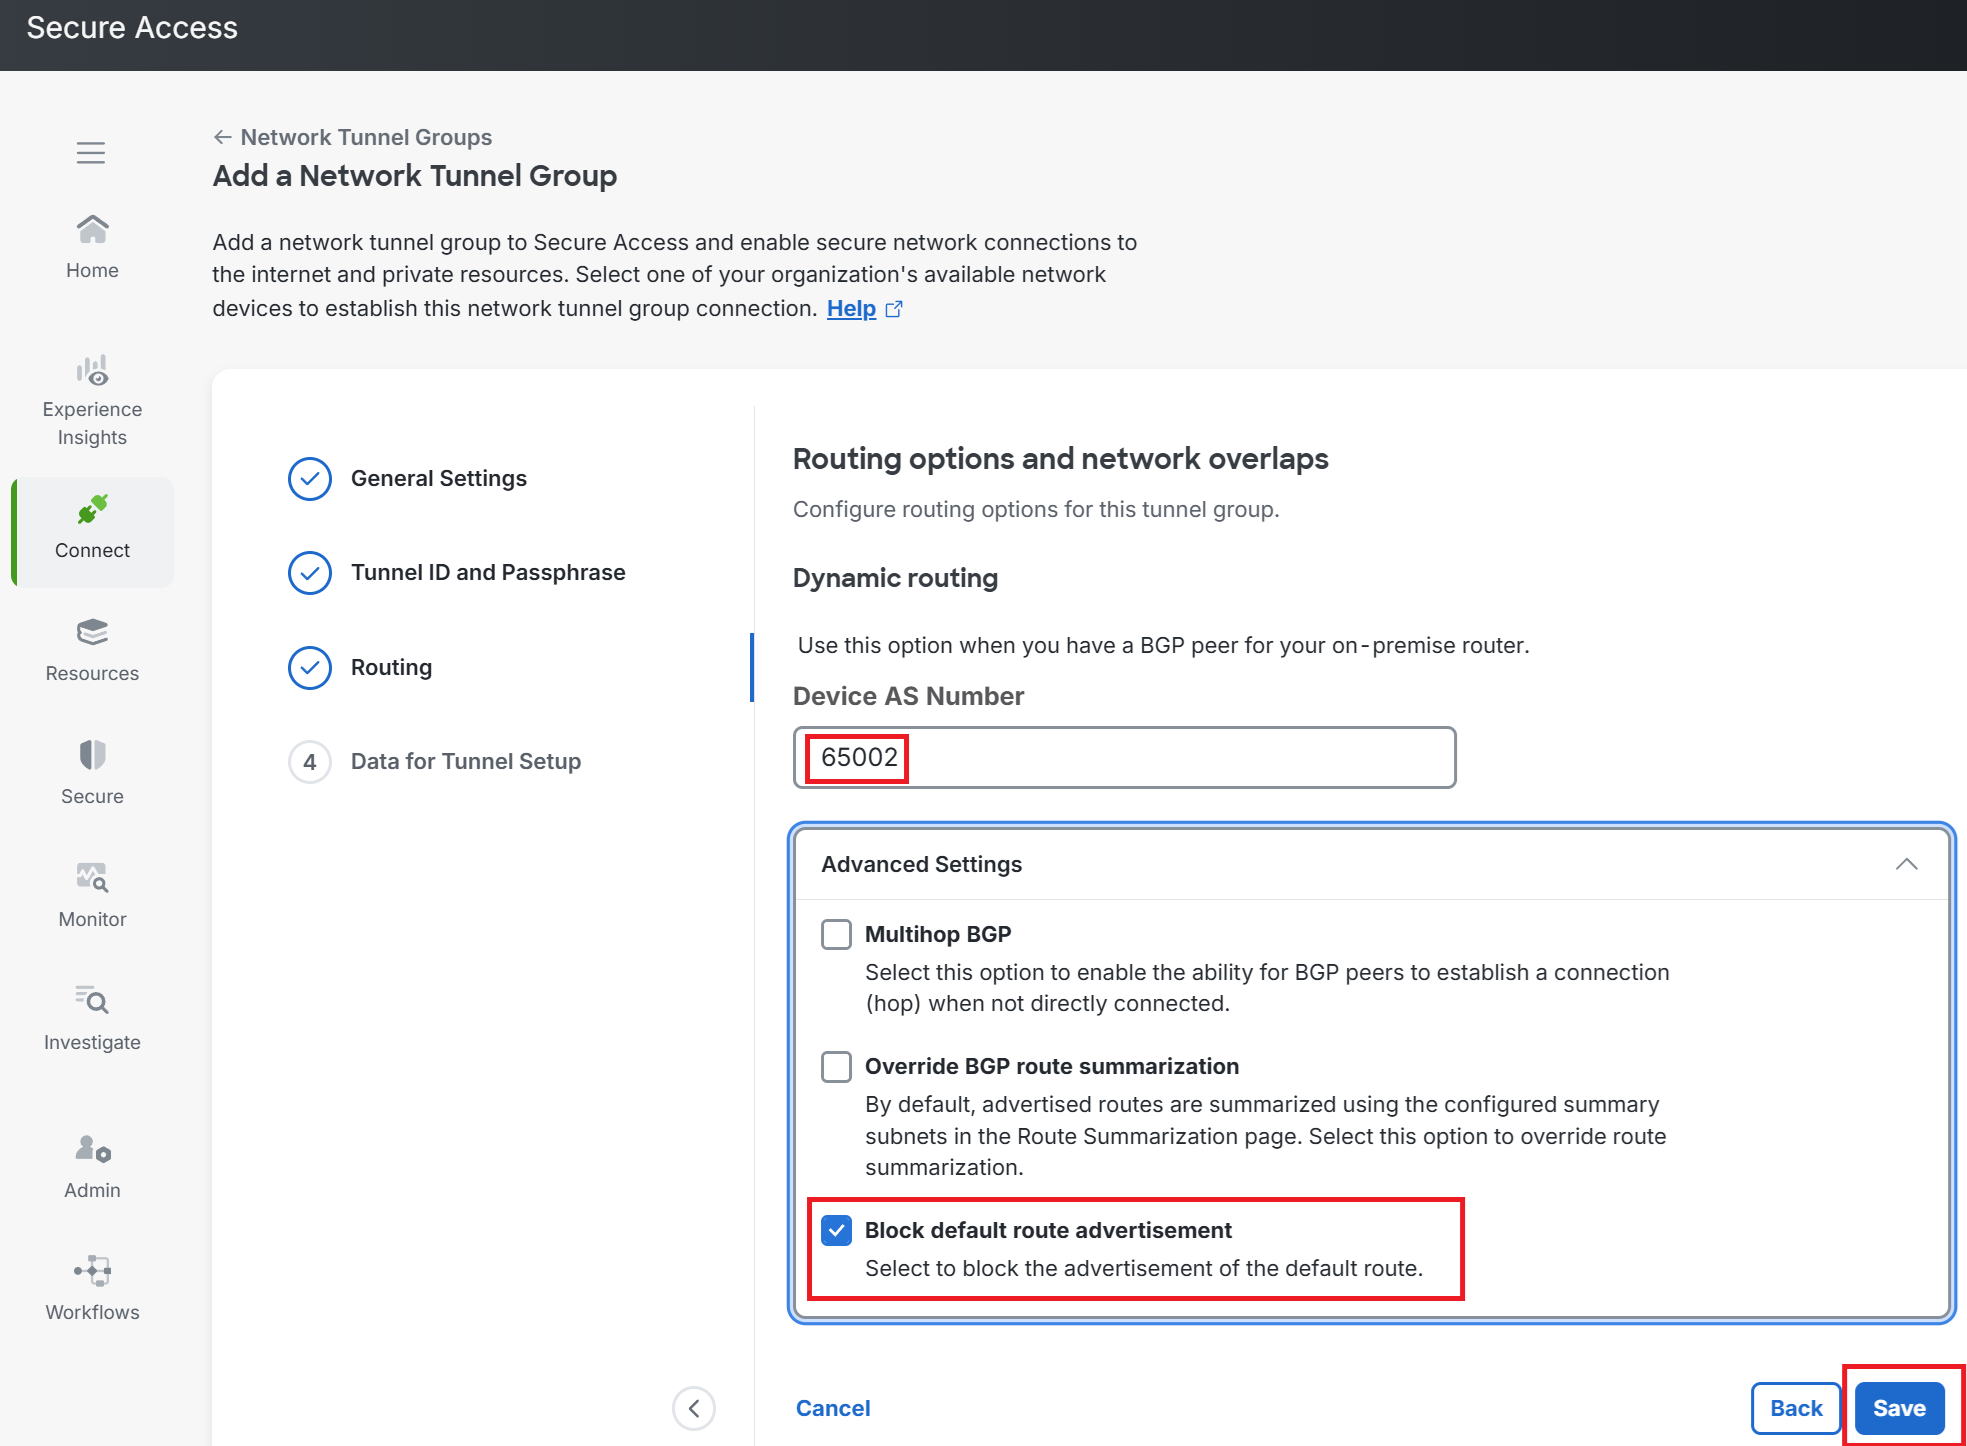
④Enter AWS's TGW AS number (AS65002) for Device AS Number.
This time, to prevent Secure Access from advertising a default route via BGP, also check Block default route advertisement and click Save.
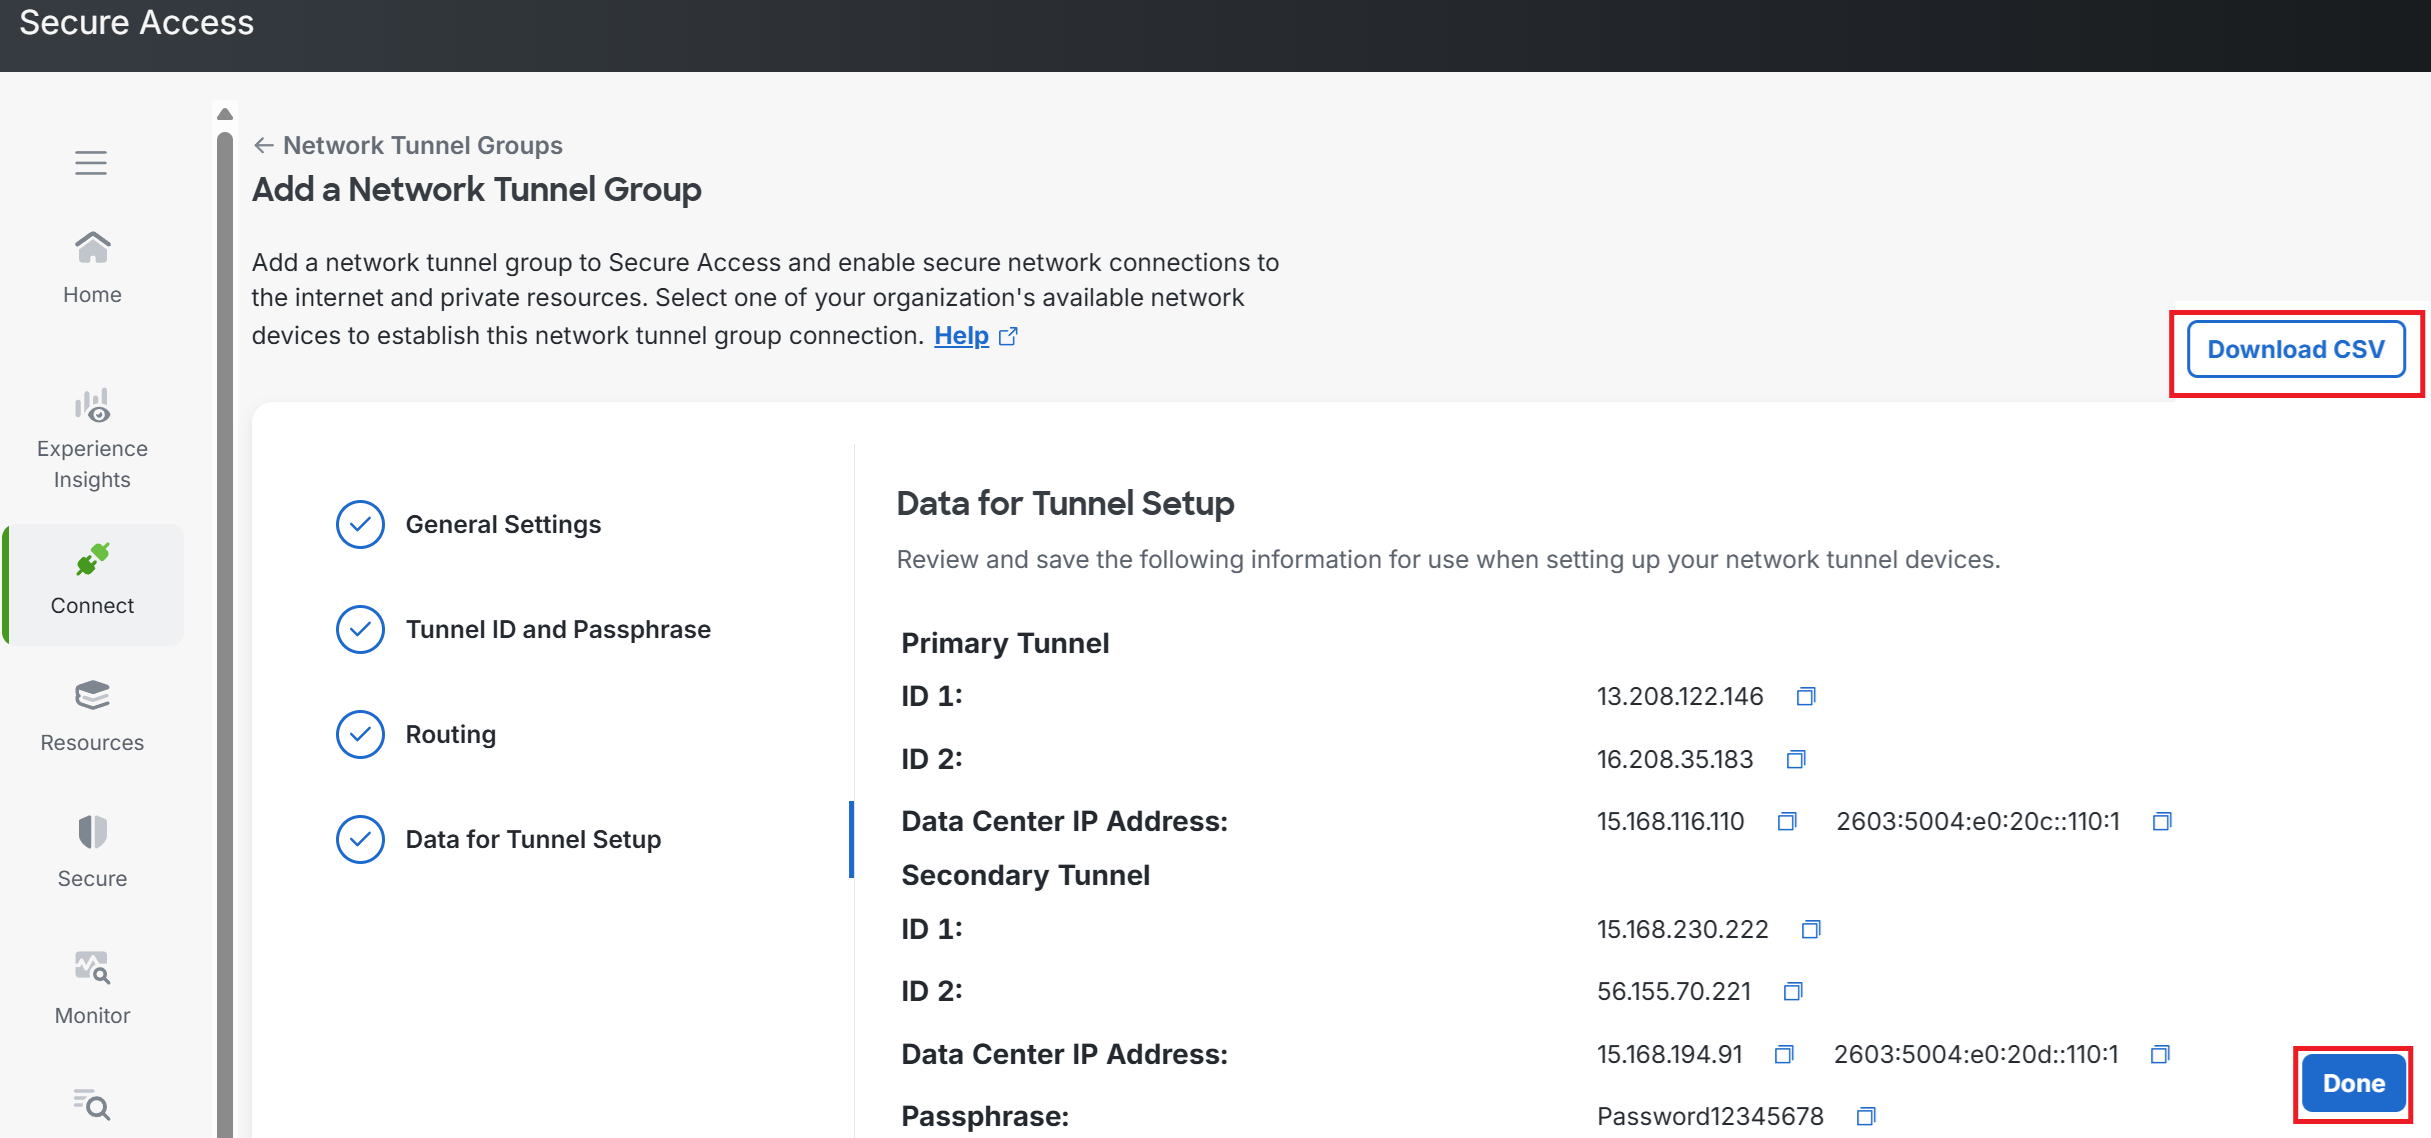
⑤The GIPs on the Secure Access side are assigned.
Click Download CSV to obtain a CSV file containing this information. Then click Done.
⑥The Network Tunnel Group has been created.
However, since the AWS-side configuration still assumes the placeholder GIPs, the status shows Disconnected.
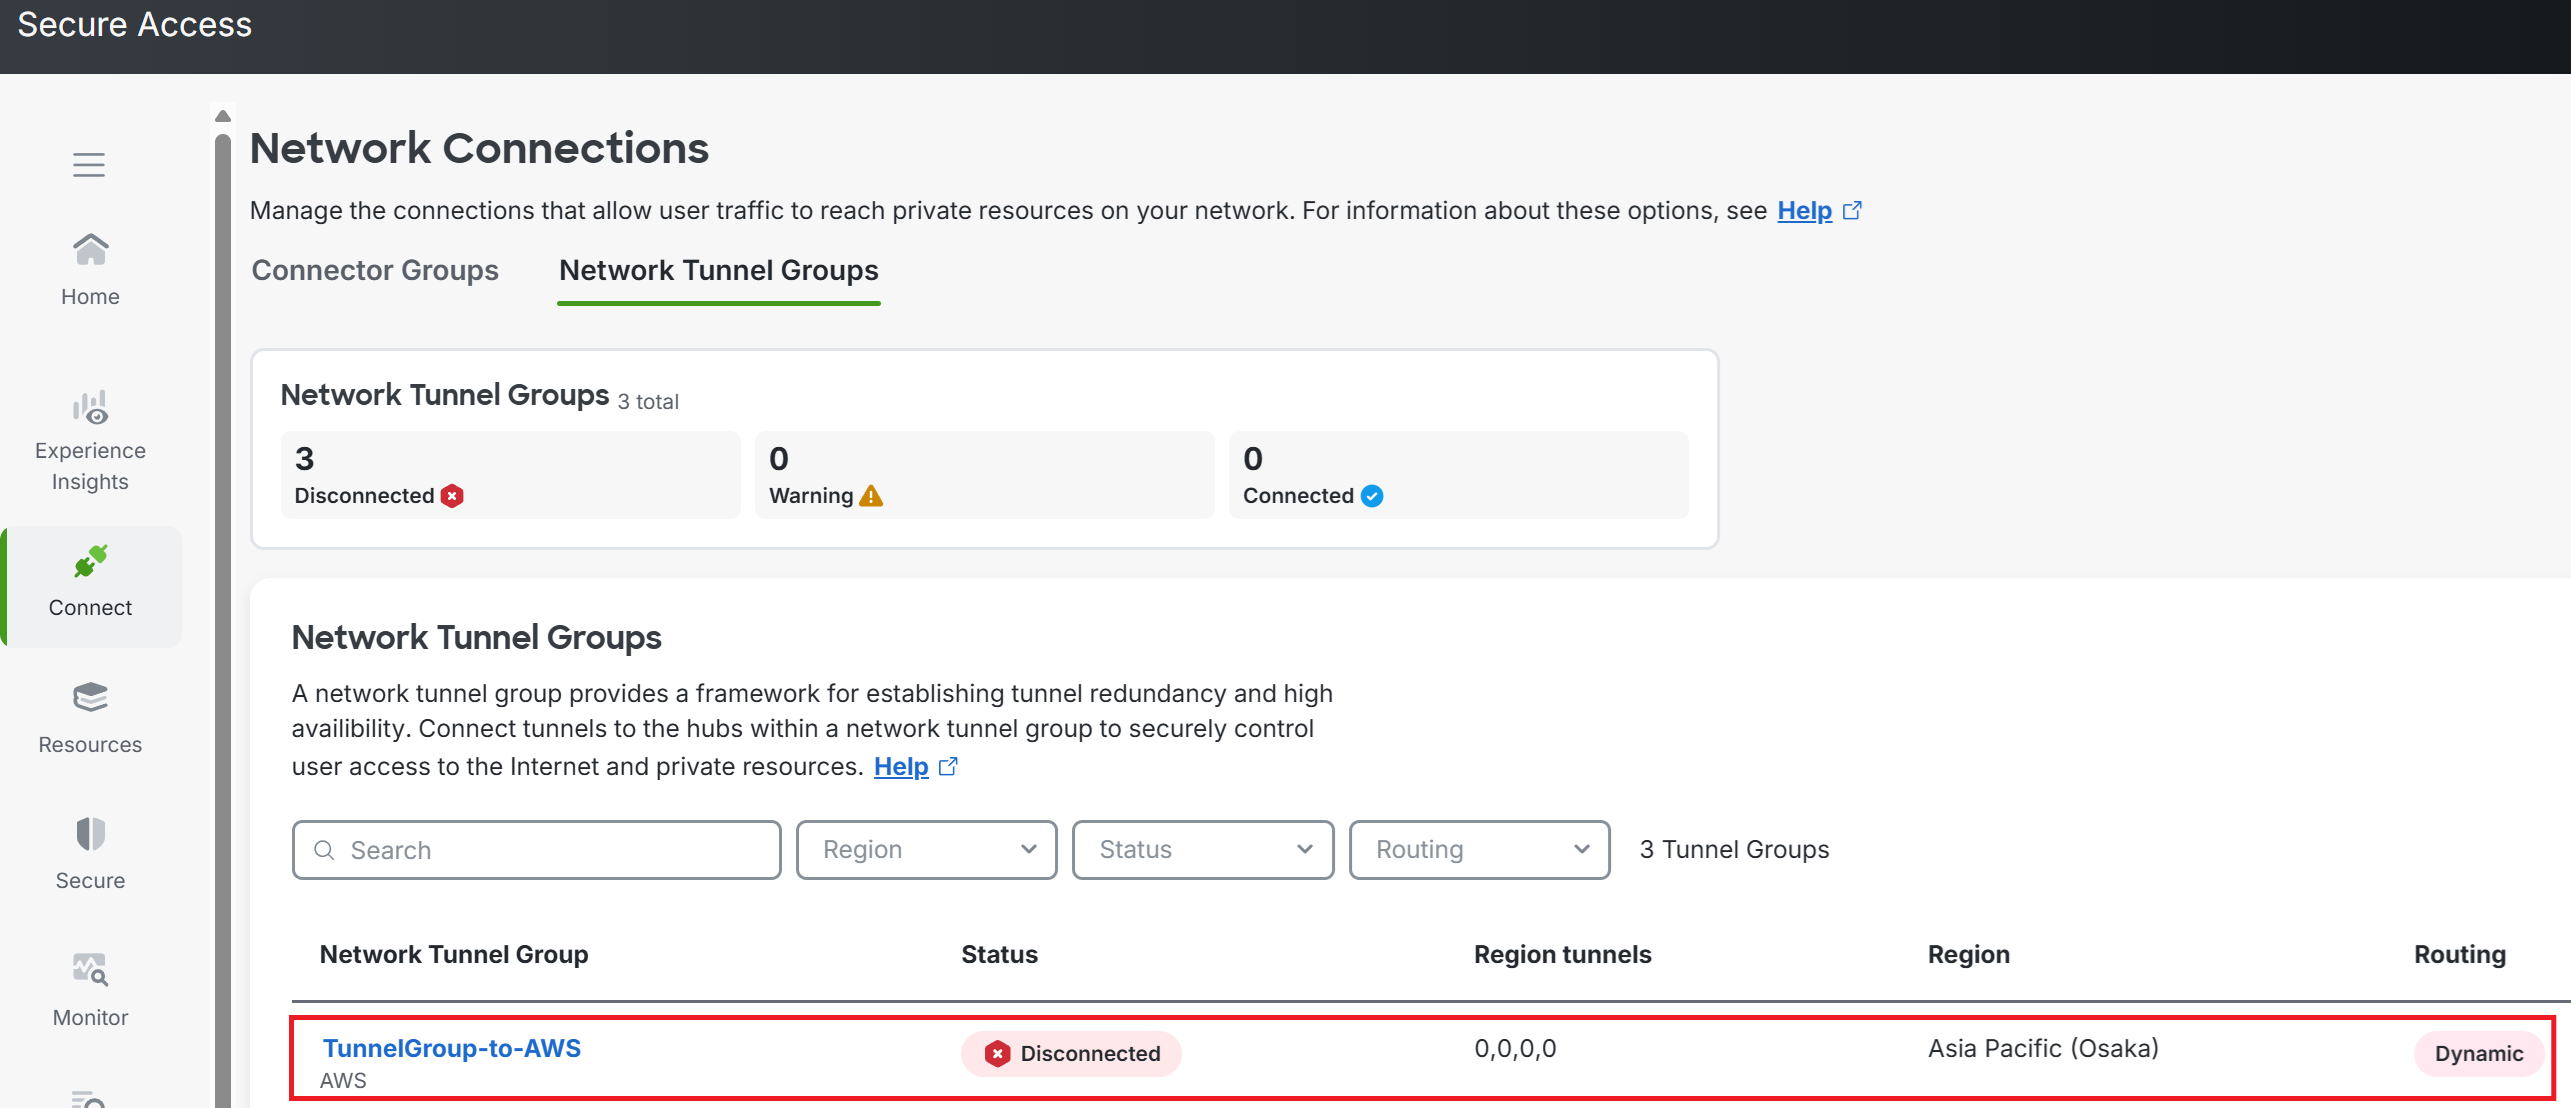
⑦Let's check the CSV file.
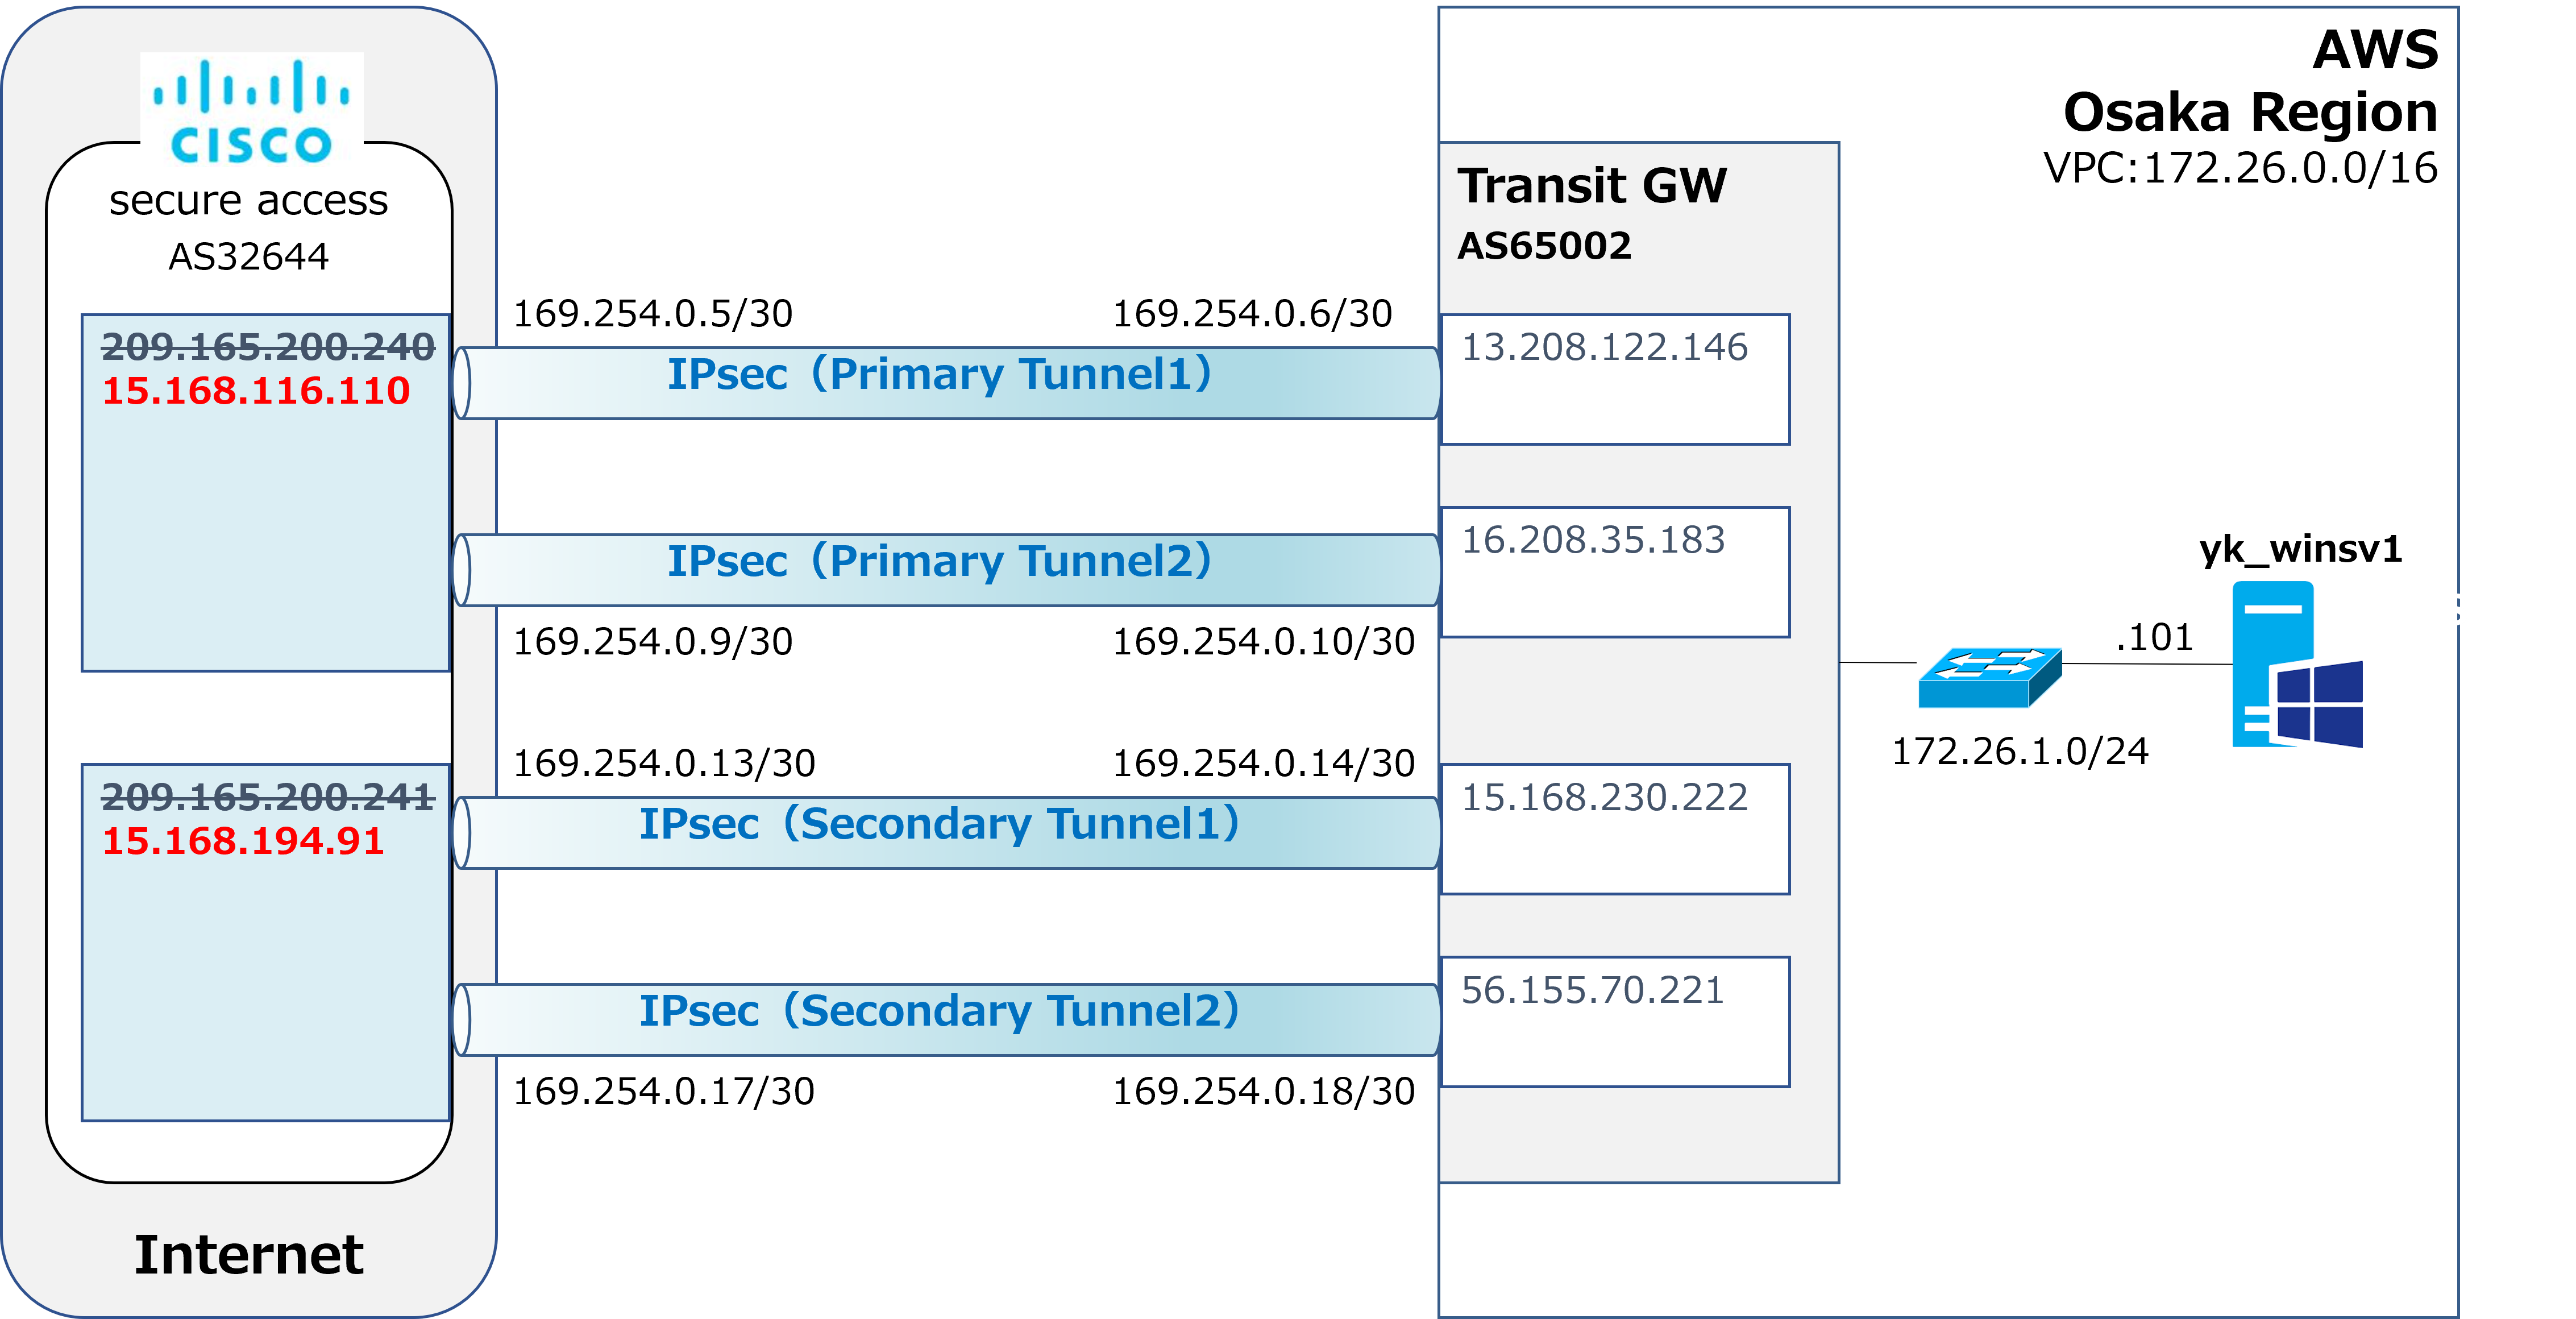
The IP shown in red is the one Secure Access assigned. The other four are the GIPs on the AWS side. Now all the IP addresses are in place.

AWS work: Creating the official Customer gateway
|
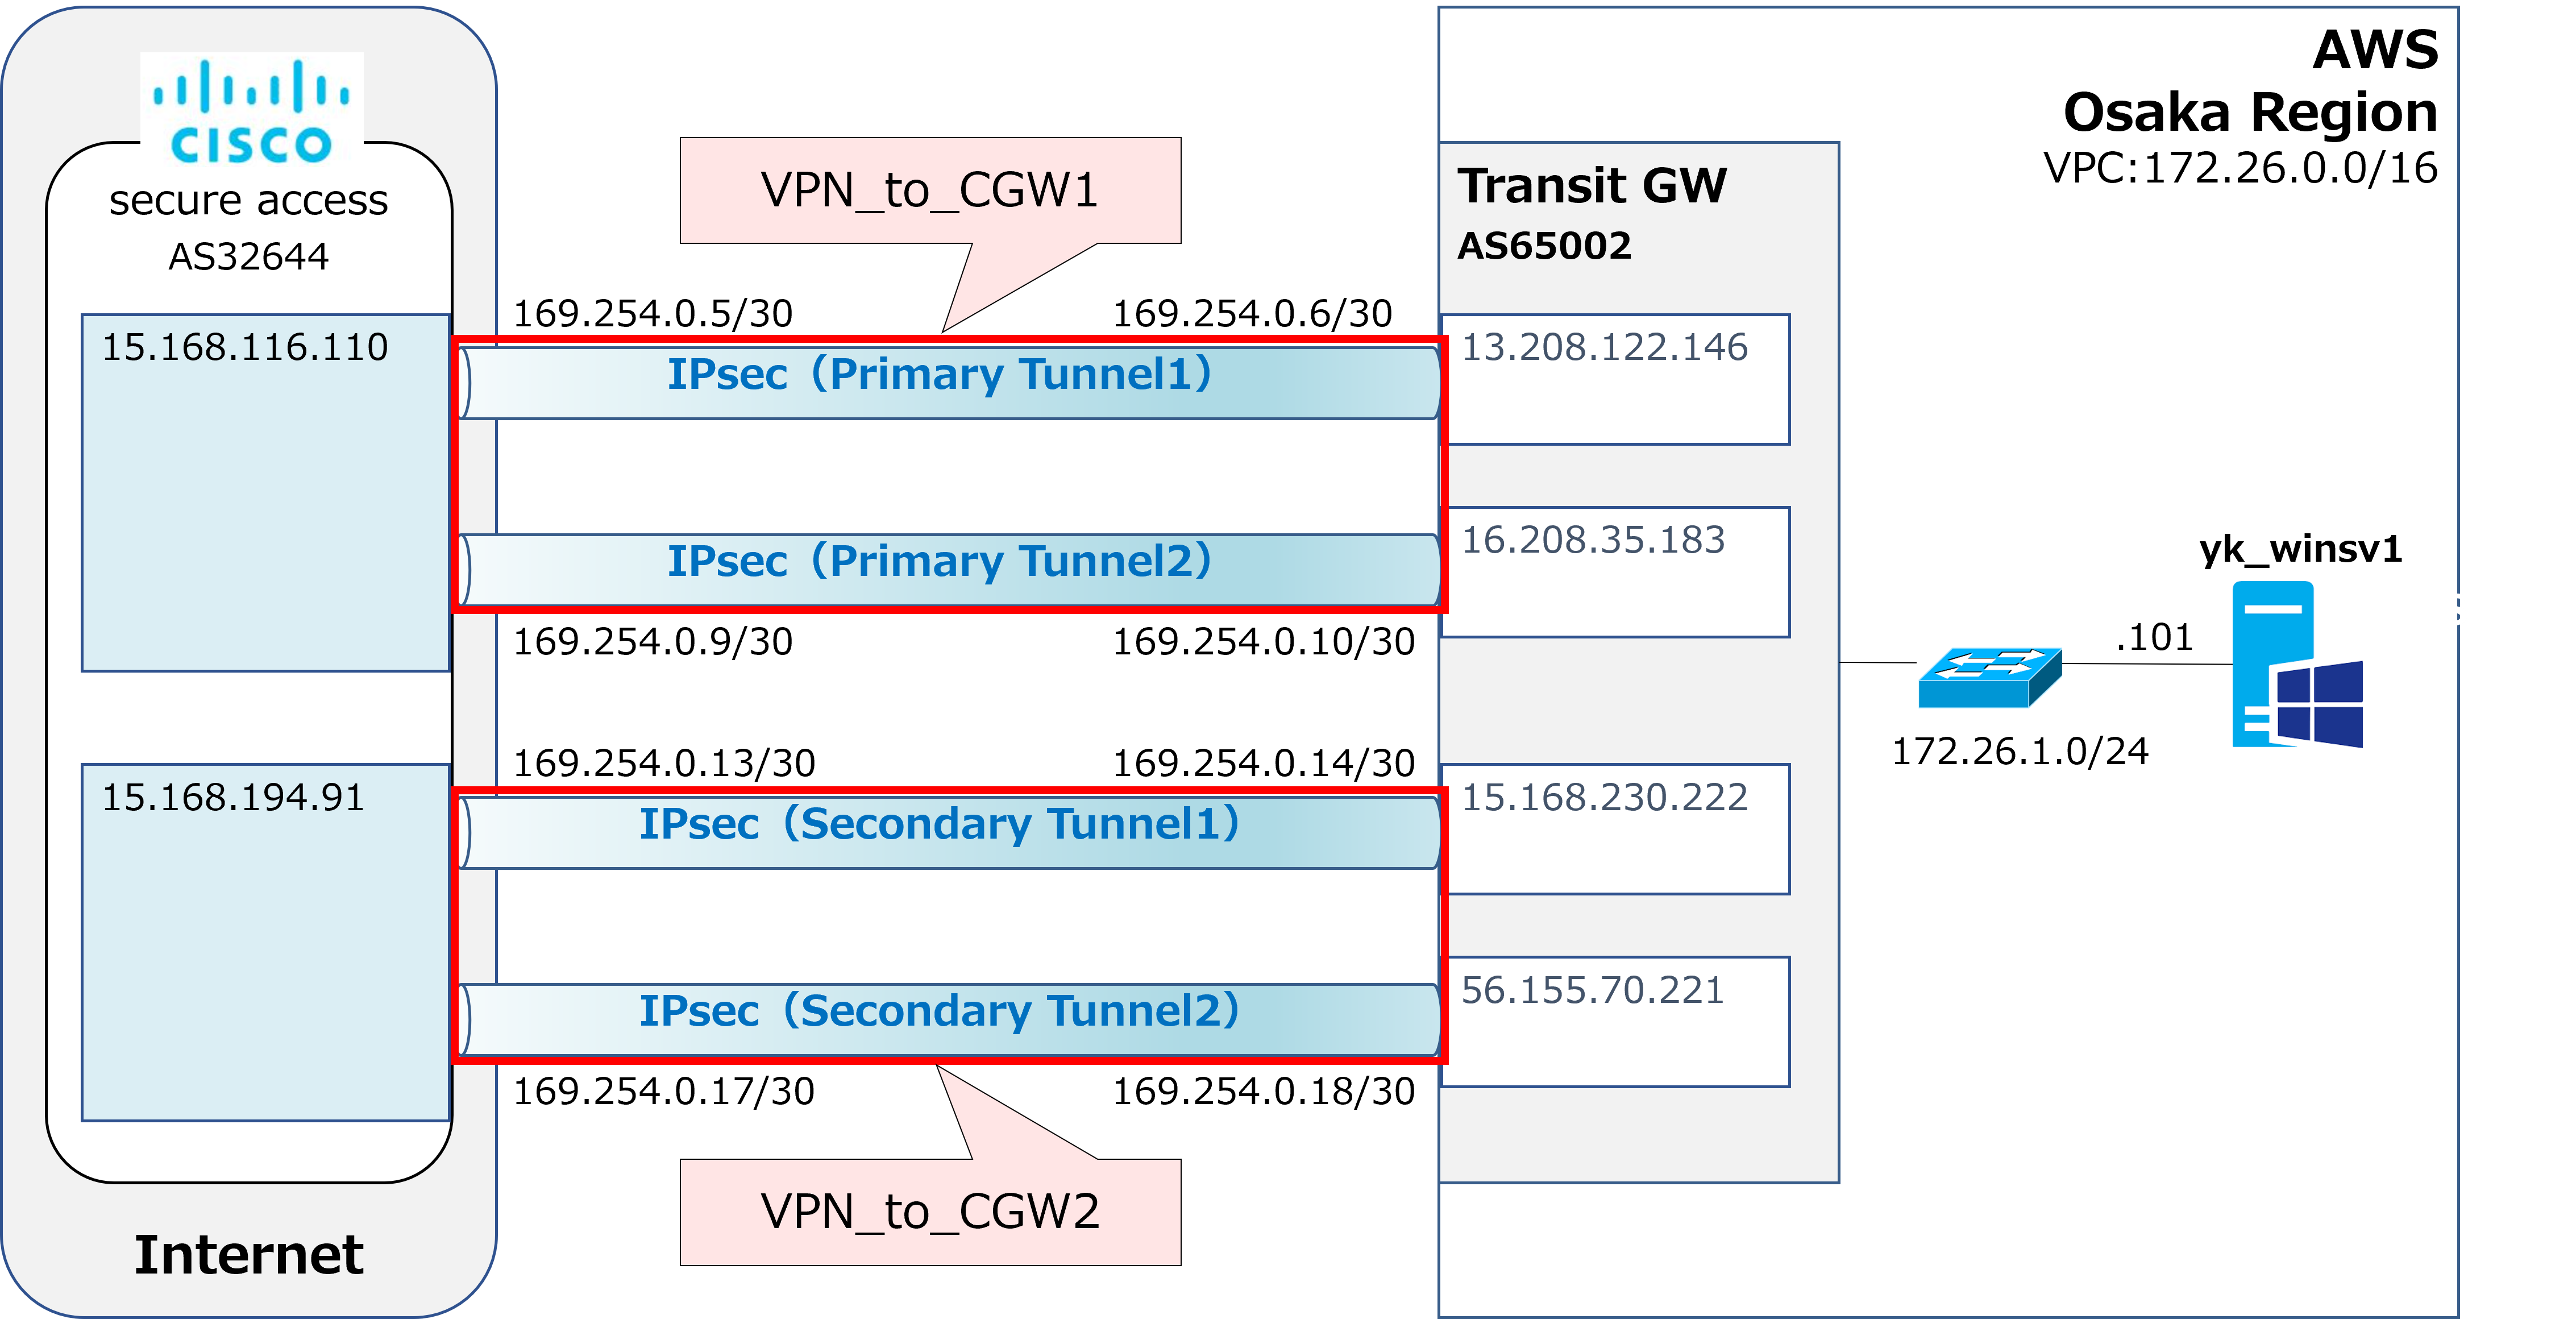
The red text in the diagram above is the official IP address assigned by Secure Access. I've struck through the placeholder GIP. Now we'll also replace the placeholder Customer gateway, which was created with the placeholder GIP, with an official Customer gateway. So, let's create the official Customer gateway. |
①Click Create Customer gateway at the top right.

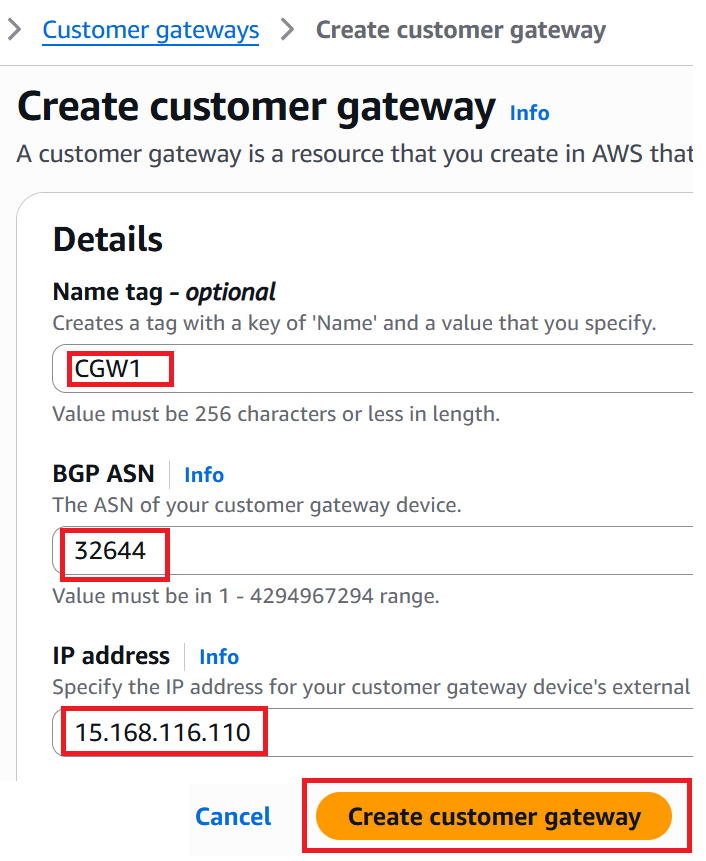
②Enter any name you like for Name tag. Since this time we're creating the official one rather than a placeholder, I used CGW1—the same name with "placeholder" dropped.
BGP ASN is 32644, Secure Access's AS number.
Enter 15.168.116.110, the IP for Secure Access's Primary Tunnel, for IP address, then click Create customer gateway.
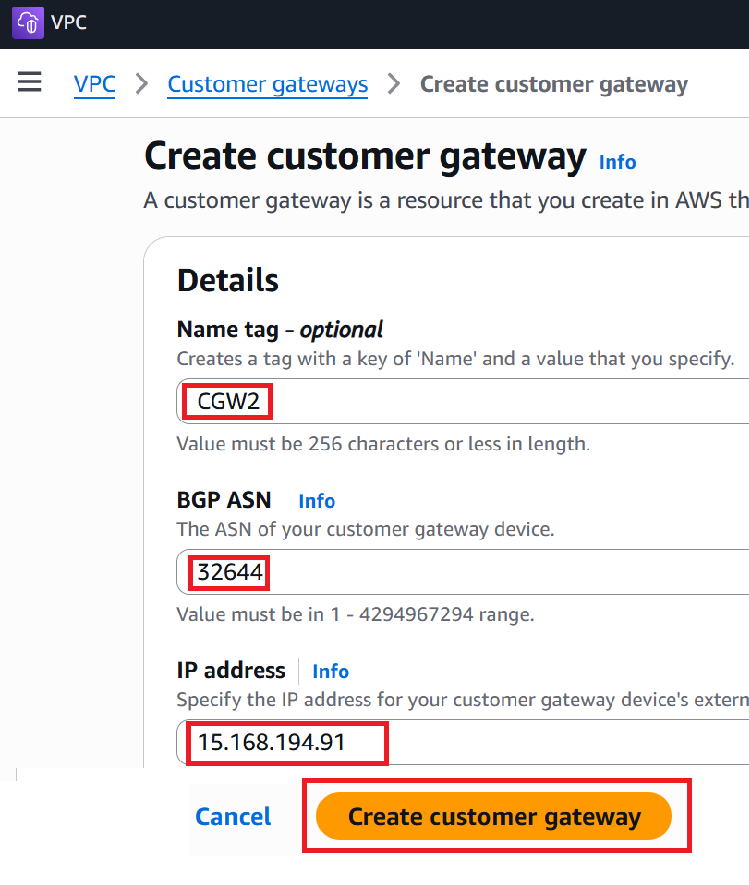
③In the same way, also create the official Customer gateway for the Secondary Tunnel.
Enter the values shown below, then click Create customer gateway.
④In addition to the two placeholder ones, the two official customer gateways have now been created.
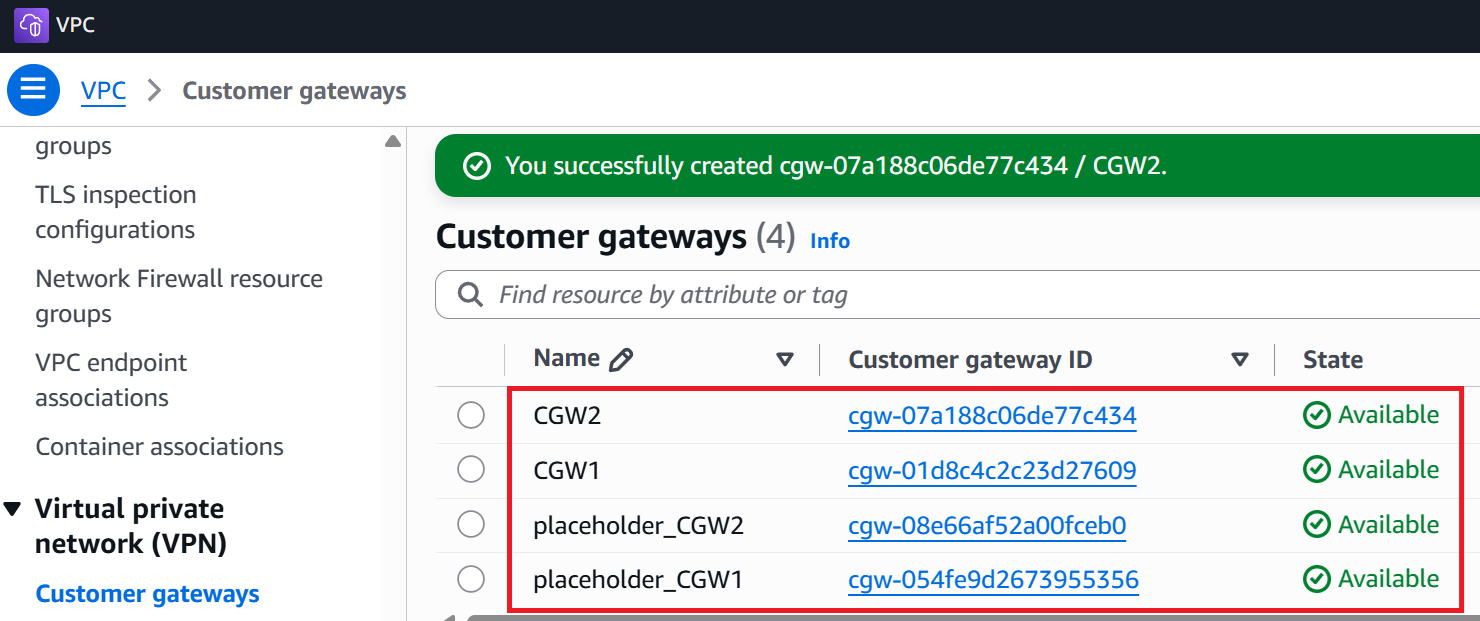
AWS work: Editing the VPN Connection settings
|
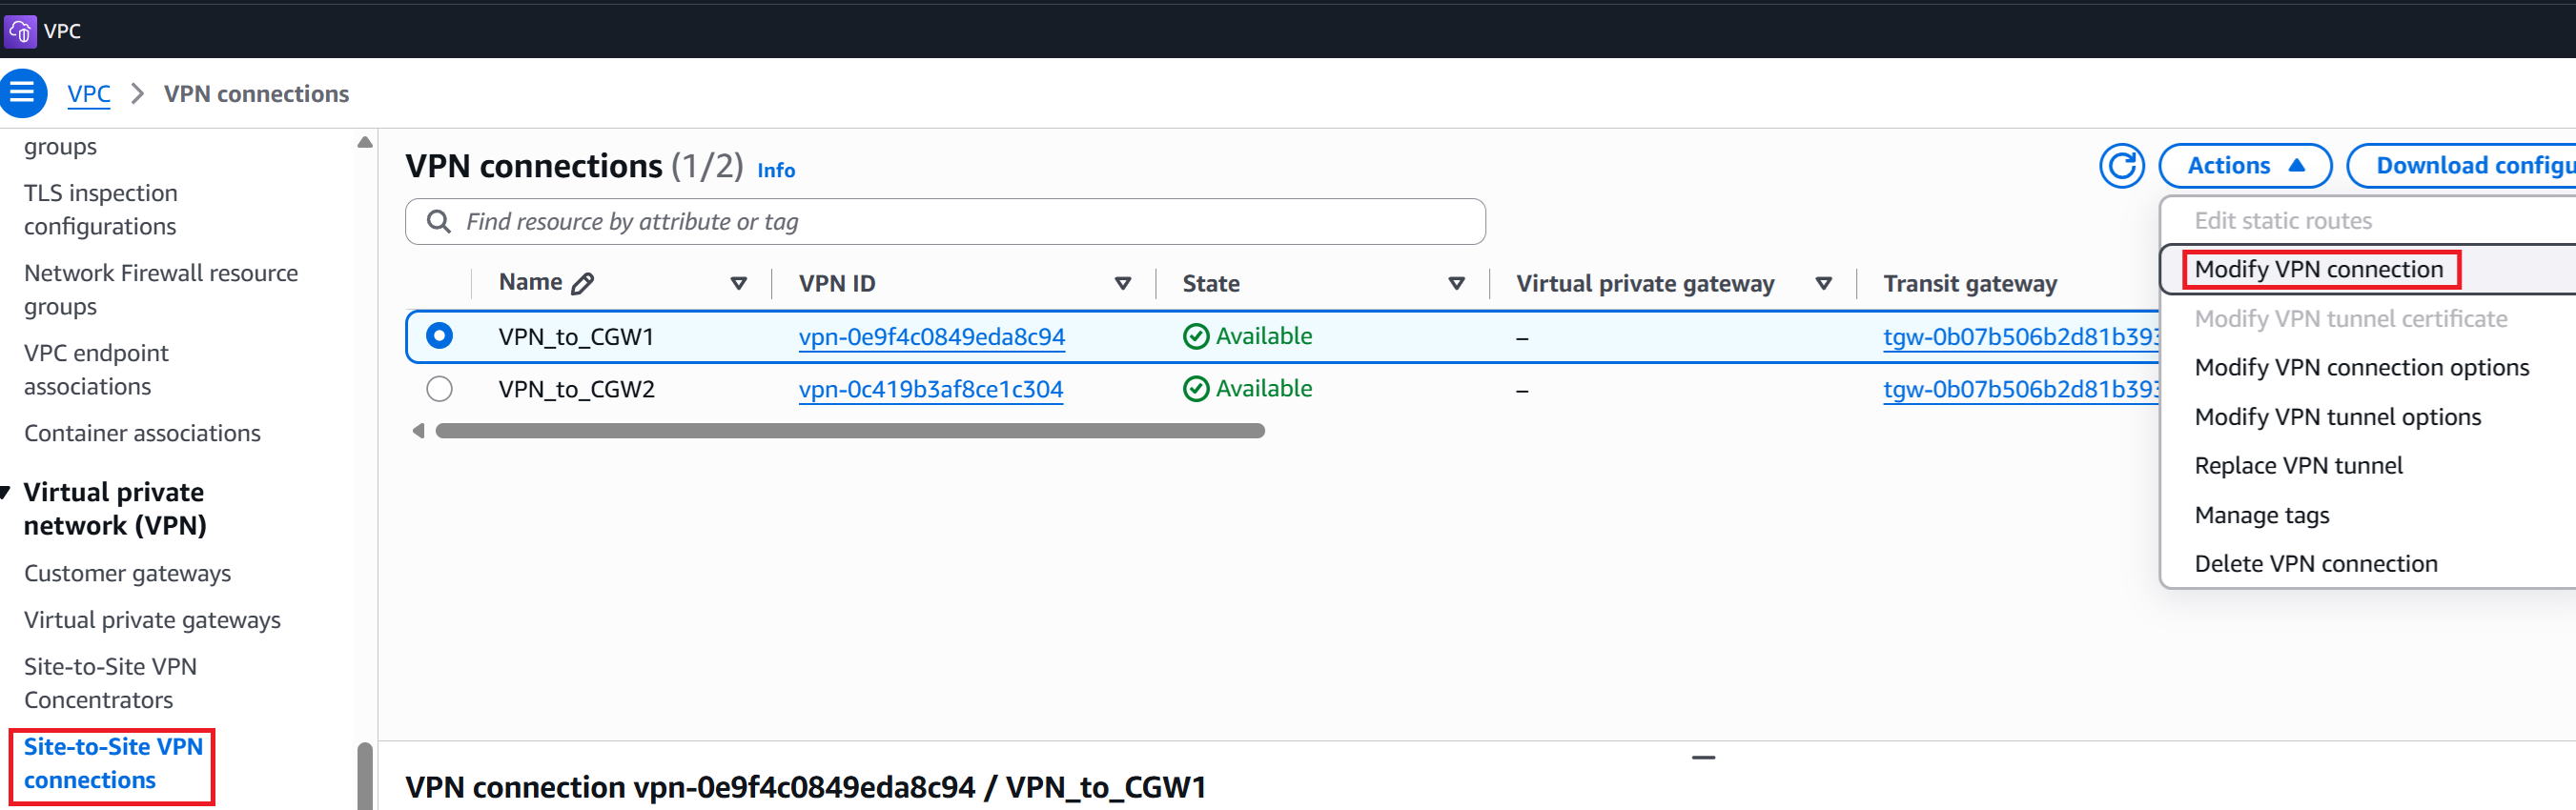
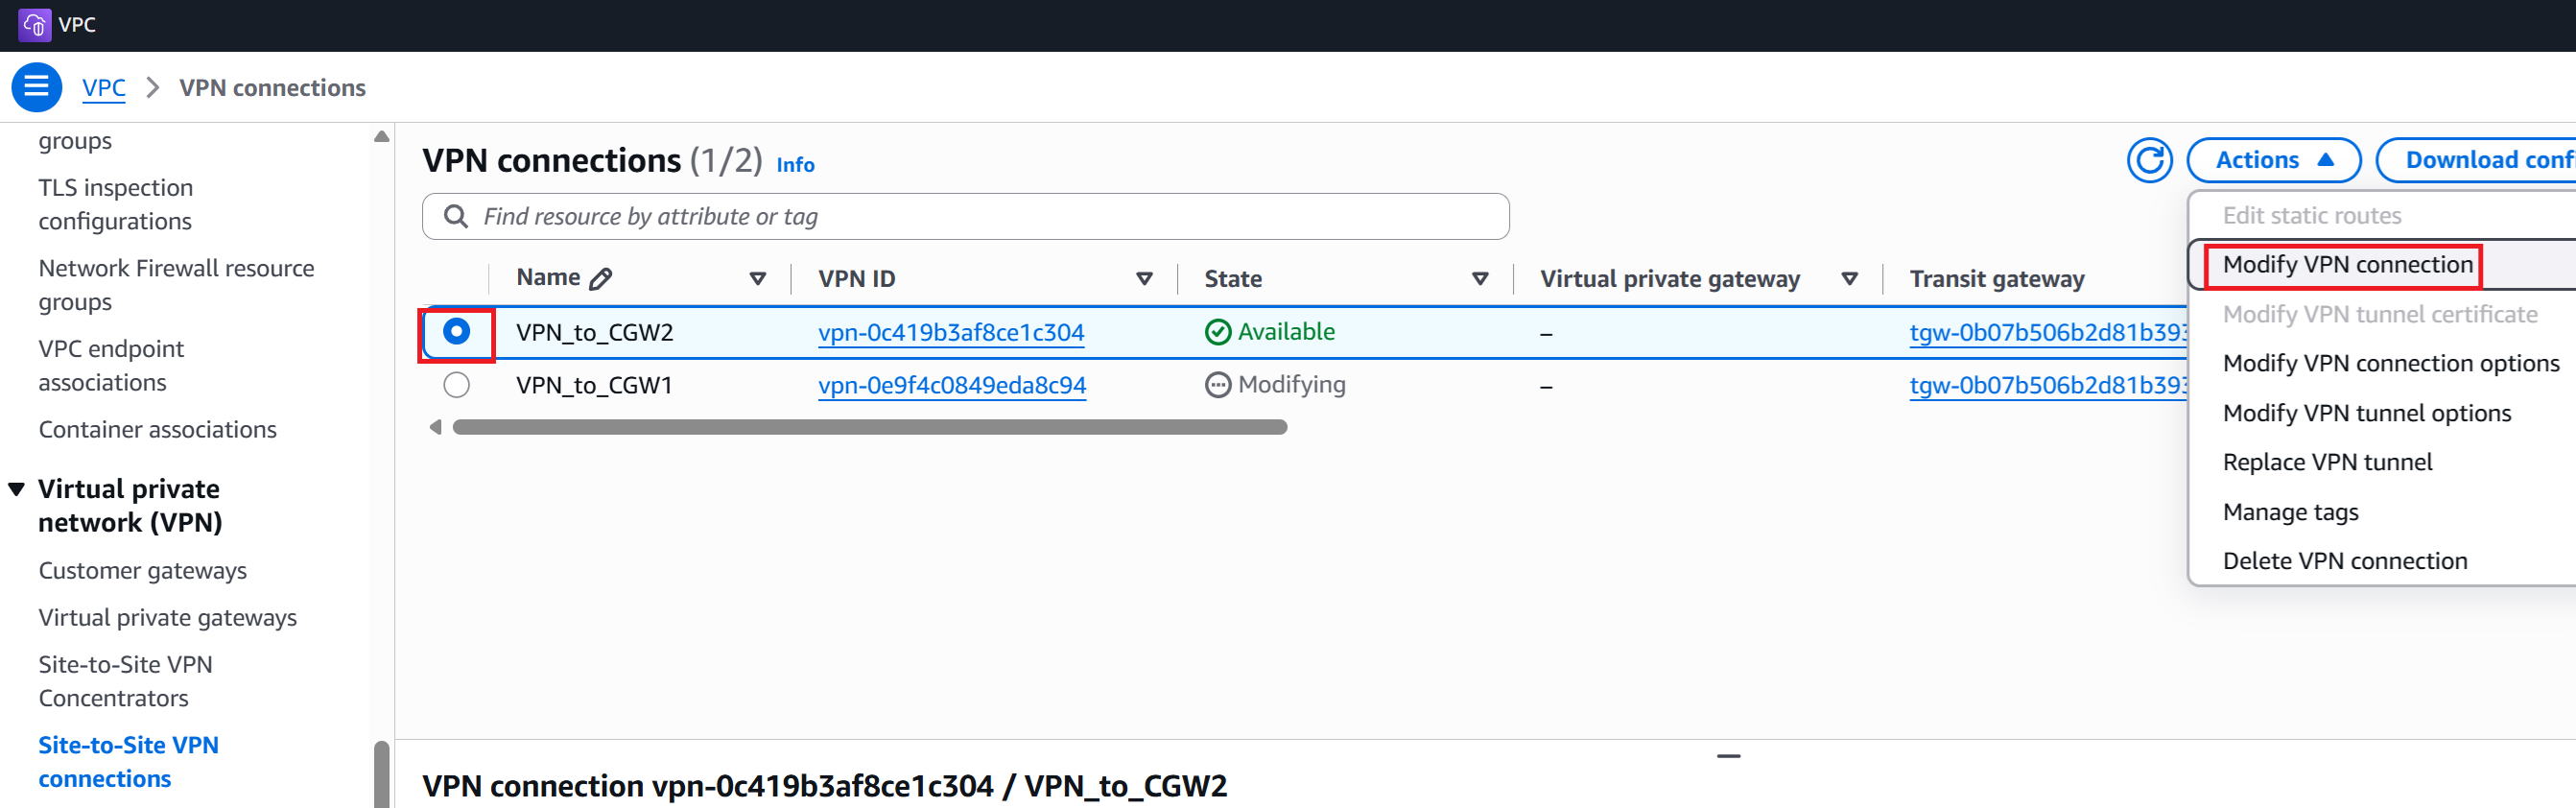
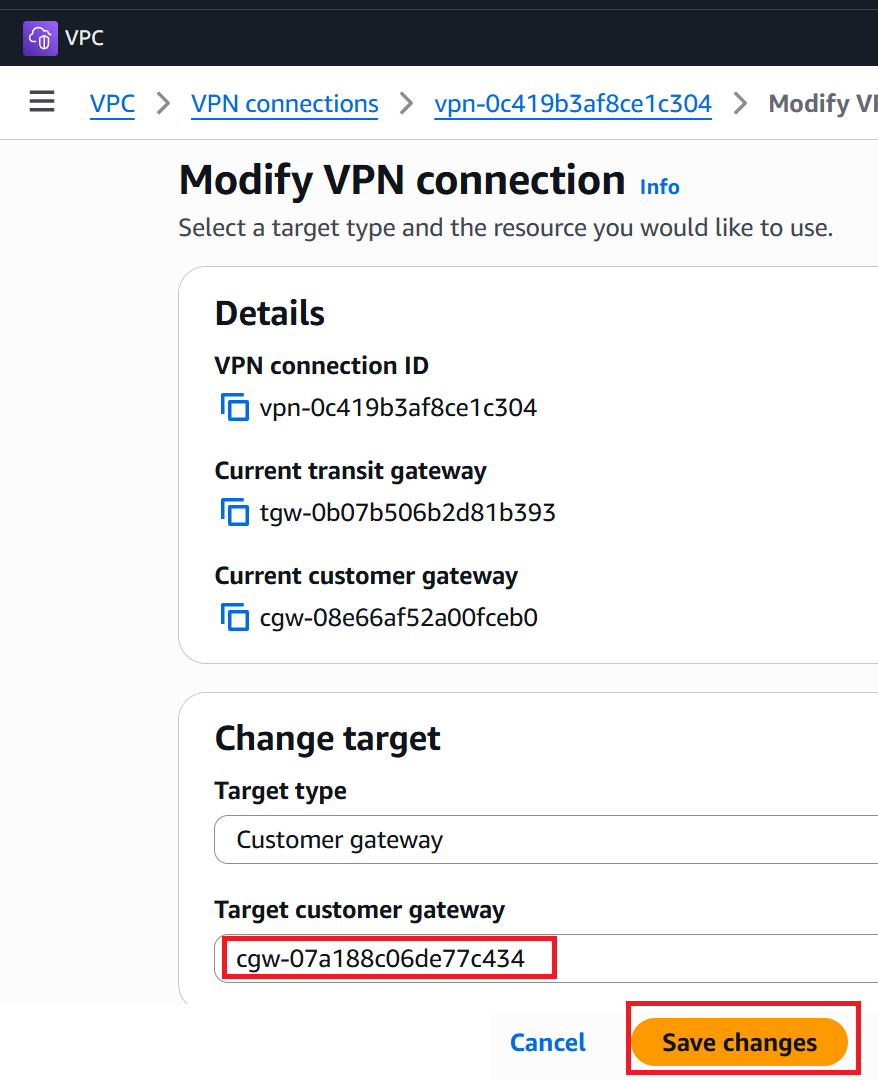
We'll edit the settings of the two VPN Connections, VPN_to_CGW1 and VPN_to_CGW2, and replace their Customer gateway with the official ones we just created. |
①With VPN_to_CGW1 checked, go to Modify VPN connection from the Actions menu at the top right.
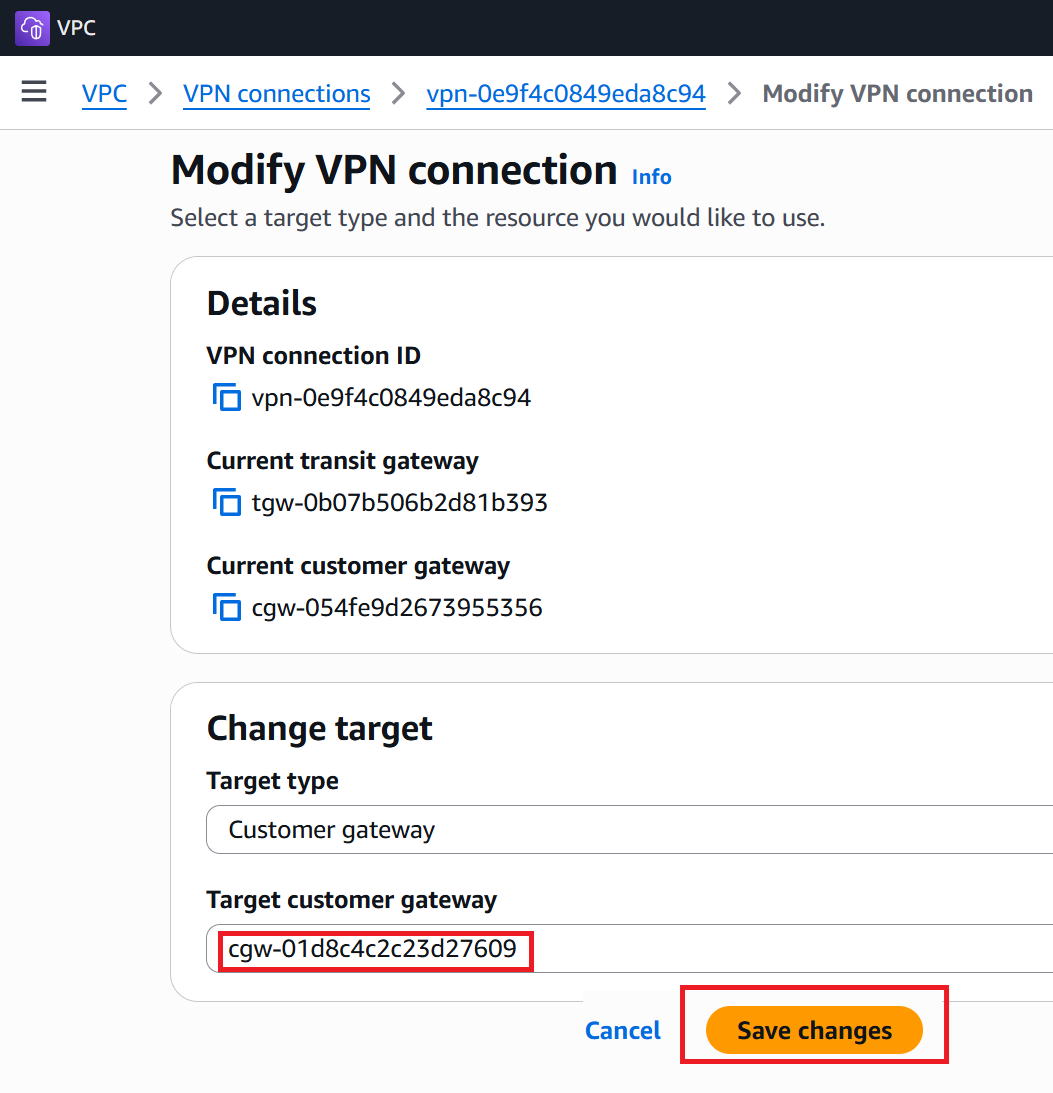
②Change Target customer gateway from the placeholder one to the official one, then click Save changes.
③Do the same for VPN_to_CGW2: go to Modify VPN connection.
④Likewise, replace Target customer gateway with the official one and click Save changes.
Checking the results
①Checking the status of VPN_to_CGW1 on the AWS side, it shows Up as seen below, confirming that the IPsec tunnel is up.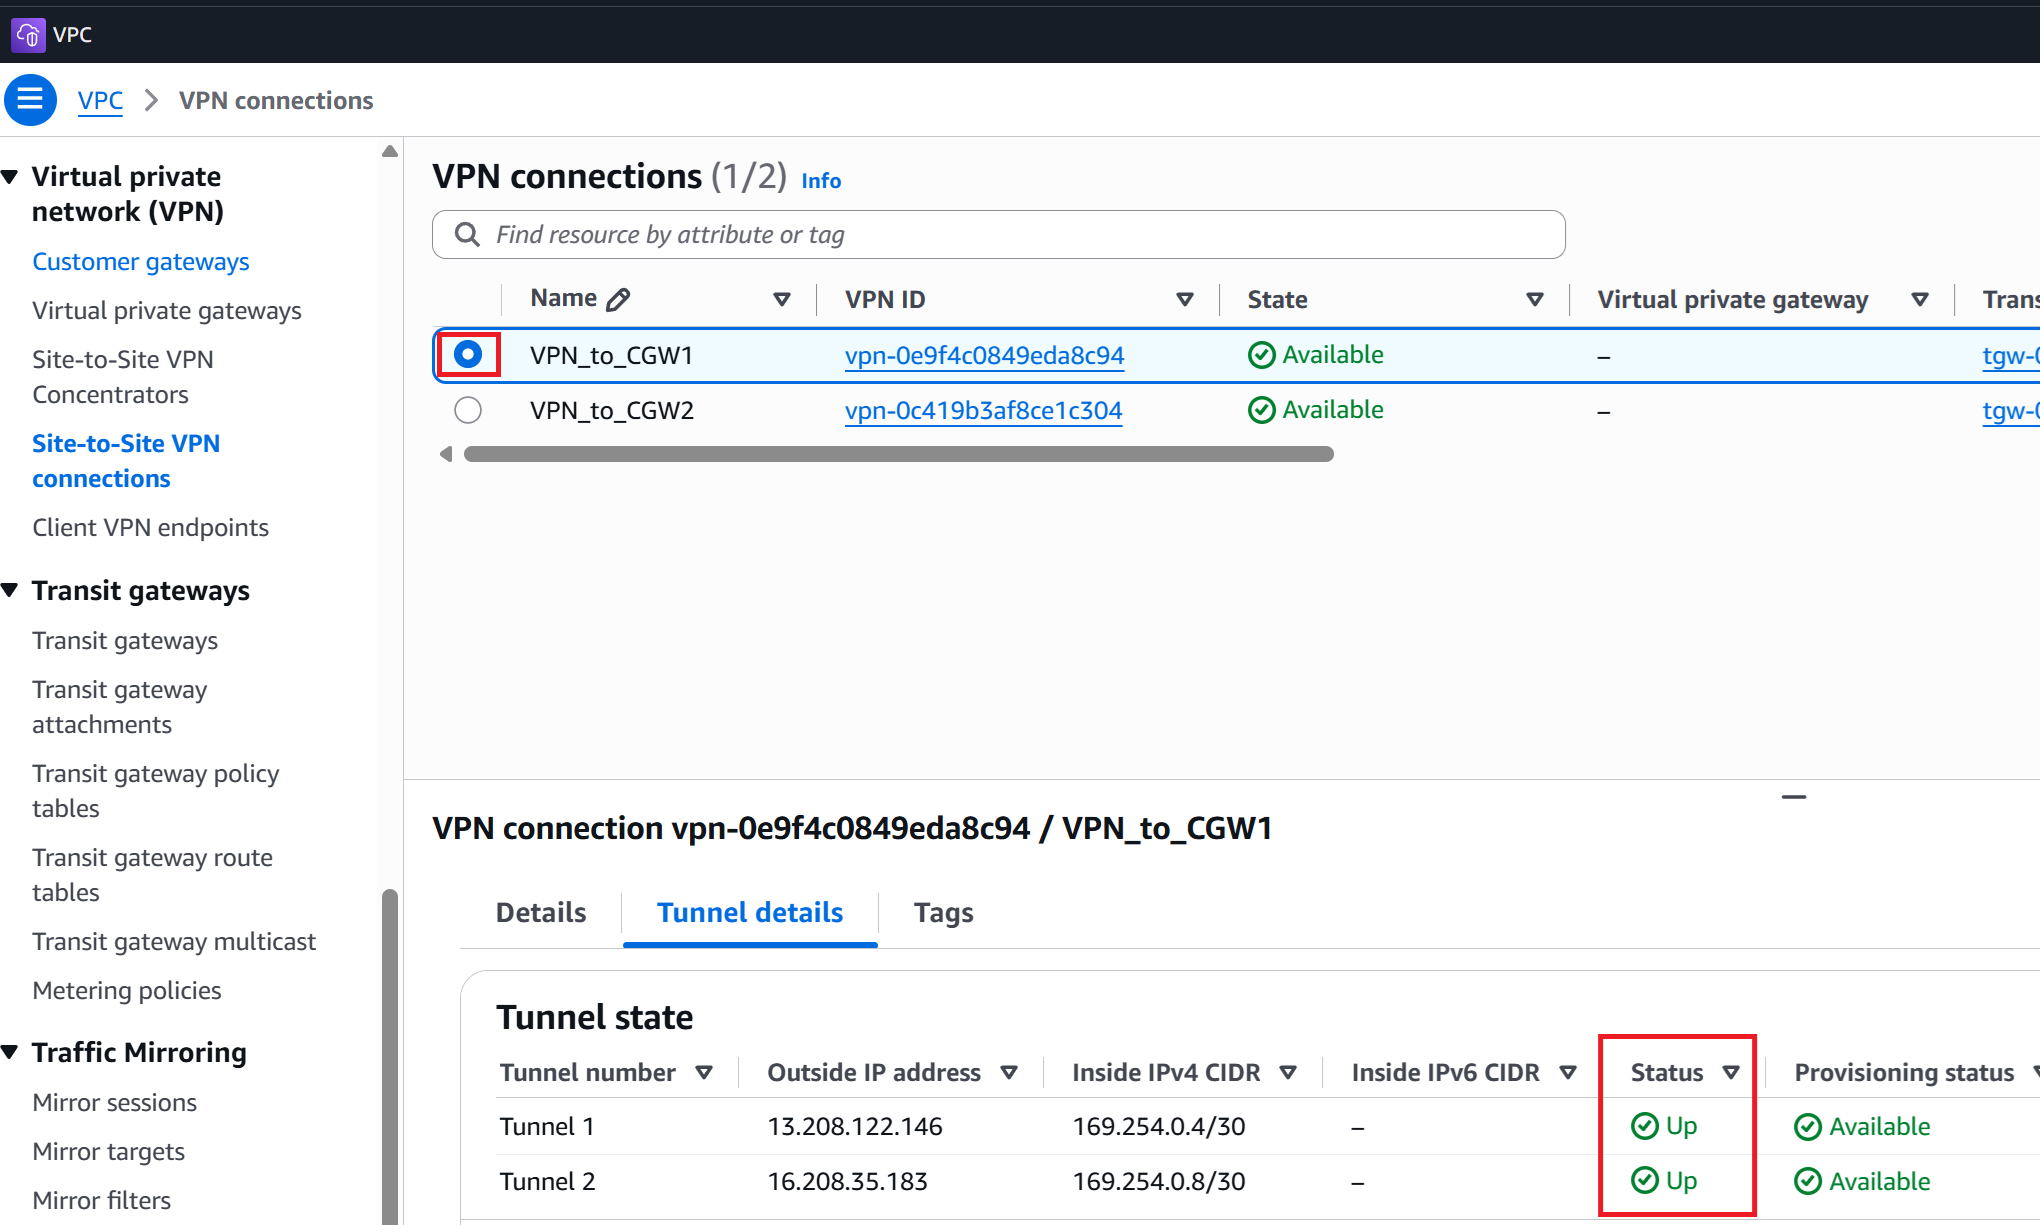
②VPN_to_CGW2 is likewise Up.
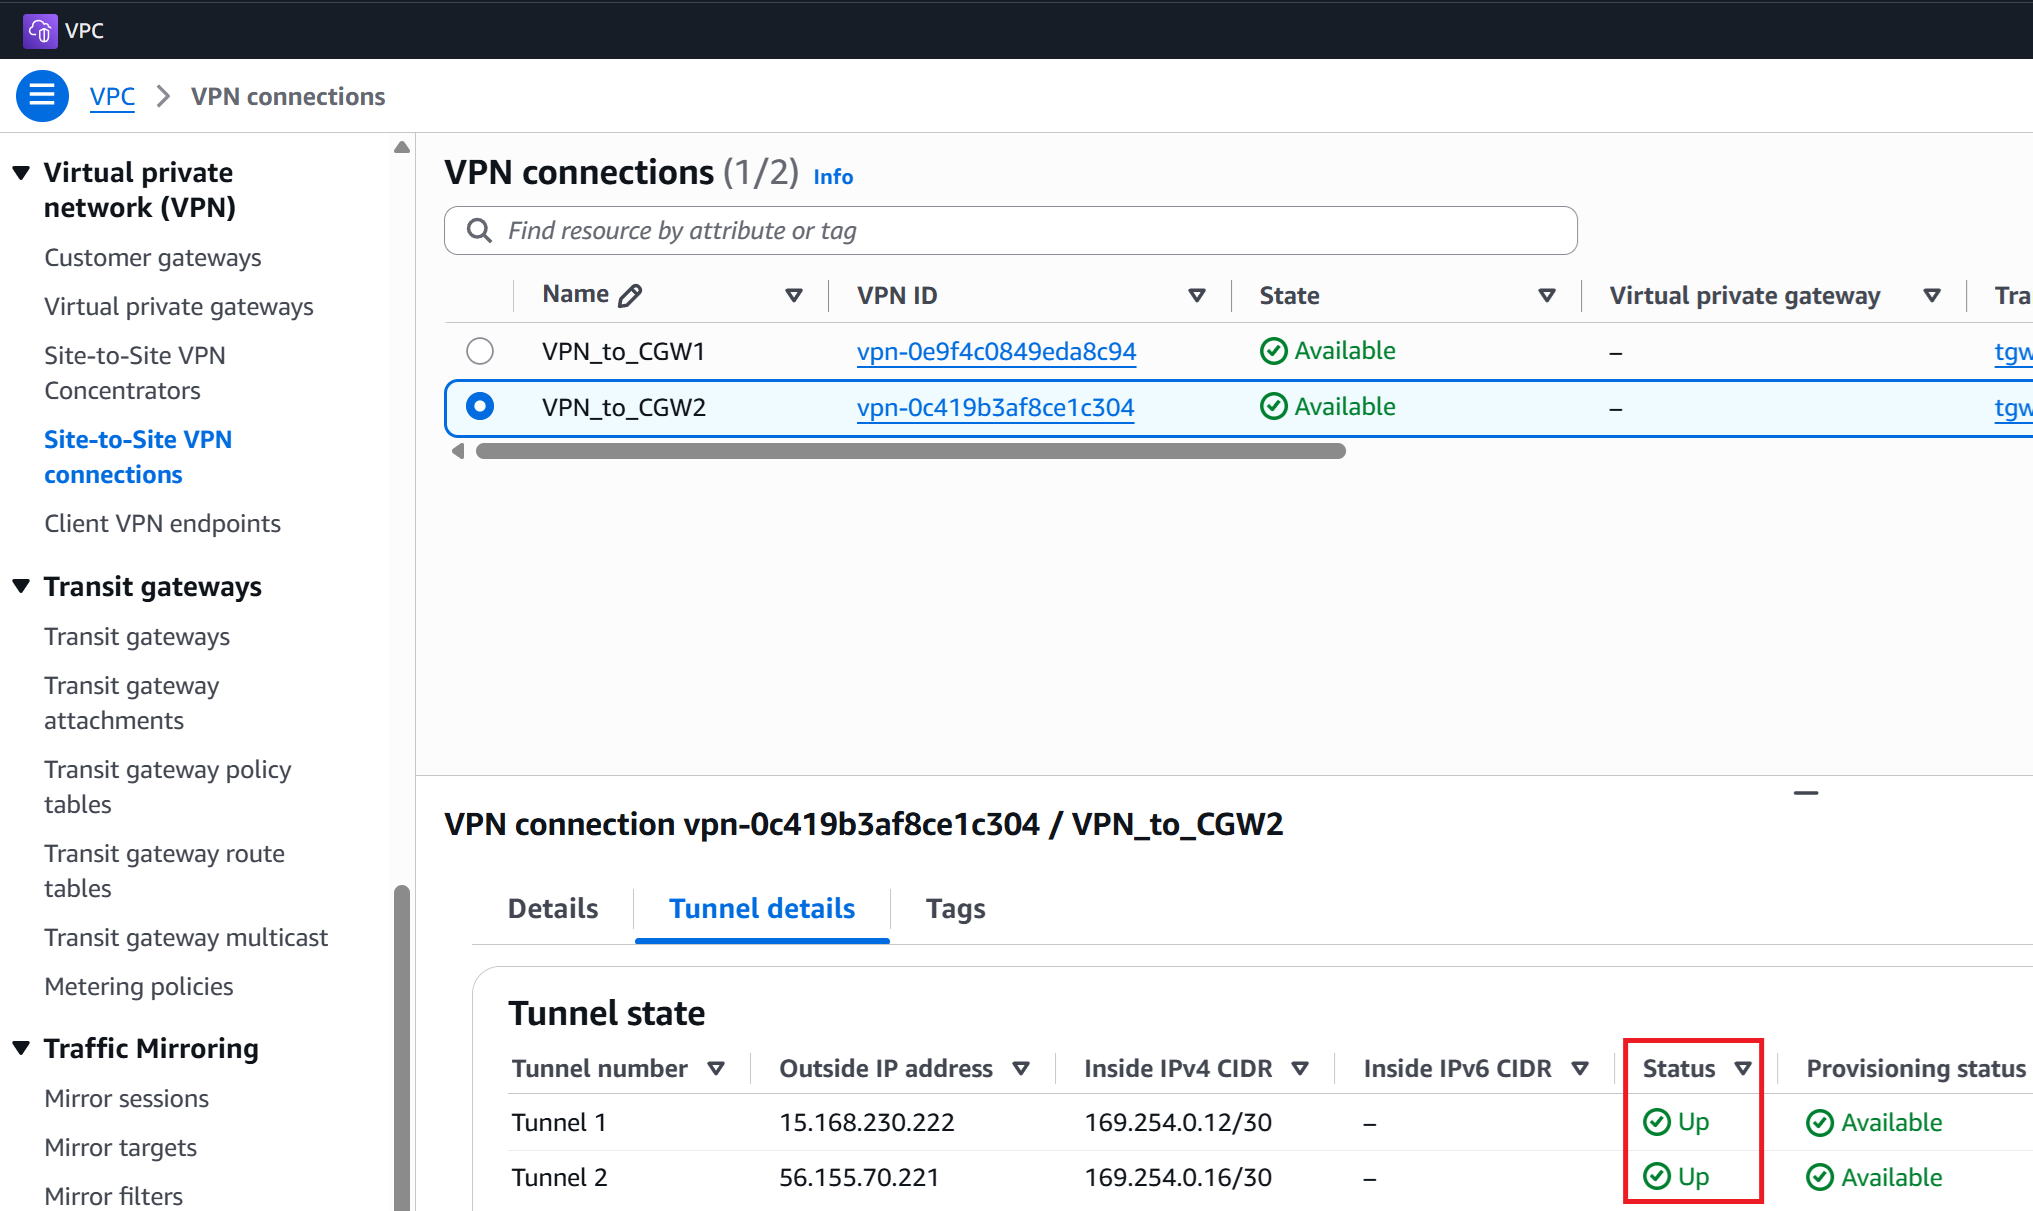
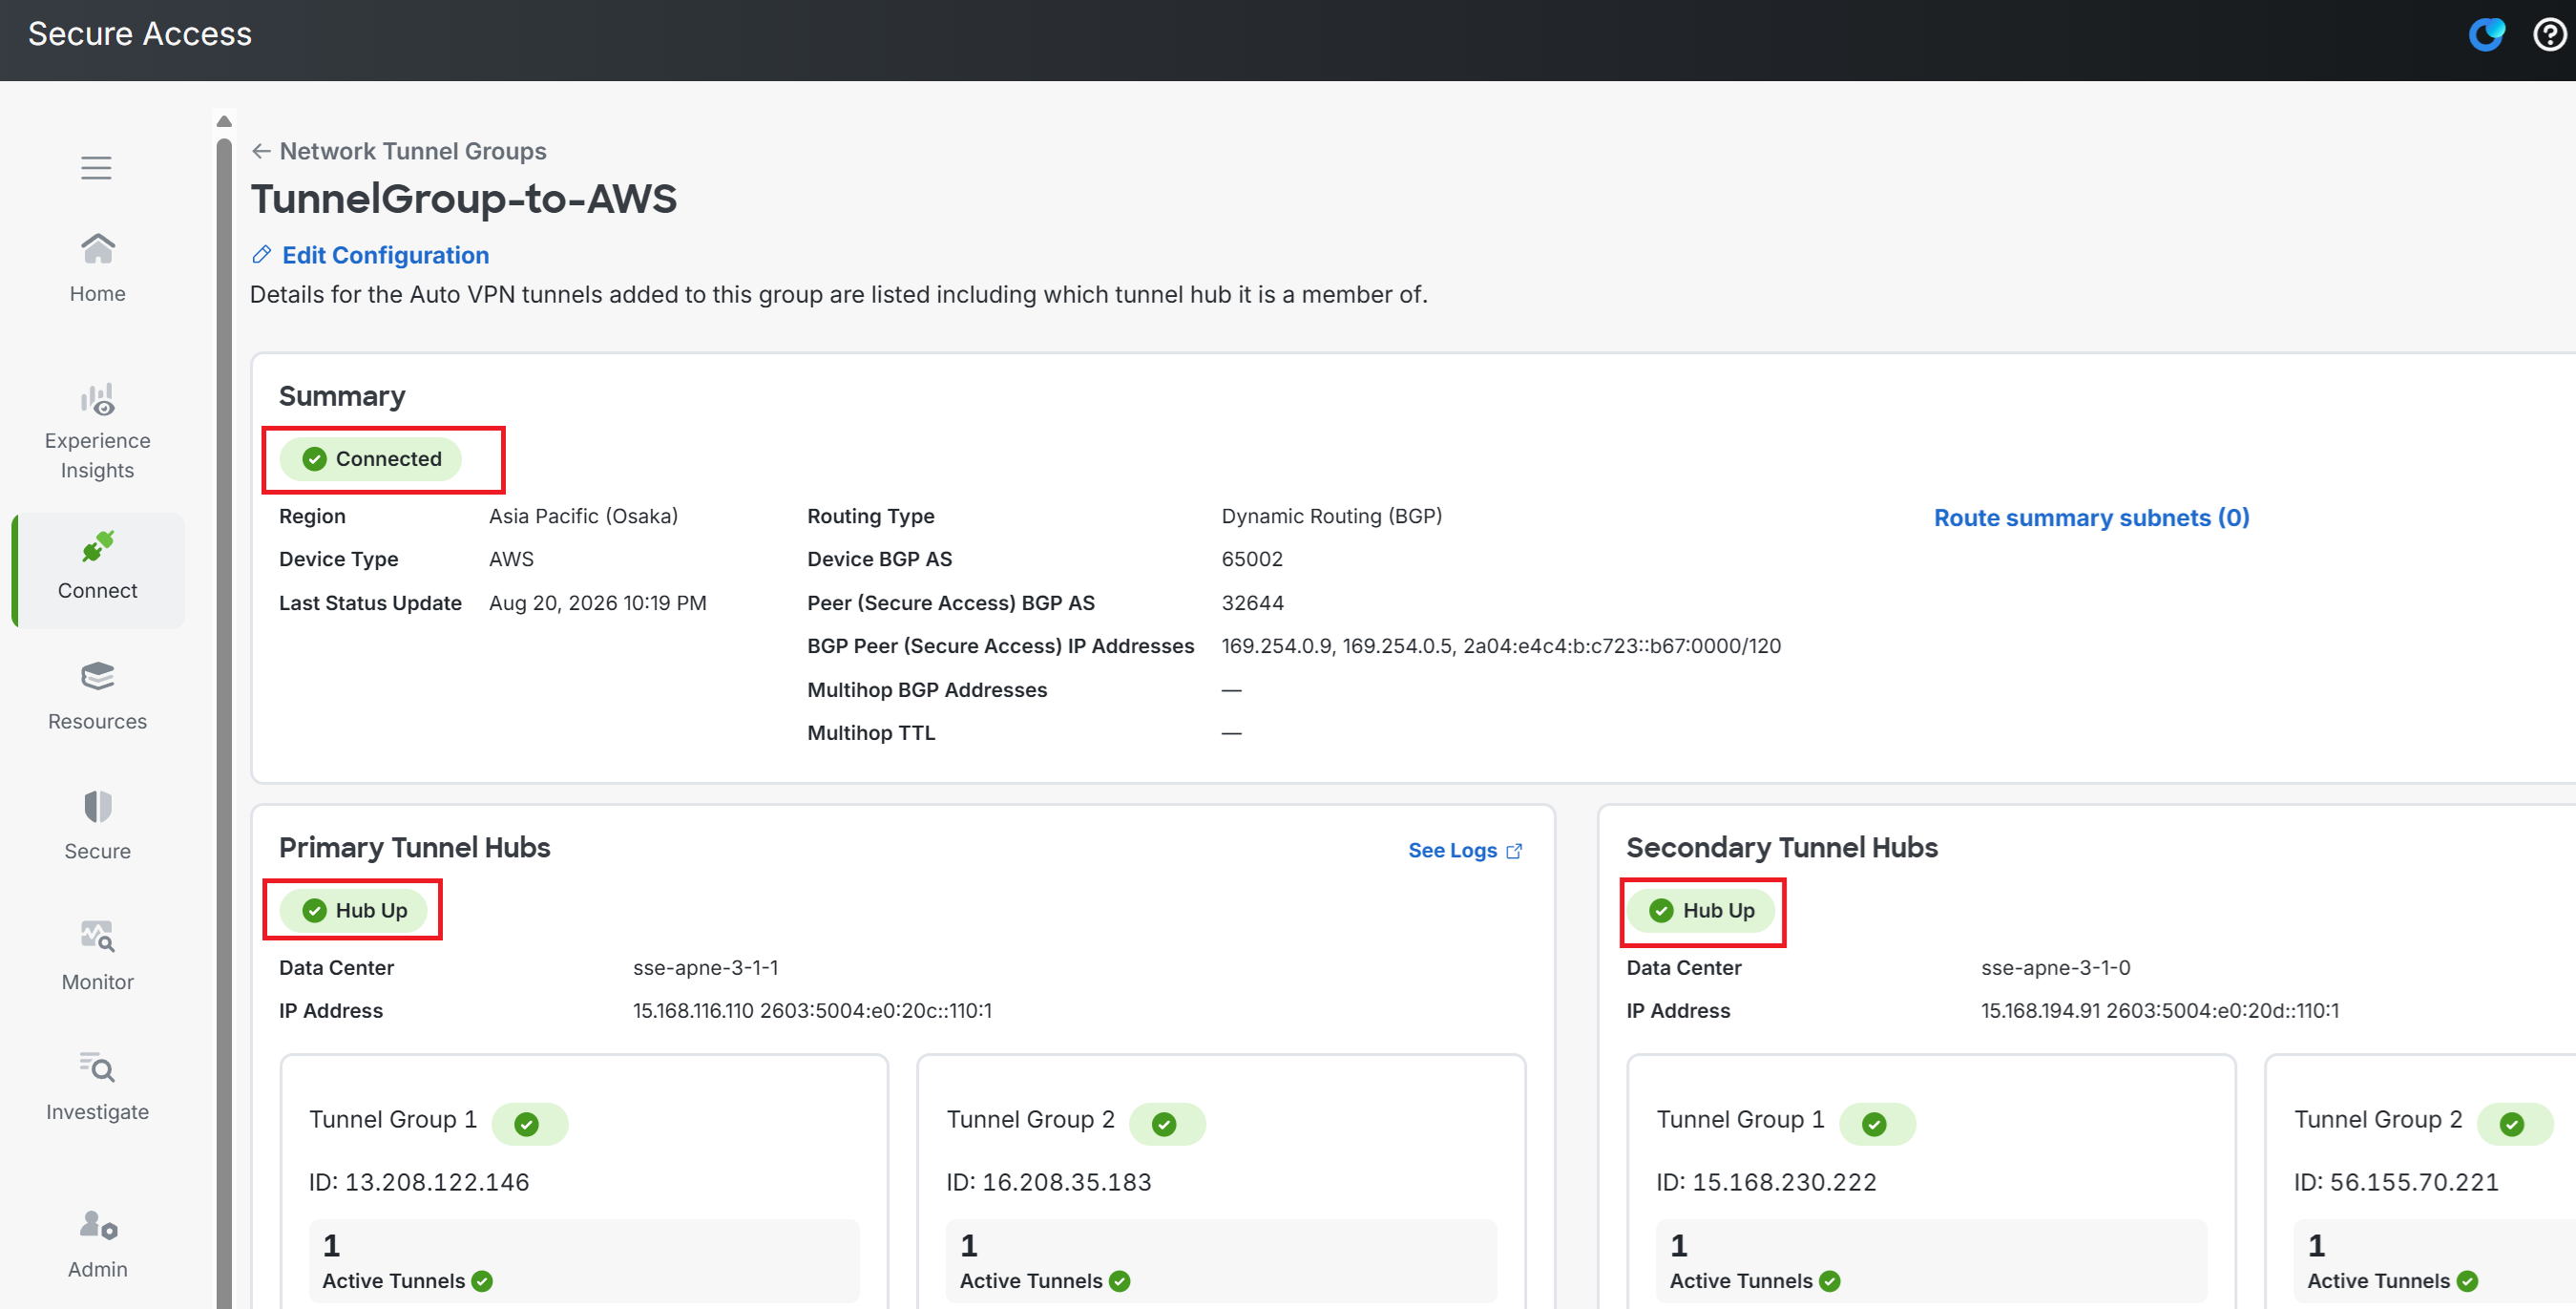
③Looking at the screen on the Secure Access side, all four tunnels here are also Active (Up)—success.
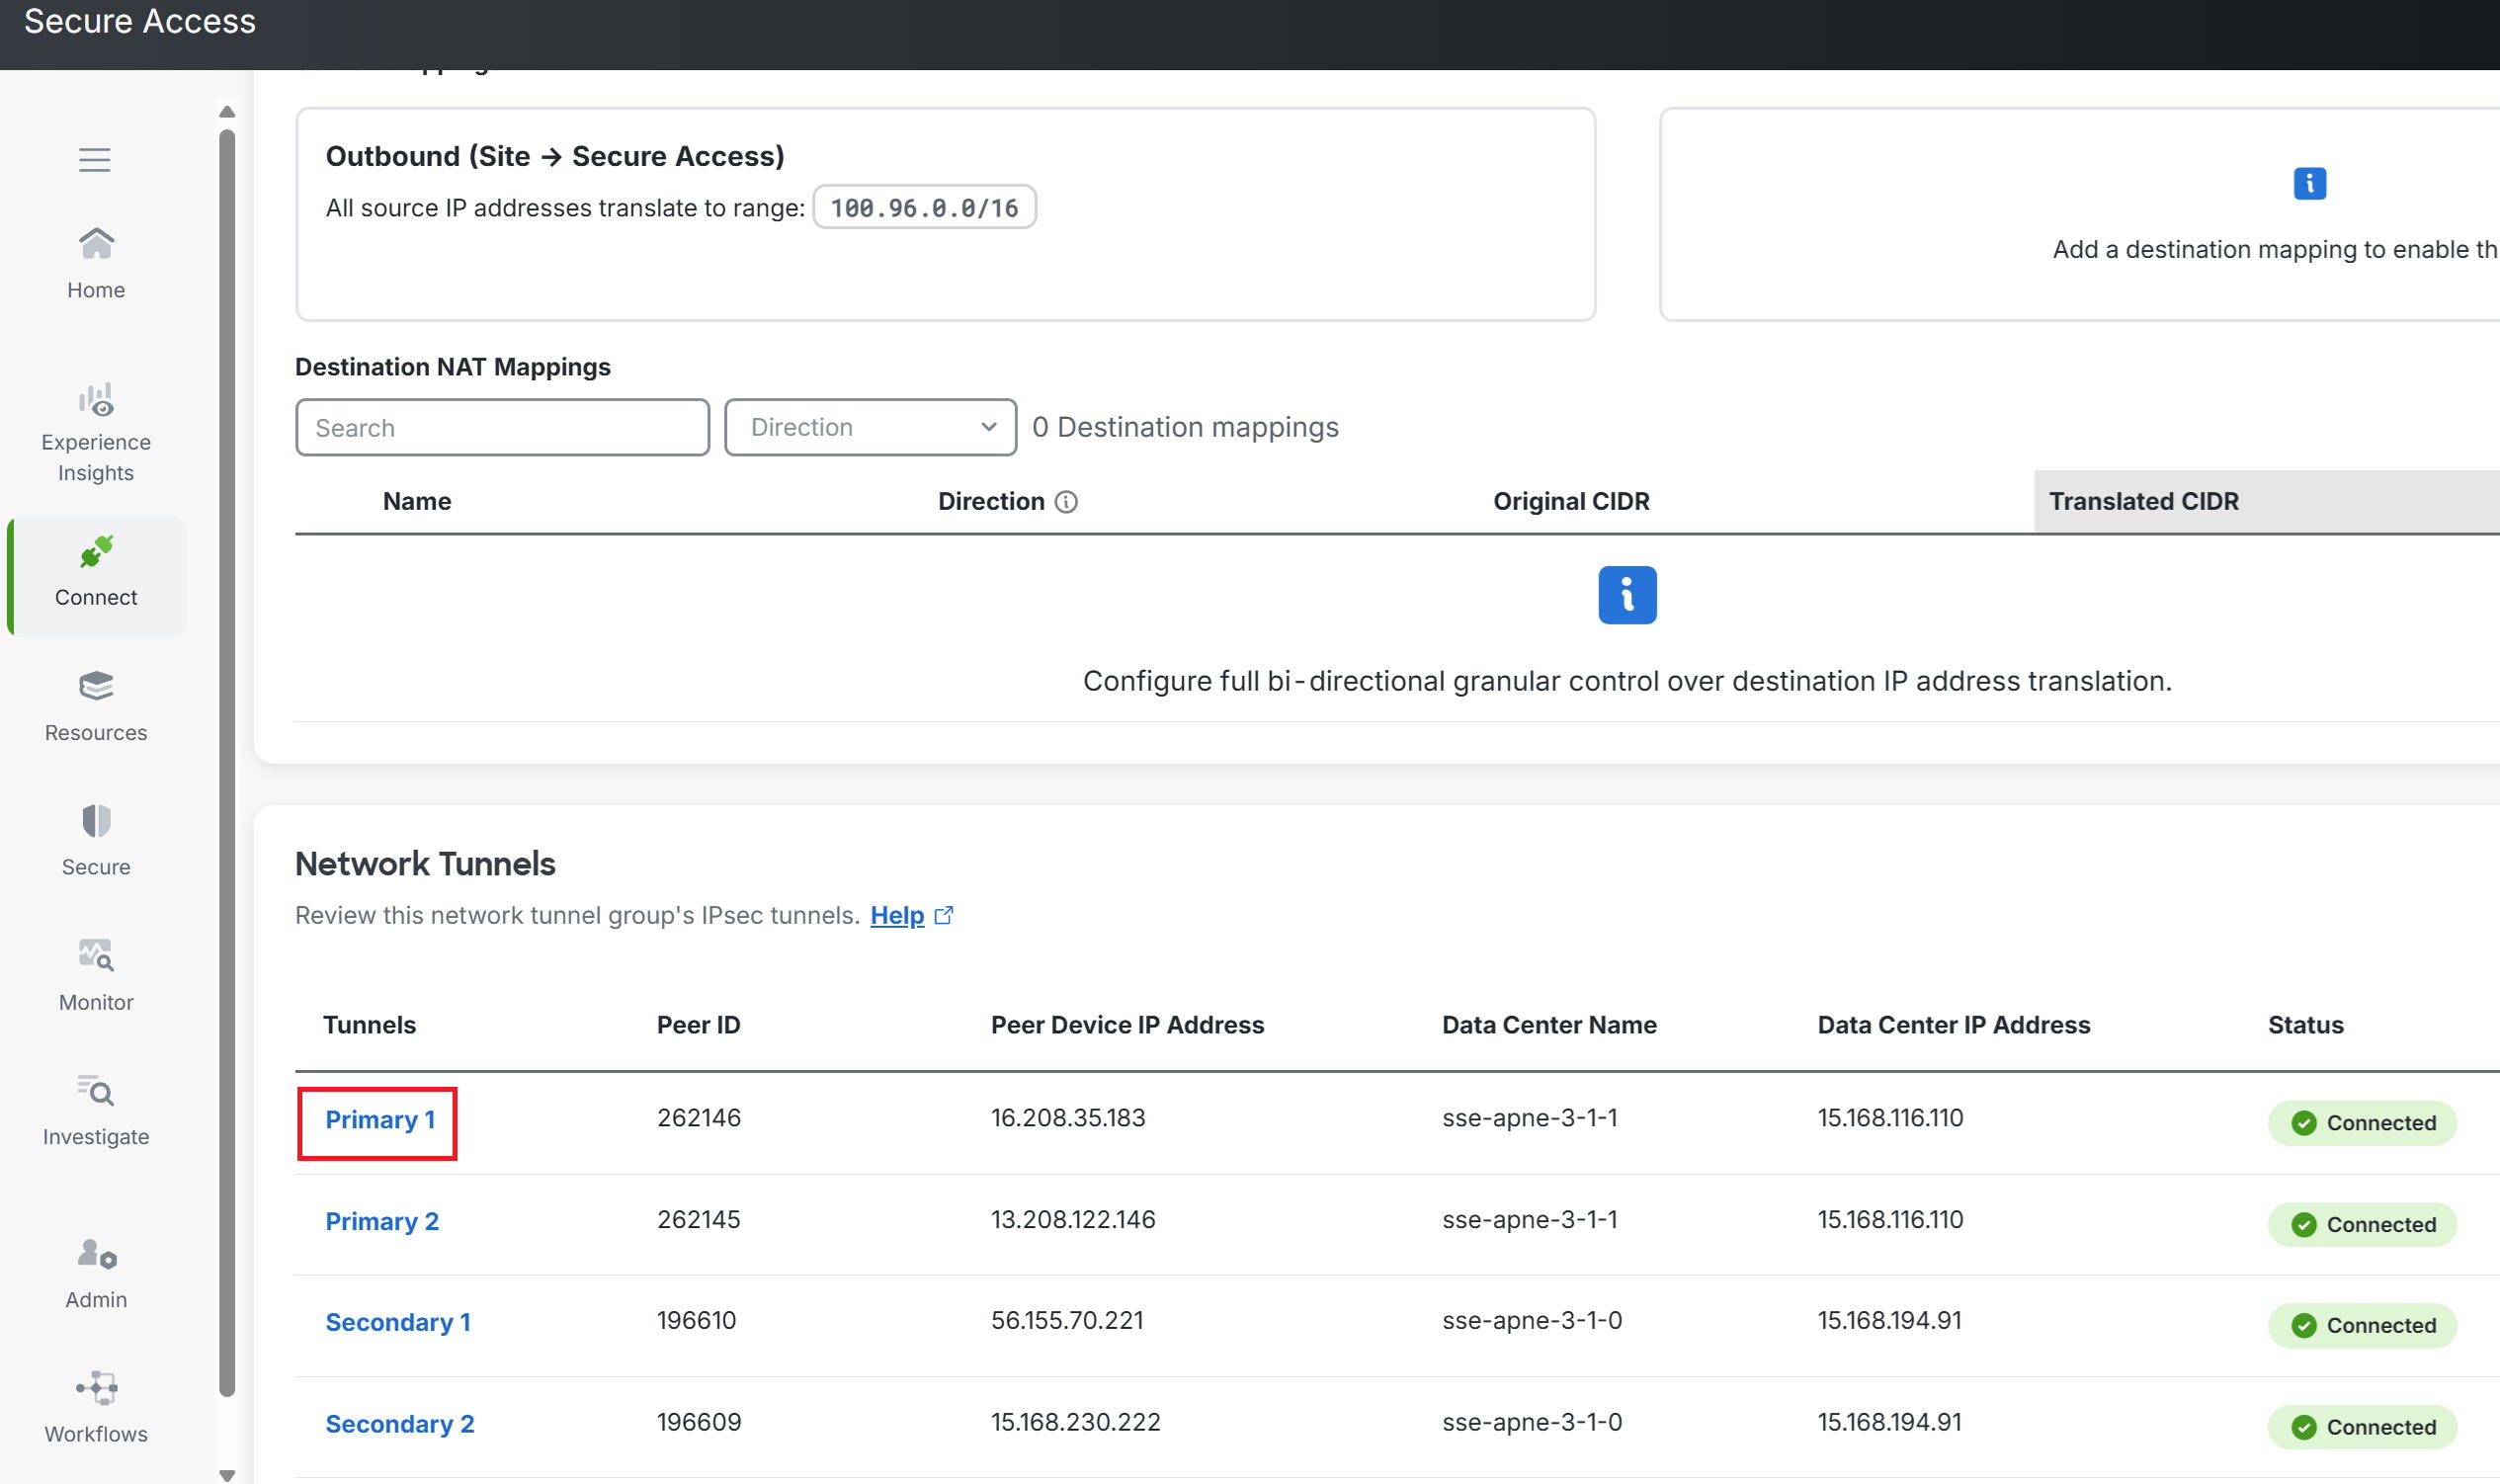
④Scroll down and go to Primary 1.
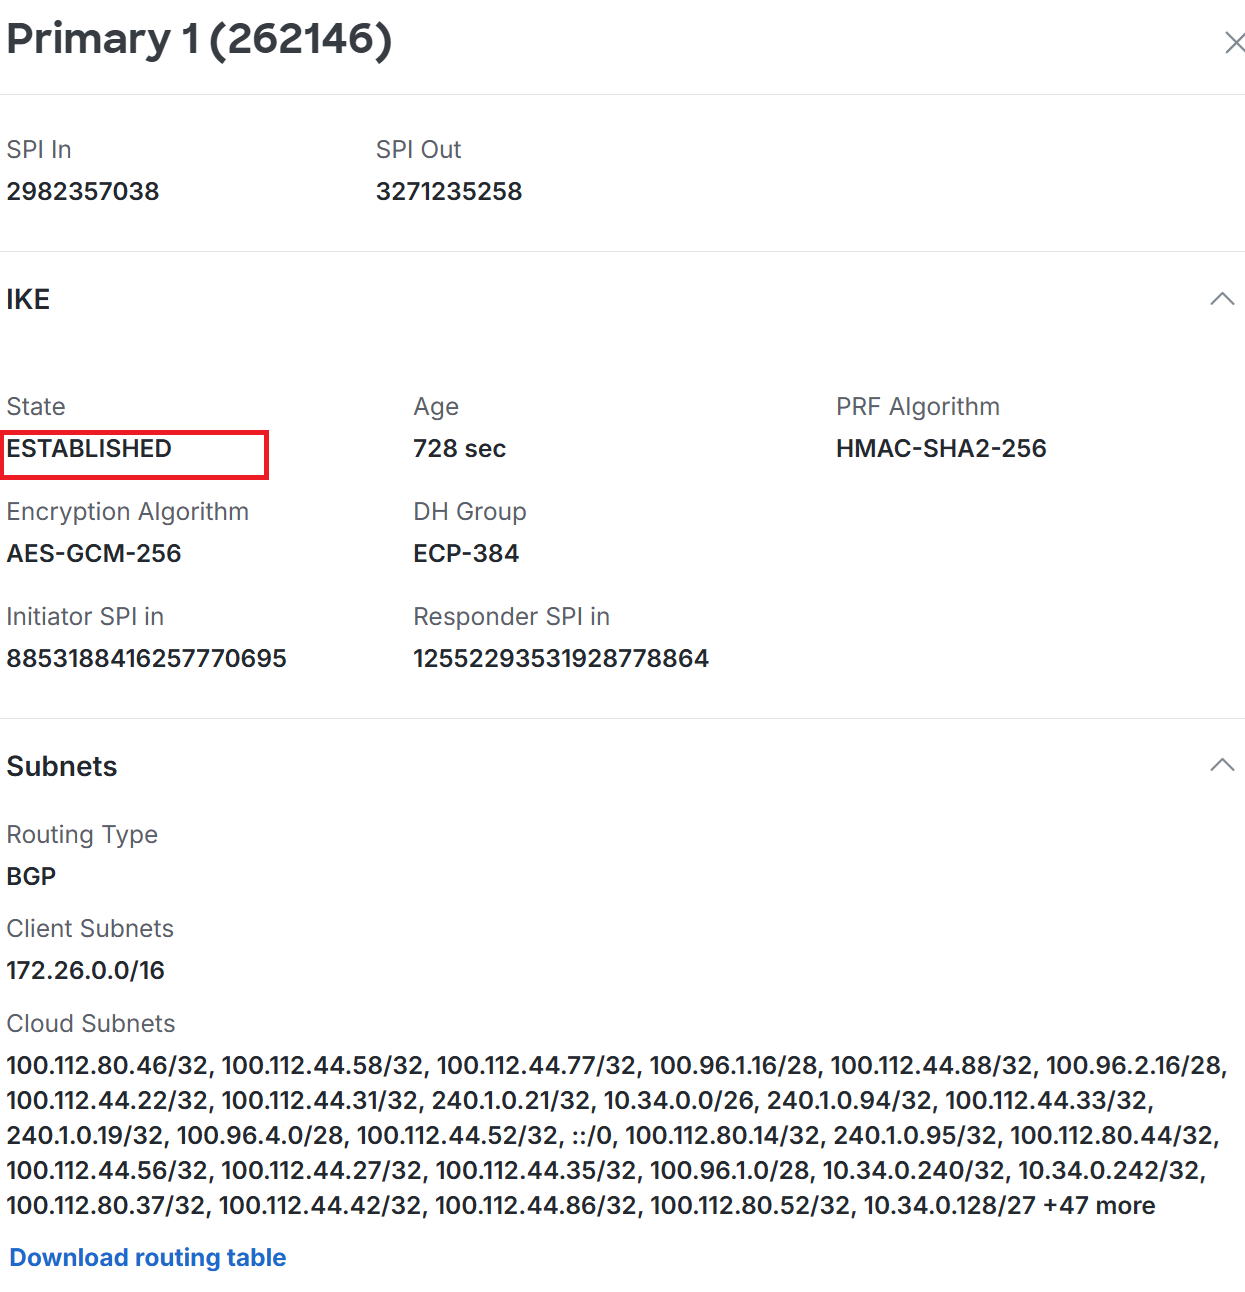
⑤Checking State, it shows ESTABLISHED—success.
Pressing the button at the bottom of the screen lets you obtain the Secure Access infrastructure's routing table, including routes learned via BGP.
|
It worked. |
|
That's right. This one was really long again, but thanks for reading. |